|
|
Post by Sirrob01 on Mar 26, 2011 14:46:11 GMT -9
I've been trying to work on a few things of my own as well as the hoards. I really like the AMP suits from Avatar and have been hoping someone else would design a paper one (no luck yet), This one has been in the works for a while but has caused me quiet a few problems. I finally have a version that can at least be built and hopefully retains the AMP suit look. However it's not intended to be a model/model more a wargamming model  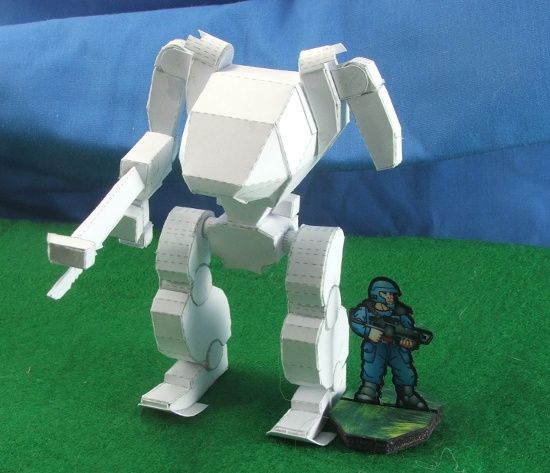 (Please excuse dodgy construction, I wasn't being very careful during assembly, I've also borrowed some of Mel's construction idea's) 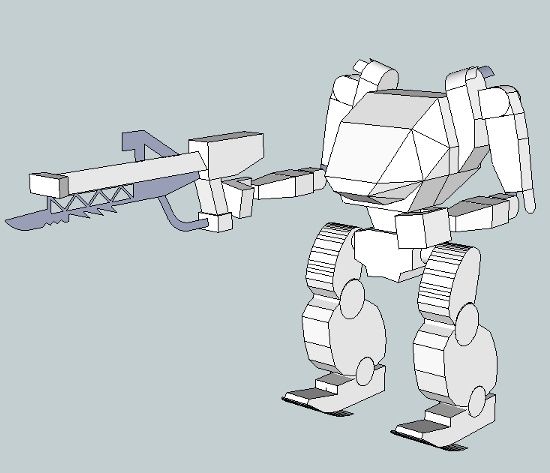 I still have a list of improvements to make, such as redesigning the lower forearm (why theirs no left arm), adjusting the autocannon barrel to a cylinder or at least trying out a cylinder etc. Not sure if I'm going to make a see through cockpit version, might be way to fiddly but I'll try and see at least. The suit itself is about 86mm tall which puts at about 1:40 scale a little big but the cockpit+lower torso at least appears like it could hold an adjusted terraforce marine, my 1:50 cockpit + lower torso just looked way to small for a terraforce guy. I've tried to retain some posability in the joints so as to allow a few different poses in the end. Thoughts on scale or design ideas are are welcome. My goal is to use the above with the terraforce guys and use mels H8-Kogura with Slicks sci-fi humans. |
|
|
|
Post by Reivaj on Mar 26, 2011 15:48:57 GMT -9
WOW  , I love it !!, excelent work Sirrob ;D |
|
|
|
Post by Floyd on Mar 26, 2011 17:20:24 GMT -9
Looking really nice!
~F
|
|
|
|
Post by tirick on Mar 27, 2011 14:08:14 GMT -9
Whether or not is is an exact replica of the AMP suit is irrelevant mate, that is just too cool! Very good job on designing a slick fit for the joints, and definitely something I'd like to see fully completed.
Tirick
|
|
|
|
Post by Vermin King on Mar 27, 2011 17:50:58 GMT -9
I totally agree. Exact duplication is not necessary when you have such a high coolness factor. I think you are correct that making it any smaller would make it look like the figure wouldn't fit. Instead of cylindrical, how about hexagonal or octagonal? Should make a fairly simple build, yet would seem cylindrical when viewed on the table. I suppose a tube with caps on the ends wouldn't be that bad either.
This will be very nice indeed.
|
|
|
|
Post by Floyd on Mar 28, 2011 5:53:08 GMT -9
I was like most in assuming a hexagon or other flat faced conical shape would be easier to build. But in actuality you increase the difficulty exponentially by having to make sure you cut/score all those extra edges close to perfect so that it assembles with some even/symmetry. I've found it twice as easy to mess up than a strait up circular shape.
But cylinders are deceptively simple to assemble. And require less cut strokes.
The only real aid for cylinders is knowing to curve the paper with either a pencil, Xacto knife handle or other dow. And first sliding it over the edge of a table corner to help promote the initial curve.
I totally agree on the size of this model. And the level of abstraction is right on par!
~Floyd
|
|
|
|
Post by Vermin King on Mar 28, 2011 6:47:42 GMT -9
Over the edge is how I do all my curved surfaces. Works like a champ.
|
|
|
|
Post by Sirrob01 on Mar 28, 2011 23:12:23 GMT -9
Thanks all for the comments and feedback . I've been working on designing a see in/through cockpit, it seems do able, need to do a test build of it next to see how fiddly and frustrating it gets. I'll leave it as option so either solid cockpit or see through with trooper. A cylinder for the barrel is looking okay, I did look at a hexagon but decided due to the small size and length it gets really fiddly by hand . I'll try and get another test build done this week |
|
|
|
Post by paladin on Mar 30, 2011 11:15:46 GMT -9
Don't know the AMP Avatar Suits  , but I know, I like every part of your model, Sirrob . Very slick design to me. And if you get the transparent cockpit done, I'll scream of joy. Cause I like to peek into cockpits with glowing panels and knobs - like Millennium Falcon. |
|
|
|
Post by Sirrob01 on Mar 21, 2012 22:28:33 GMT -9
Only been a year since I started this model...real life etc got in the way plus I had to virtually tweak every component. 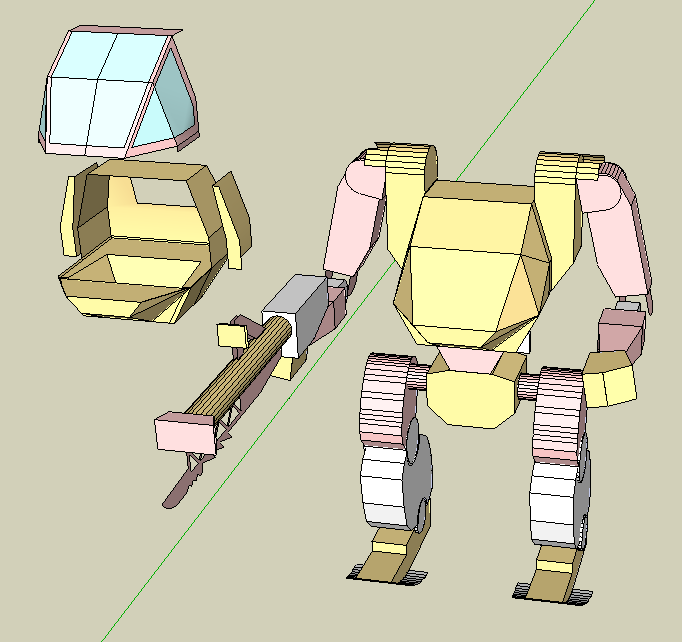 Any component not white has been changed, pink indicates a version2 change and yellow a version3 change. I have yet to build version3 out of card/paper. list of the main changes. ~ Main Cockpit shape simplified (again). This should help make the solid cockpit and see through cockpit easier to build. V1 was a pita, V2 was slightly better, hopefully V3 will be a good compromise. ~ Foot simplified ~ hands changed to simple blocks ~ Upper arm thickened slightly (looks better when built) ~ Upper shoulder to cockpit piece changed to a more square component, this better reflects the shape of the Avatar AMP suit. ~ some small boxs turned into flats. ~Pelvis simplified ~Gun handle removed due to solid hands. I learnt a fair bit doing everything for UFO in sketchup, including the unfolding so for V3 of this model I unfolded (basically UV map) the model inside sketchup instead of using pepakura.  All the bits for the solid AMP suit fit on one craftrobo page zone. The above layout lets me easily texture in sketchup something which is normally a pita. Although unfolding takes a little more time than pepakura I do find I have unlimited control and can better optimize unfold shapes and the layout as a go. I tend to end up doing a mountain of post processing on a model pepakura unfolds. I probably should try some of the other papercraft software packages and see if they are any better. Next step is a V3 test build then I'll start texturing. |
|
|
|
Post by dragnoz on Mar 21, 2012 22:32:45 GMT -9
WOW..... bloody amazing..
|
|
Deleted
Deleted Member
Posts: 0
|
Post by Deleted on Mar 21, 2012 23:43:13 GMT -9
WOW..... bloody amazing.. Youp! its amazing! |
|
|
|
Post by dragnoz on Mar 22, 2012 0:05:33 GMT -9
HA boy do i know that feeling...
|
|
|
|
Post by old squirmydad on Mar 22, 2012 6:26:51 GMT -9
What program are you using to unfold inside Sketchup?
|
|
|
|
Post by Sirrob01 on Mar 22, 2012 13:19:15 GMT -9
yah amazing I didn't think to simplify the shapes on the first version design..Seems I make that mistake every time and it causes me to go back to drawing board a lot . But the comments are much appreciated Mesper and Dragnoz makes all the extra work seem worthwhile Flattery Squirmy but I have a bit of a process I worked out so I can also use it as UV map, it's not fast and very manual but unlimited control and saves me time at cutfile and instructions steps. Basic process if you want to give it a try on a simple cube or something, I've used colonial Klinks method to create a UV MAP and then worked out how to get flattery/Inkscape and sketchup to work nicely with it. So it's not all my work:) www.modelsfromthemist.com/tools/download/SUUVMAP.pdfPlugins You'll need flattery plugin (i must be one of the 5 people who bought it before it became free), faces to groups plugin groups to components (hot key those last two to speed things up. ~ create basic object, and create parts as components as I go. This keeps everything from sticking together ~ Scale my model to actual size and add paper thickness gaps for inserted bits (needs to be about 1/128 -1/64 inch gap all round roughly 95% scale down works). ~ Pick a component and explode it. You'll need to hide any other components nearby or reselection later on becomes a pain. ~ Reselect the whole object by double clicking, Run the faces to groups (use any edge, that will pick up hidden ones as well), ~ drag and select all those groups then run groups to components. reselect all those now components ~ Copy the whole pile of new components and then group them. ~ Paste your copy to the side. ~Unfold your copy using the flattery plugin tools (I only unfold I dont bother to index (2nd button only)), the copy will unfold but the original should remain 3d, but if you click all the way down through the groups and components on either one the other ones face will likewise highlight indicating they are still linked. ~ To get your unfolded object horizontal draw a small flat plane somewhere (well to the side of your main object don't want them to overlap)and do a last unfold down onto that, that'll pull your object down onto the horizontal plane, delete the unrequired flat plane. Make sure your outside surfaces face upwards. ~ Move it onto a flat rectanagle which is dimensionally craftrobo cut size. ~ Duplicate your shape and move it to the side somewhere, explode it back out until it's totally ungrouped/uncomponented. Now add glue tabs (this stops the tabs appearing on your 3d model). I changed the flattery plugin so my tabs are by default smaller so a simple double click adds a smaller tab (I'll try and find the line of code later on if your interested). select all the tab planes and group them move them over and around your proper flattened object. ~ piece one done ~ Once all parts are done, hide your craftrobo plane select all your flattend parts copy them paste them then explode the whole lot. Now use the SVG export that comes with Flattery to export them in svg format which you can then use in inkscape (theres a whole raft of cleanup there as well but I have some steps that speed it up). this also pretty much gives you an instant cut file after cleaning. ~ Texture your UVMAP, you should be able to follow the colonials link above to texture all the shapes fairly quickly. If you need to do multiple skins simply repoint the base texture in sketchup to a new png/bmp skin file and the whole model will change instantly to relflect the new skin. Hmm reading the above it seems messy and a lot of work but I'm finding it quicker as I spend slightly more time in design and setup but less time in cutfile generation and instructions. My pepakura process was worse and I had to manually create the cut file plus photograph every piece for the instructions...I'm sure you know what I mean If a few people are interested I'm happy to expand the above more fully and add some pic's etc, to turn it into a more detailed how to of sorts  |
|
|
|
Post by Vermin King on Mar 22, 2012 14:19:37 GMT -9
This is amazing info, but completely over my head. I'm sure others would love to see this expanded upon.
|
|
|
|
Post by old squirmydad on Mar 22, 2012 14:33:18 GMT -9
Sounds even more involved than my workflow.  I'll have to give it a try though as one of my mantra's is, "there must be a better way." Pics would help for certain. |
|
|
|
Post by dragnoz on Mar 23, 2012 2:21:17 GMT -9
I'd Love to have it expanded, photos added and pinned to the "how to section" :-)
I have just started using sketchup and moved from Metasequoia and Pepakura after years... and would love to combine all of that into one consolidated program.
But time is a luxery i dont have so learning it from scratch is a bit of a pain and i keep finding myself quickly popping into Metaseq and Pepakura to do something because I know them back to front...
|
|
|
|
Post by Sirrob01 on Mar 23, 2012 15:17:34 GMT -9
I'm going to finish up hoard96 layout and start building when I need a rest I'll come back and expand the above add some picys etc. If it gets to long I'll drop it into a PDF Squirmy yes your right it is a little convoluted, I find it less of an issue when I'm colouring in inkscape but when using gimp it does add an extra step. I'd be curious what your current process is? The above does use all free software that will run on linux (yep even sketchup), Something I've been trying to move towards for 4 years. Just waiting on Scribus now . I've been meaning to try using blender but the learning curve is nasty... |
|


 , I love it !!, excelent work Sirrob ;D


 , but I know, I like every part of your model, Sirrob


