|
|
Post by Brave Adventures on Feb 16, 2014 4:05:36 GMT -9
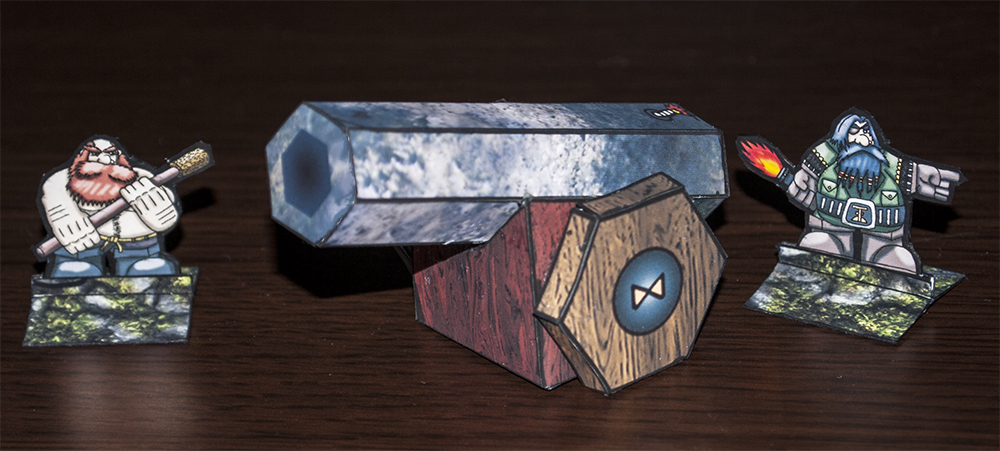 I'm looking for a 1-3 people who would be interested in getting advanced copies of sets in exchange for giving me feedback and helping me do test-builds. If you are interested, let me know at contact@braveadventures.com. The photo above is a dwarf cannon I am working on. It'd be one of the sets I'd ask the testers to test. Thanks! Ryan |
|
|
|
Post by cowboyleland on Feb 16, 2014 6:15:43 GMT -9
LOL! I can't help thinking how hard it would be to roll the cannon around on those wheels  |
|
|
|
Post by dungeonmistress on Feb 16, 2014 19:27:18 GMT -9
It would be an honor to test your creations and to give you feedback. My group meets about once a month to play, if that makes a difference to you.
|
|
|
|
Post by Brave Adventures on Feb 17, 2014 5:01:28 GMT -9
LOL! I can't help thinking how hard it would be to roll the cannon around on those wheels  Haha. Good point. I guess I could try doing circular wheels. This design is easy to assemble though. Plus I kind of like how it looks. Anyone else have an opinion? It would be an honor to test your creations and to give you feedback. My group meets about once a month to play, if that makes a difference to you. Thanks! I'll send you a message. |
|
|
|
Post by Vermin King on Feb 17, 2014 5:29:45 GMT -9
I always prefer round wheels, but I know many people don't. If you were to double the number of facets from six to twelve, that would probably be a good compromise
|
|
|
|
Post by Brave Adventures on Feb 17, 2014 15:46:15 GMT -9
I always prefer round wheels, but I know many people don't. If you were to double the number of facets from six to twelve, that would probably be a good compromise Hmm, maybe I could try offering 2 wheel options? The more sides I add, the more finicky I think it will get. Good Suggestion though. How about an octagonal wheel? Kind of a compromise between 6 and 12. |
|
|
|
Post by cowboyleland on Feb 17, 2014 17:17:54 GMT -9
Actually a dwarf cannon is one of the four or five unfinished projects I have on my hard drive. I used these wheels as inspiration for mine 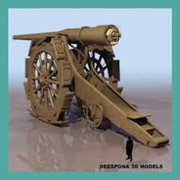 the shape, not the scale! |
|
|
|
Post by stevelortz on Feb 17, 2014 18:02:02 GMT -9
...snip... Haha. Good point. I guess I could try doing circular wheels. This design is easy to assemble though. Plus I kind of like how it looks. Anyone else have an opinion? ...snip... I find the hexagonal wheels to be appealingly whimsical, but that's just me! Have fun! Steve |
|
|
|
Post by squirmydad on Feb 17, 2014 21:07:13 GMT -9
Actually a dwarf cannon is one of the four or five unfinished projects I have on my hard drive. I used these wheels as inspiration for mine  the shape, not the scale! Ooh! I like those wheels! You could keep the hexagonal shape and put the round wheel shape in as texture. Easy to build and might look really cool. |
|
|
|
Post by Brave Adventures on Feb 18, 2014 2:23:10 GMT -9
Actually a dwarf cannon is one of the four or five unfinished projects I have on my hard drive. I used these wheels as inspiration for mine  the shape, not the scale! Ooh! I like those wheels! You could keep the hexagonal shape and put the round wheel shape in as texture. Easy to build and might look really cool. I actually really like that idea! I think that would make the texture a lot more interesting. Thanks guys! I might also change it to an octagonal wheel and see how finicky it is to assemble. |
|
|
|
Post by Vermin King on Feb 18, 2014 8:47:01 GMT -9
Eight isn't bad to build at all. That is pretty common on 'kids' models. So if eight-sided is considered acceptable for you kids, it should be good for old farts like me ... LOL
|
|
|
|
Post by mproteau (Paper Realms) on Feb 18, 2014 8:51:32 GMT -9
If you ever need a tester, you can PM me. Depending on the complexity, it may take me a couple days to get something assembled, and I'm terrible at taking photos, but I'm a good copy editor, and have a machine cutter if you need help validating that they're working a-ok.
|
|
|
|
Post by Brave Adventures on Feb 19, 2014 6:01:32 GMT -9
If you ever need a tester, you can PM me. Depending on the complexity, it may take me a couple days to get something assembled, and I'm terrible at taking photos, but I'm a good copy editor, and have a machine cutter if you need help validating that they're working a-ok. Thanks mproteau! I think with you that makes 3 "brave" volunteers ^^ including stevelortz and dungeonmistress. Can you message me your email address so I can send you more details? |
|
|
|
Post by stevelortz on Feb 19, 2014 11:16:12 GMT -9
Yesterday I received the dwarf cannon file from Ryan, and spent the evening putting it together while watching the TV. I am very happy with the results. My camera is on the fritz, but my copy looks just like the one in the photo at the top of this thread.
I spent about 2 and 1/2 hours working on it, mainly because I like to let each gluing operation dry thoroughly before moving on to the next. That way I don't smoosh it up while I'm handling it.
All of the assembly is very easy except for one part. The carriage block has a trough in the top that the barrel fits into. Here's how I did the carriage block.
First I scored all the fold lines, cut it out and folded all the lines. Then I glued the right side panel (looking from the breech end to the muzzle end) to the back panel. I left the square bottom panel open until last, so I could reach up inside the carriage block with my finger or a simple tool.
Then I folded the trough panels and their glue tabs into the carriage block so that they were all in their proper places. Next I put small amounts of fluid white glue on the tips of cardstock slivers, and used the slivers to insert the glue between the glue tabs and the pieces they were to be glued to. I did this one glue tab at a time, holding everything in its proper place until the glue on that tab was sufficiently dried. That way, I was able to maintain the carriage block's proper shape through the whole process. After the trough was all glued, then I glued shut the bottom panel
This step might be beyond a novice modeler, but on the other hand, it might be a good exercise for a beginner to undertake advancing to the next level of ingenuity and patience.
For the barrel, after scoring, cutting it out and folding it, I glued the long glue tab to the opposite fluting to form the tube. After that was dried, it was easy enough to glue each end cap into place.
The first thing I did with each wheel after scoring cutting and folding was to glue together the rim panel opposite the rim panel that connects the two faces. After that, it was easy to glue each of the other rim panels in turn.
The components: the carriage block, the barrel and the wheels, can be shifted around before you glue them together, so you can modify the way the gun looks a certain degree to suit your fancy.
Making the wheels octagonal instead of hexagonal would not, in my opinion make them too fiddly.
I enjoyed putting this model together, and am happy with the results! Thanks, Brave Adventures!
Have fun!
Steve
|
|
|
|
Post by Brave Adventures on Feb 20, 2014 4:02:55 GMT -9
Wow! Thanks for the awesome report Steve! Do you think it would make it easier to glue the frame together if there was a little box that could be placed inside for support? I'll try creating octagonal wheels this weekend and re-texturing it like Squirmydad and Cowboyleland suggested.
|
|
|
|
Post by stevelortz on Feb 20, 2014 4:45:56 GMT -9
Wow! Thanks for the awesome report Steve! Do you think it would make it easier to glue the frame together if there was a little box that could be placed inside for support? I'll try creating octagonal wheels this weekend and re-texturing it like Squirmydad and Cowboyleland suggested. Leaving the bottom of the carriage block open while constructing the trough was a key decision for inserting the glue between the trough glue tabs and the surfaces they were supposed to stick to. A little box in the carriage block might interfere with that. Good work! Have fun! Steve |
|
|
|
Post by dungeonmistress on Feb 20, 2014 9:44:50 GMT -9
I will be building mine on Monday. My report (perhaps with pictures) will follow. Thanks for the clear descriptions, Steve, I know what to look out for because of them.
|
|
|
|
Post by stevelortz on Feb 20, 2014 14:44:13 GMT -9
I will be building mine on Monday. My report (perhaps with pictures) will follow. Thanks for the clear descriptions, Steve, I know what to look out for because of them. You're welcome, dungeonmistress! This cannon could also be useful with the toy soldiers in Hoard 104, November 2012! Have fun! Steve |
|
|
|
Post by mproteau (Paper Realms) on Feb 20, 2014 19:01:47 GMT -9
OK. I did a quick build of this. It took about 45 minutes, with edging. I *don't* wait for much to dry. I give tabs a 10 or 20 count to and move on... I was motivated to get this done before I was too tired to safely cut things.    I think the end results are pretty good. I was skeptical about how much I'd like a hexagonal barrel, but it's not all that noticeable to me once it's assembled and in front of me. So, a couple things struck me. It made MUCH more sense when I realized there's a reverse fold in there... My brain latched onto everything as a regular fold, and I couldn't imagine how it was going to attach. It didn't take LONG to clarify that in my mind, but required a little brainpower. I'm not sure how much the bottom flap actually gains the model - is it really that much stronger because of it? Would some simple flaps that folded in to double up the thickness around the bottom edges be enough? Just wondering if that'd make assembly easier, skipping the base. If the base stays, there's no reason to waste ink giving it a texture, is there? Just a thought - include some strips of rope that could be stretched over the barrel and attached to the sides of the base, to make it seem that the barrel is strapped down? Or perhaps some metal bands? Another detail that might be nice - make the wick a separate piece that stands up? Maybe have the wick printed on the barrel, bit have an optional one that would cover that up and give a wick that stands up. I think the added dimension would add a bit to the look of the model. From the picture you posted, I assumed the barrel would be bigger and fit snugly in the base. Was this something you changed after that build? I feel like I want to complain about the hexagonal wheels, but they really weren't hard to assemble, and they look right at home on the model. It's really kind of a cute little cannon. Still, I think a round wheel option would be nice, even if used flat rather than 3d. Ok. One last thought... If you added a slot on the base that a tab on the cannon barrel could slip into, and ditto on the sides for the wheels, then the model could be optionally assembled to allow for being dismantled. I didn't cut out the minis. I won't do that without cutfiles. I'd encourage breaking the PDF up into two pages - one for the canon model and one for the minis. Then you could line up the bases for quicker scoring and cutting by hand, you could print out a couple cannons without needing to print out a ton of standees as well, and... oh... I don't know. I'm tired and I'm starting to feel like I'm just making stuff up.  I still think two pages would be better than one, and layers for registration marks is a must.  |
|
|
|
Post by Vermin King on Feb 21, 2014 4:41:35 GMT -9
Having read Steve's report, and personally having a dislike for trying to stick glued tabs inside a piece and hold until it grabs, I re-did the tabs so that it has flaps that close onto the tabs 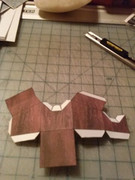 As Steve did, glue side to back. 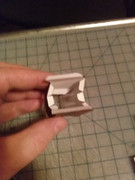 Glue the top piece with the connector flap down first. 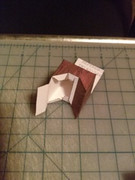 Glue down second top piece. 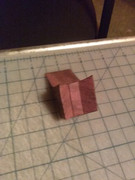 Close bottom flap 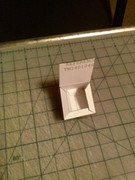 I forgot to shut off the camera between shots here and ran it out of power, so final shots will have to wait. The wheel assembly which I was doubtful on went together so unbelievably easy. Glue the rim piece opposite the fold first, then just glue the remaining flaps on the tabs. The barrel is just a standard build. Connect the long flap to the long tab, forming a tube, then close the end flaps. |
|
|
|
Post by stevelortz on Feb 21, 2014 8:50:31 GMT -9
Vermin King - I also thought about re-arranging some of the tabs, but I decided to build it the way Ryan had laid it out, and describe that. I like the way you re-arranged the tabs!
Have fun!
Steve
|
|
|
|
Post by mproteau (Paper Realms) on Feb 21, 2014 9:21:17 GMT -9
I like the way you've rearranged the tabs as well.
|
|
|
|
Post by Vermin King on Feb 21, 2014 9:59:46 GMT -9
I like gluing flaps to tabs, not inserting glued tabs into something. It builds really quick this way.
I have to admit that I had my doubts on the wheel layout, but the wheels go together very easily if you glue the flap to the tab opposite the fold and then close the rest of the flaps
|
|
|
|
Post by stevelortz on Feb 21, 2014 14:17:33 GMT -9
I like gluing flaps to tabs, not inserting glued tabs into something. It builds really quick this way. I have to admit that I had my doubts on the wheel layout, but the wheels go together very easily if you glue the flap to the tab opposite the fold and then close the rest of the flaps That's why I think that they could work well as octogons! Have fun! Steve |
|
|
|
Post by Brave Adventures on Feb 21, 2014 20:36:52 GMT -9
Ahh! I see! Thank you for the pictures VK! I'm not very experienced at designing 3D paper models, so this kind of information is very handy.
Here is my to-do list for the cannon:
-Make an optional "stand-up" wick.
-Make a barrel tab and carrier slot like Steve suggested, so the cannon can slide into the carrier instead of needing glue. That way it can be disassembled etc.
-Re-texture the cannon, and add details like metal bands/ropes or something like Mproteau suggested.
-Create octagonal wheels with new textures like Cowboyleland suggested. As you guys noticed the hexagonal wheels were super easy to assemble! My own experience with round shapes are that they can be kind of difficult to put together, so I'm leaning towards octagonal wheels with a round-wheel texture inside.
-Re-layout the tabs the way Steve and VK suggested.
Questions:
What are registration marks and how do I make cut-files? I don't have an automatic cutter and I have no experience with them. I'd be happy to add cut-files etc. if I knew how though. Do different machines need different types of cut-files? The layout I sent you guys is by no means the final product! The finished layout will definitely be more than one page and will be more thoughtfully laid out. I guess that makes sense to put the minis and cannon on different pages though, since not everyone will want to use both. My own instinct is to cram as much as possible onto a page to save paper though.
Should I re-size the barrel so it fits in the carrier more snugly?
Should I change the shape to make the carrier longer or add some kind of hitch-pin thing?
Anything I missed?
Thanks for the help!
Ryan
|
|
|
|
Post by mproteau (Paper Realms) on Feb 22, 2014 3:54:53 GMT -9
I'll email you some PNG files that can be used as layers for reg marks. If you use them in your PDF, I'll be happy to make you some cutfiles. I thought I emailed *someone* some png files recently...
I don't mind the barrel the size it is now, and while I thought about whether the carrier shape should change, I'm ok with how it is.
|
|
|
|
Post by Vermin King on Feb 22, 2014 6:44:55 GMT -9
From this discussion, I'm thinking this could still be one page, if the base on the upper right is moved up along with the base right below it. It would be tight. Are you familiar with Minibox models? www.minimodel.cz/ Many of the models there have an easy version and an advanced version. On the easy version, they use 'grey' for the space under the vehicle, which looks like shadow (http://www.minimodel.cz/data/papercase/modely/X53_Liaz_okruhovy_1991.png). I would like to see a couple mm's of grey along the bottom of the carriage block so that it doesn't look like it is sitting on the ground with decorative wheels. You could have the tailpoint drawn onto the back panel to give it a sense of stability. That is unless you choose to design a 2d piece that goes back. I personally like the look of the barrel at its current size. mentioned above, rope or chain to secure the barrel to the carriage would be great. I hadn't glued the barrel onto the carriage, so I just made a piece to glue onto the bottom of the barrel and fit into a slot in the carriage, and it works very well. I think I should have made it a little bigger, but since mine will just sit, not be used in a game, it is fine. I did mine sort of like a base. A very small base, with a huge 'figure support' |
|
|
|
Post by Vermin King on Feb 22, 2014 16:43:02 GMT -9
|
|
|
|
Post by dungeonmistress on Feb 24, 2014 20:30:53 GMT -9
Well, here it is! Your Dwarven Cannon and Crew went together very easily. Although; in my case, I had to start from scratch. I have a very nice printer, but no ink for a long time now, so, I printed off the PDF at my local library - which means B & W and on plain copy paper. 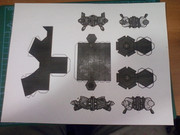 Then I color it by hand. 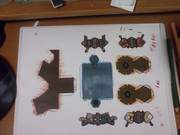 Then glue it to cardboard to make it sturdy, for it will be used in game. 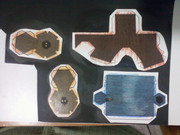 Now, for the cutting and gluing. 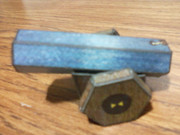 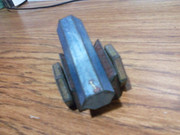 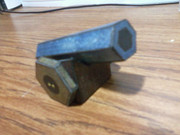 The wheels went together easily and I don't think that eight sides would be any harder, though they would look nicer. The carriage took a couple of minutes of consideration before I figured out what needed to be done. A small diagram showing it's assembly would be nice. The barrel was simplicity itself. I think, though; adding a tab to the underside of the barrel that would slide into a slot in the carriage would be a better answer than gluing it in place permanently. This is something I think I will do before I introduce it in game. I'll send you pictures when I come up with an idea. I showed this to my husband and he said it would blow up. I asked why? He said "Because the barrel is blocked!" Yes, well, he is my favorite wizard! He suggests a small inverted cone that would be glued into the front of the barrel to give it a more realistic, 3D look. He also, said "where are the cannon balls?" and "the Dwarves need a step ladder!" It was my turn to shake my head! Again, I say "He IS my favorite wizard!" Anyway, so here's the finished product. 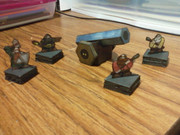 Thanks for letting me take part in this test! |
|
|
|
Post by Vermin King on Feb 25, 2014 4:53:28 GMT -9
I was thinking if I did this again, I would also have an open barrel. Tubes are easy and you could make connector tabs easily from the graphic 'opening'. Nicely done. What type of medium did you use for the coloring process?
|
|