|
|
Post by greypilgrim on Mar 12, 2016 4:23:05 GMT -9
Chris -
I am in the process of building some paper terrain for for grandson's birthday (he is a big Star Wars Lego nut!), and I build the Landing Pad.
My question is: did you make a version that was modularly expandable. Perhaps where you took the quarter arcs of the circle for the corners, and had straight line sections to expand the sides, and 'blank' tiles for the center(s) - giving a larger landing "grid" for a larger platform? Or did you ever consider it?
I really like the texture flavor for the Landing Platform, and just wish it could be made bigger.
|
|
|
|
Post by Vermin King on Mar 12, 2016 4:39:22 GMT -9
I have never seen a modular version, but I had done some ships for a friend's son, and wanted to do a larger Landing Platform.
I didn't need it much larger, so I spent a couple bucks and had it printed at the local print shop enlarged to 11X17 inch cardstock.
It built up fairly solid.
|
|
|
|
Post by greypilgrim on Mar 12, 2016 5:39:25 GMT -9
@vermin King: Thanks for the tip!
The original pad is 7" square. How big did you print out your larger version? 10x10" Or did you print half out twice for a 20x20 ?
How well did the texture quality hold up at that expanded size?
*EDIT* Pic?
|
|
|
|
Post by squirmydad on Mar 12, 2016 8:06:09 GMT -9
Fuzzy brain today...in the Ebbles ground tiles wasn't there a set of 6x6 tiles with 1/4 arcs of tarmac so that you could make a 12x12 tile group for starships to land on? I'll try and find the files. edit> There are also these Spaceport tiles by Dave Graffam. |
|
|
|
Post by greypilgrim on Mar 12, 2016 11:16:36 GMT -9
Yes, there is. Yes, I have it.
Unfortunately, for my wanted purpose, it has a concrete-style texture rather than the machined metallic as used in the Landing Platform. This concrete pad is 5x5 as a quarter, so it would make a 10x10. Again, there is no extra sections to extend the overall size beyond this.
My apologies, I guess I'm in the middle of a "More-more-more, Giant Economy, Supersize It" kick at the moment...
[Wow, look at this - I started a discussion - LOL ]
*EDIT* Sorry, squirmydad - my brain is fuzzy today, too.
Your comments are correct as to size - and Dave's is a nice metallic, as well. (I've got several of his pieces and am purchasing this one as well as we text.)
My comment here above is addressed to the 7x7 (overall size) ground tiles that Chris put out. Sorry for the confusion.
I was interested in the bigger size for Chris' Landing Pad because my grandson is really into Star Wars Legos - and this texture, to me, really smoked of star Wars heavy industrial flavor.
|
|
|
|
Post by Vermin King on Mar 13, 2016 15:53:39 GMT -9
Was out of town, but when I did this, it was the first model that I took to the print shop. We actually built it during a paper model day at my friend's house and I didn't take photos. And I'm kinda going by memory here, but it seems like it came out about 25 to 33% larger (which was enough to land the chickenhawk, though it was tight). As this is a fairly dark model and the print shop did a really good print, the texture quality looked good. A few months ago, Andy was talking about doing another model day, and he said everything held up pretty well except for the mechs we built. I have a feeling they may have suffered from rougher play time.
|
|
|
|
Post by aleks on Mar 14, 2016 0:58:04 GMT -9
Hi. sorry if I'm inopportune... are you talkin about this one?  |
|
|
|
Post by Vermin King on Mar 14, 2016 3:46:13 GMT -9
That's the one I was talking about. Hopefully, it is the one that greypilgrim was talking about
|
|
shep
Eternal Member
Red Alert! Shields up! LENS FLARE!!!
Posts: 1,260
|
Post by shep on Mar 14, 2016 6:22:15 GMT -9
Oh, that looks familiar. I just built that landing pad myself for a game of Shadowrun two weeks ago... If I had to lengthen this pad, I would do it like this: 1) Print 2 copies each of the top and bottom of the pad on 300 g/m² cardstock size A3, so that there are 4 sheets, 2 with the pad top and 2 with the bottom. The parts on each sheet have to be printed to one half of the sheet, so the other half remains white cardstock. 2) Build one of the tops by scoring the sheet along the outer pad line looking towards the blank half of the sheet. Fold the blank half under and glue both halfs together, thus creating a 600 g/m² landing pad. Build the other parts of the pad the same way. 3) Now take some foam core or corrugated cardboard. Trace the outline of the pad to the foam core. Do this twice. Before you cut it out, add a box at least an inch high and two or three inches wide to one edge of one of the foam core pads (this will be the add-on male pad) while cutting the same rectangle from an edge of the other foam core pad (this will be the regular female pad). 4) Build the rest of the original landing pad. Strengthen the walls beneath the pad on the inside with foam core or corrugated cardboard. You will need 2 of these sections but only one ramp. 5) Build the landing pad sandwiches: pad top, foamcore center, pad bottom. Glue those really sturdy pads to the walls that go beneath each pad. The ramp goes to the side opposite the opening in the center layer of the female pad. 6) Paint the visible parts of the center layers black or dark grey. When the paint and glue are completely dry, you're done. You should now have the regular landing pad plus an add-on that you can simply stick into the regular pad. There will be a step down from the pad to the ramp. The extra sturdiness should be enough for the two pads to hold even larger LEGO spaceships...  |
|
|
|
Post by greypilgrim on Mar 15, 2016 16:38:14 GMT -9
Yes: the photo aleks out up is indeed the one in question. What I ended up doing was dragging the top and bottom into separate files in GIMP and expanded (scaled) one quarter section of each to twice its size (coming to 7.5"), resulting in a 15" square. (I was satisfied with the texture - it didn't seem to decay or bleedout as much as I had feared.) Then, in another file, I mended two of the support sides into one long wall; I placed two of these on a single page, as well as a third which I blanked out the detail (to save ink). Printing out two copies of this last page gives four long solid under-walls and two blank walls to support the underside middle - which will be notched and glued to the underside in a cross pattern, connecting to all four outside walls. shep: I appreciate your effort in describing your concept. I must confess, however, that you lost me - especially with the male and female parts. Do you have a pic? That might help me understand. I'll apologize if your concept is actually straight forward - but I've had a really long day with overtime at work and my brain may be a bit foozie. I'll read it again tomorrow when it (my head) may be clearer. Thank you again for your suggestion! [Yes I'll get a comparative pic after they are completely assembled for my grandson at the end of the month; first, they have to travel flat in my airline luggage. |
|
shep
Eternal Member
Red Alert! Shields up! LENS FLARE!!!
Posts: 1,260
|
Post by shep on Mar 16, 2016 0:10:38 GMT -9
Okay, my fault, I thought with having a grandson, the concept of male and female parts would be familiar to you...  Here's a quick schematic of what I mean: 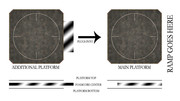 The additional platform is the male platform which "plugs into" the base platform (the female one). You basically build 2 platforms and one ramp. In the center of each platform you add a sheet of foamcore to (a) make the whole built stronger and (b) create the male/female link. This link is created by adding a "key element" to the additional platform while cutting out a "lock element" of the same size from the base platform. This way you can put the "key" into the "lock" to attach both platforms together, creating one big platform of original width but double length. Don't forget to strengthen the walls of the platform stands as well in order to be able to hold the weight of larger LEGO models. I hope, the sketch helps to better explain what I mean. EDIT: With my "lock & key"-system you could basically limitlessly extend the original main platform by adding more additional platforms to it. You just have to build the platforms like parts of a jigsaw puzzle with 2 locks (left and bottom) and 2 keys (right and top). |
|
|
|
Post by greypilgrim on Mar 16, 2016 13:34:11 GMT -9
Thank you Shep.
Okay, so you are using the foamcore itself as the connector system - cutting it to shape before applying the texture printed cardstock.
A useful technique in general. Unfortunately, here it results in a platform with several circles of the original size and not a single landing spot with one large circle, which is what I was looking for.
|
|
shep
Eternal Member
Red Alert! Shields up! LENS FLARE!!!
Posts: 1,260
|
Post by shep on Mar 16, 2016 16:40:11 GMT -9
Ah, I see... Well, then the way you described seems to be the best.
Btw, back in the day (70's/80's) LEGO had a seperate SPACE product line. They had some big ground plates in that line, too. One set were twoplates with craters, the other was a stretch of road and a landing pad. They've been oop for ages, but are still on ebay now and then. Maybe you can find them somewhere, because aside from the blank spaces for road, landing pads and craters, they sport patches of LEGO's typical knobs so you can build stuff on the plates...
|
|
|
|
Post by greypilgrim on Mar 18, 2016 18:45:55 GMT -9
Thanks for the old Lego tip, shep - I'll keep my eye out for those as well.
BTW, the double-length under wall comes out to 8 1/2 inches...
|
|
shep
Eternal Member
Red Alert! Shields up! LENS FLARE!!!
Posts: 1,260
|
Post by shep on Mar 19, 2016 0:09:08 GMT -9
8.5" is just about printable, isn't it? Sorry, but being European, I'm using the metric system, and although I'm quite used to calculate into inches and feet and the other way round, I tend to forget the size of a LTR sheet. Our A4 is 21 x 29.7 cm which is higher but smaller, but I can't remember the exact difference. If you should run into trouble printing your double-length walls for the underconstruction, you could of course just as well use four of the original pillars, one for each quadrant of your upscaled landing pad... About the original LEGO pad, these links might be interesting for you: The later "alien" version of the pad: www.ebay.com/itm/LEGO-2-Space-Landing-Pads-6710-Squidman-Escape-5969-Satellite-6458-NEW-/141929892193?hash=item210bae4961:g:4IAAAOSwmmxW5yHZThe original LEGO Space landing pad: www.ebay.com/itm/LEGO-Town-City-Space-Base-Plate-32x32-Light-Gray-Landing-Pad-Rare-/131752784384?hash=item1ead13f200:g:KiMAAOSwQYZWzmhiThis auction is (at the moment) quite the bargain, but I guess the price will go up during the last days: www.ebay.com/itm/Huge-Vintage-Lego-bulk-lot-Space-sets-w-instructions-7-5-pounds-/231880951676?hash=item35fd2e877c:g:GzcAAOSwh-1W6uQXAnd finally, this is not so much a deal, but it gives you a nice overview over the original pads (2 sets of landing pad/street and 1.5 sets of craters): www.ebay.com/itm/8-Lego-Vintage-Space-Baseplate-Landing-T-Raised-3947-Moon-Gray-Yellow-Road-ACRS-/111920924505?hash=item1a0f01c759:g:sV4AAOSwuAVW1IWi |
|
|
|
Post by greypilgrim on Mar 20, 2016 3:54:35 GMT -9
shep : 1)Thanks for the Lego sales links! 2)I'm a little more comprehensive of the basic cardstock skills than what you seem to be thinking ... but, I'm taking your suggestions with a smile ... ... No bad feelings either way, I hope! 3) I will admit that I am still quite the 'novice' using GIMP for design/alteration. But, that hasn't stopped me from successfully creating a graphic kitbash and having it published by WorldWorks Games. (I adapted a castle wall section with crenelations.) 4) Yes, American paper is 8.5 x 11" (216 x 279mm) which gives a 7.5 x 10" usable printing area after discounting for the half-inch margin of "no-print-land". Which is why I used the max size to make my upscaled pad. I had to print out the landing deck in four sections. 5) BTW, as a big star Trek fan, I like your 'Kirk' avatar.
|
|
|
|
Post by cowboyleland on Mar 20, 2016 5:06:26 GMT -9
On the theme of "printing big stuff:" I have never had any trouble using a 1/4" margin. I think I have even used 5 mm (0.20")? Your printer may vary. Another trick I use sometimes is to figure to use the margins as tabs. It is easy enough to eyeball the tapers at the ends.
Printable area is then 8"x 10.5" or about 203mm x 266mm
|
|
shep
Eternal Member
Red Alert! Shields up! LENS FLARE!!!
Posts: 1,260
|
Post by shep on Mar 20, 2016 5:26:57 GMT -9
shep : 1)Thanks for the Lego sales links! No trouble, I hope they were useful. Not on my side... Compared to my experience with other software, I know nothing about GIMP (which is not true, but is in comparrison to Photoshop, Lightroom, Corel Draw, and Painter). I've been using Photoshop since version 7 and Corel Draw before that. But it seems you have quite a hand with GIMP if some of your mods got published. In mm, I leave a 5mm margin on all sides of an A4 sheet which gives me 20 x 28.7 cm to work with. That's more than enough for most pojects, though I sometimes run into the limits of my printer not being able to handle A3 paper... Nah, that's just to celebrate David Okum's Star Trek minis which originally lead me to this forum... |
|
|
|
Post by greypilgrim on Mar 30, 2016 23:34:22 GMT -9
The landing pad builds for my grandson's birthday are complete (and delivered this past week). 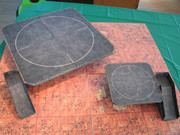 For the super-sized version, I created a pair of notched blank walls to reinforce the side walls:  I GIMPed two of the side walls end-to-end, then stretched it out for the correct length. I used black foamcore as bases and sandwiched between the upper and lower pad surfaces for durability. This did mean the top landing of the ramp access falls just shy of the landing pad surface itself, but I considered it acceptable, if not even prototypical. [Okay, there, my old model railroading background is showing through - lol.] The comparative sides: 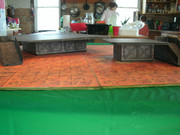 |
|
shep
Eternal Member
Red Alert! Shields up! LENS FLARE!!!
Posts: 1,260
|
Post by shep on Mar 30, 2016 23:44:03 GMT -9
Shiny! What did your grandson say?
|
|
|
|
Post by greypilgrim on Mar 31, 2016 14:17:31 GMT -9
|
|
shep
Eternal Member
Red Alert! Shields up! LENS FLARE!!!
Posts: 1,260
|
Post by shep on Mar 31, 2016 23:59:42 GMT -9
Just had a look, now that's super-shiny! Woot! Oh, I'd loved to have had playsets like this when I was a kid...  |
|


