|
|
Post by Punkrabbitt on Nov 8, 2019 17:34:37 GMT -9
Can you please make a no-box EZbild tailight version as well?
|
|
|
|
Post by Vermin King on Nov 8, 2019 18:51:59 GMT -9
|
|
|
|
Post by Vermin King on Nov 9, 2019 7:02:06 GMT -9
For Punkrabbitt,  I think tomorrow, I am going to play with having the inner fin part fold over from the top, something I'd considered from the start of this. The triangular fin end will fold over from the outer fender, and the rounded taillight oval box will be at the bottom of the inner fender. Should still be fairly simple (unlike Cami's taillight piece in the second photo above), but would make the back end much more convincing. And as I picture it (sort of an elongated wheel shape that glues flat against the bumper), it should be rather forgiving for variance in build method. And it should translate over to the Nomad and Ute ... once I get the original version worked out. EDIT-- BTW, I thought that it was an optical illusion, a perspective thing, that on the Nomad, the window bottom in the tailgate seemed higher up than at the sides. The more images I see, the more convinced I am that it is not. It is slightly higher, a leftover from the sedans and coupes having a slightly rounded rear deck. So I have incorporated that into the Nomad model. |
|
|
|
Post by Vermin King on Nov 9, 2019 10:22:59 GMT -9
And here I am sidetracked again. Just because I think it would be cool to have a pair of these on the wall. 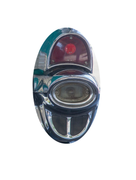 Of course, I will have to line things up first, but I saw this article, and immediately thought a pair of 3d taillights on the wall would be kinda different and cool at the same time. www.auntannie.com/BoxesBags/OvalBox/Pattern/One big oval for the complete housing and a smaller oval for the back-up light. And no, I do not plan on doing a separate oval for the back-up lights on the models, but a laminated oval cut-out on top, might be an option for those that might want it |
|
|
|
Post by Vermin King on Nov 10, 2019 9:20:42 GMT -9
Well, hope to get the new fins done today. I really overthought this. If I view the taillight as an elongated hexagon, I can have the sides of the fins as the two upper sides of the hexagon. The fin face will valley fold to place the hexagon top at the bottom of the triangle. It becomes a more complex build, but it can be done without increasing the number of parts, unless you want to cut out and extra back-up light to glue on top of the taillight box.
I hope I'm not raising the expectation bar too much, but this is definitely the best path for having an EZ-Bild convincing model
|
|
|
|
Post by Vermin King on Nov 10, 2019 17:49:54 GMT -9
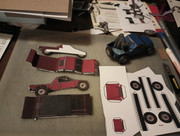
Well, internet searches have to be worded properly to get the results you need. I was trying to get a dead on view of one side of the tail fin molding at the rear. I knew that this molding was in two parts on the left, the lower section being the cover for the gas cap. I knew that the right side was one piece with a molded indention mimicking the top of the gas cap cover door on the left, but my question was whether the exterior side of the fin is vertical or angled. Because of the artistic angles of the photos, it was difficult to tell, until I found a vendor for replica parts. 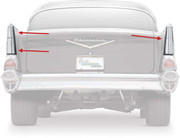 And this shot 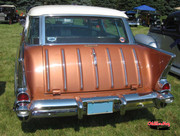 Essentially a right triangle. At least it would be, if the base of the triangle is at the vertical midpoint of the back-up light. I had mistakenly considered the trim molding extended vertically from the midpoint of the taillights. As I was working out my taillight/rear fin faces, I had a point where I had a vertical outer edge, but continued manipulating things to get a symmetric piece. Rats. Now I need to work out how I want to connect the different faces of the new parts. I have to try to work out how to do it simply. As I just work through it mentally, I always end up having a void that needs a separate part to cover. If that's the case, I think that designing it so there is one larger extra part would be less fiddly than a small part. Just have to work it out |
|
|
|
Post by Vermin King on Nov 24, 2019 16:50:08 GMT -9
Well, I decided to do the '57 Chevys for December's Hoard. That's the pieces I intentionally set back.
After doing some file organizing and cleaning up some promo photos, I decided I wanted to build something. I thought I remembered what I wanted to do with the Desert Buggy, so whipped it out (only now that I'm building it, I forgot to do the front end bracket). I'll cobble something together. I have no need for side boxes and I thought about deleting them from the page, but I will probably use them to make the front end piece. At least on this one.
|
|
|
|
Post by Vermin King on Nov 25, 2019 9:26:41 GMT -9
Well, Desert Buggy is started. 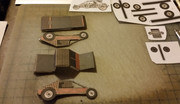 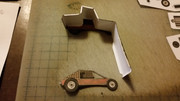 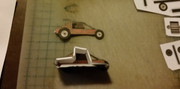 Because of the shape of this one and the ancillary parts, this is more of an intermediate model. Not hard, but you have to pay attention to what you are doing |
|
|
|
Post by Vermin King on Nov 30, 2019 7:10:36 GMT -9
As mentioned in the VK Labs thread, the little buggies got a bit of a workout Thursday    No irreparable damage, though damage of course happened. The first victim was the swamp buggy -- one tire popped off. The next was a buggy whose hood and grill popped loose from the side. Jesse's Toyota pickup got pulled because it really wasn't very solid. Key points gathered was that for rough handling, the two-layer-thick-side models held up best. The models with undercarriages held up best. The models printed on 110# cardstock held up best But with more than an hour's rough play from little kids used to playing with diecast cars, it was amazing to me that none were totally destroyed. I do need to go back and design the undercarriages for the Wasteland Buggy 1 and Wasteland Buggy 2 |
|
|
|
Post by Vermin King on Dec 1, 2019 8:16:30 GMT -9
|
|
|
|
Post by Vermin King on Dec 11, 2019 6:11:22 GMT -9
I am such an idiot. I put off the 57 Chevys for the Procrastinators Hoard intentionally. Played with it yesterday just a little and a little more than that on Monday, only I was playing with a previous version, not the one with the corrected roof. No wonder I was having such a hard time with everything. Now that I am working from the correct model, this should move smoother
EDIT--
No time to do more than look at this right now, but I need to make a list of things to do
1. Headlight Surround
2. Rear Bumper
3. Rear fender/taillights
4. Carry over fixes to all versions
5. Ute
|
|
|
|
Post by mesper on Dec 11, 2019 17:31:46 GMT -9
Wasteland...
If you are a PC player, you probably know the franchise, the game itself and its creators - classic turn-based Sci-Fi/PostApo RPG. Now you can download the enhanced version of the latest release of the game - Wasteland 2 Directors Cut - for FREE! BTW as a additional bonus you will also get the original version, and a lot of digital goodies! Just check out the most player-friendly store - GOG! Wasteland 2 Director's Cut FREE on GOG...I've already downloaded! //BTW - this is not a paid entry - I have been using GOG for several years as a player, and Wasteland is really worth the sin!
/Mesper

|
|
|
|
Post by Vermin King on Dec 12, 2019 8:59:32 GMT -9
A little more sorting out. The inside fender needs tweaked. I like the new fenders and headlight surround  |
|
|
|
Post by squirmydad on Dec 12, 2019 9:29:15 GMT -9
Wasteland...
If you are a PC player, you probably know the franchise, the game itself and its creators - classic turn-based Sci-Fi/PostApo RPG. Now you can download the enhanced version of the latest release of the game - Wasteland 2 Directors Cut - for FREE! BTW as a additional bonus you will also get the original version, and a lot of digital goodies! Just check out the most player-friendly store - GOG! Wasteland 2 Director's Cut FREE on GOG...I've already downloaded! //BTW - this is not a paid entry - I have been using GOG for several years as a player, and Wasteland is really worth the sin!
/Mesper
Thanks! I played the original several times, don't throw away the toaster, but I haven't tried this version. And now back to '57 Chevys.  |
|
|
|
Post by Vermin King on Dec 12, 2019 9:32:42 GMT -9
And I think I have the tweak worked out, but I need to adjust the files. The slanted inner surface of the rear fender needs to remain slanted to the midpoint of the taillight assembly. I'll fix that tonight and then proceed to the test build
|
|
|
|
Post by Vermin King on Dec 15, 2019 11:38:57 GMT -9
I haven't even finished the test build, but this isn't the answer. It's buildable, but trying to get those inner fenders installed will be fiddly as heck. I'll muscle through this one, but I have a new idea that I think will be easier to keep things aligned and easier to build. My new idea is to build the standard version and have an optional bumper/taillight/inner fender assembly that glues on. I wish I had thought of that earlier. So often better ideas come to me while I am building
|
|
|
|
Post by Vermin King on Jan 1, 2020 6:29:37 GMT -9
Sun-uva-ma-beach! As I just wanted to get the Cybertruck out of my hair, I didn't come back to this since the 18th. Part of my latest design is on one of my older versions, and the 'final' version had a bunch of parts removed to make room for the new ones, that aren't there. So, now I need to do some sorting. I think we already decided to keep the Procrastinator Hoard open until Sunday or so. If I concentrate on this today, hopefully it will be ready for the Hoard.
|
|
|
|
Post by Punkrabbitt on Jan 1, 2020 20:31:02 GMT -9
Can't you just procrastinate closing the Hoard until this is done?
|
|
|
|
Post by Vermin King on Jan 2, 2020 4:35:13 GMT -9
Well, got it cut out last night and edged. Will hopefully build over lunch. Then I will carry it over to the other colors. This looks like it will be a lot less fiddly. Then, before I forget what I did, I will do the Nomad version on Saturday. Assuming it is as successful as it looks EDIT--  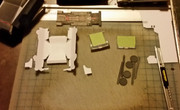 Things that were changed -- Trunk separated from rear window, leaving a tab to attach it Inner rear fender folds over from the top Inner piece to align the bottom edge of trunk (lines up under the tab at the top of the rear fender) Enhancing of the taillight lenses and windshield wipers Needing to add fold lines Aside- My original ideas on changes to the Bilsport Jr model was to have the rear inner fenders fold down from the top (but there wasn't room as laid out and would require other changes), add 3d taillights, add a chassis and 3d wheels, fix the greenhouse so that it didn't look out of proportion and fix the roof so that it was more rounded. Dry fitting the taillights looks much easier. Positioning of the inner trunk mount is almost fool-proof, the roof is definitely better as is the greenhouse. My bumpers and side details help. So I think this will be the final version, unless there are some tweaks |
|
|
|
Post by Vermin King on Jan 2, 2020 8:32:18 GMT -9
|
|
|
|
Post by Vermin King on Jan 6, 2020 9:01:47 GMT -9
Well, last night I decided the dry-fit test Cybertruck was taking up too much room, so I slapped it together. I used it as my test on protruding tires. I cut out the tires from the sides, built the truck body, built the wheels, and then glued the wheels into the round opening. To keep them square, I glued the front tires first and let it sit to dry with the tires sitting flat on the cutting board, and then did the rear. I used the tread pattern to mark how far they would protrude. I put a thin bead of glue around the opening and set the tires so that the tread line was evenly on the opening. This wasn't my final design, but a test of concept. On the other file, I have a body side molding piece that glues on which will give those parts some depth. 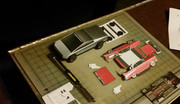 And I got to this point on the Chevy over lunch and wanted to do some description 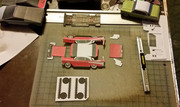 My new files have many of the fold lines indicated. Pre-shaping will be important to achieving a satisfying build. You will notice I did the front to back crease at the base of the windows. This is really where I start each time on the slanted side glass versions. It is important to not just fold the rear fender tabs down, but you also need to get them below the fold line and then crease back out to be even. I will try to get a photo of what I mean, but it is hard to hold the paper and show how I make the crease AND take a photo at the same time. I also wanted to explain why I cut off the tabs when I build wheels. I know many of you hate to build wheels, and part of this is getting the fiddly little tabs glued securely. I hate that, too, so I cut them off. to me it is easier to glue the treads into a circle, put a bead of glue around the edge and glue it to the tire face. Without tabs trying to do their own thing, it is easier to get the tread to conform to the shape of the tire face and edge gluing yields a more secure bond. You can see in the photo above that I haven't cut off the tabs yet, but I will |
|
|
|
Post by Vermin King on Jan 7, 2020 9:00:15 GMT -9
Success! 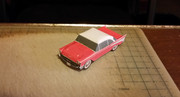 I will put together instructions tonight and get this posted in the Hoard |
|
|
|
Post by Vermin King on Jan 7, 2020 13:46:50 GMT -9
|
|
|
|
Post by Vermin King on Aug 28, 2023 7:05:16 GMT -9
Yes, I am revisiting Dorado Motor Works. Especially Wasteland Motors. Between Trophy Trucks, Dakar, and Kings of the Hammer, I have wanted to do either a 'Buggy Truck' or a heavily-modified truck for a long time. Scherer has a number of Ultra4's decked out to look like it has a bed in the back, but most of those are just panels and the 'bed' is non-existent, just the exposed framework to strap stuff to. Dan Fresh actually has beds and frames in some of his KoH entries   I briefly flirted with the idea of doing that last one and a couple Trophy Trucks, but I wanted something that would fit in better with the idea of the Buggy Truck. To end up with any kind of usable bed, I needed to modify an extended-body buggy. I have one that can't reach the finish line for Papercuts! that has extra framework and looks more like a post-apoc type truck.  The extra roll cage extends into the bed. Where it comes across behind the cab would be a grab bar/ support for a standing gunner in the back. Or extra tie-down points for cargo. Blue just happens to be my place-holder color on my working models, but I kind of liked the look in blue. Since the extra roll cage version was leading to too many dead ends, I decided to do a clean-bed version, still built loosely on the Wasteland 2 general shape, but with the necessary adjustments to allow for it being more truck-like. Doing the test-build currently, but it looks promising. Similar to a Ute, Ranchero, Santa Cruz, or El Camino, there is storage behind the seats in the cabin and an exposed bed. Originally, I had the top of the bed sides horizontal, but it looked too much like someone whacked off the back end and welded a bed on. Also tried an old Ridgeline type line, higher at the cabin than the gate. But to my eye, the bed sides being taller at the tail looked better. Here's the file currently, missing a tab  And here's where I am at on cutting out the parts  EDIT -- And I have already spotted two tab issues. That's why we do test builds |
|
|
|
Post by Vermin King on Aug 28, 2023 14:52:07 GMT -9
I really like this set-up for slab-sided vehicles. I cut along the top edges to make sure that when I do the fold-overs on each side, the edges line up.  The white area on the insides helps show where the upper and lower parts go. Pre-shaping is important.   I then glued the chassis onto that side, leaving the front and back unglued for now. Then glue the inner tailgate to the rear tab and glue the bed in place.   Close up the top, front, the chassis, and finally glue the outer tailgate and back of the chassis  If you just need a quick truck, leave off the chassis and whichever hood ornamentation. There is a larger 'scoop' that I used to make it look more truck-like. The smaller one or having none makes it look more buggy-like   This was a test-build, but when I attach the 3d wheels, it should look pretty good. I'll try to get to that tonight. I fixed the tabs on the blue version and made a reddish brown version   |
|
|
|
Post by Vermin King on Aug 31, 2023 7:39:09 GMT -9
At lunch today, I was getting started on building and adding the wheels, but the more I looked at it, the less happy I was. The C-pillar/panel of the cab originally was to be split, with half covering the back of the cabin and half being a grab bar/ wind screen for the bed. If I had time to do the version with the extra grab bars, it would be even better (at least as I picture it in my head).  Doing the quick version with the rear of the cabin lining up with the rear of the C-pillar, is less than satisfying. After doing the wheels, I was hoping to have time to build the red version with the smaller hood scoop. Yeah, time is running short. This version is useful, but not 'right', so instead of proceeding, I went back to Gimp and changed the model to what I first pictured. I should have time to get the red one done.  |
|
|
|
Post by Vermin King on Sept 1, 2023 5:22:13 GMT -9
Well, without the pressure of getting this done quickly, I will have more time to do it the way I envisioned it
|
|
|
|
Post by Vermin King on Sept 14, 2023 11:57:11 GMT -9
|
|
|
|
Post by Vermin King on Sept 17, 2023 14:52:11 GMT -9
|
|
|
|
Post by Vermin King on Sept 26, 2023 14:56:16 GMT -9
Finally got back to this   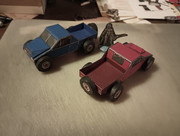 Now I need to do the tweaks on the Clean Bed version and get to work on the more elaborate one |
|