|
|
Post by okumarts on May 17, 2017 3:52:20 GMT -9
Excellent work!
|
|
|
|
Post by lightning on May 18, 2017 4:59:50 GMT -9
It's not finished yet! First try at a tusk texture. (Imagine no wooden poles  )  |
|
|
|
Post by lightning on May 19, 2017 7:43:34 GMT -9
How do you like this version? I assembled all the tusks, takes a while, but actually not as much as I feared. After your first tusk you get the hang of it and when do you six in a row, while the glue sets on one for one section you repeat the steps for the other five! :-) 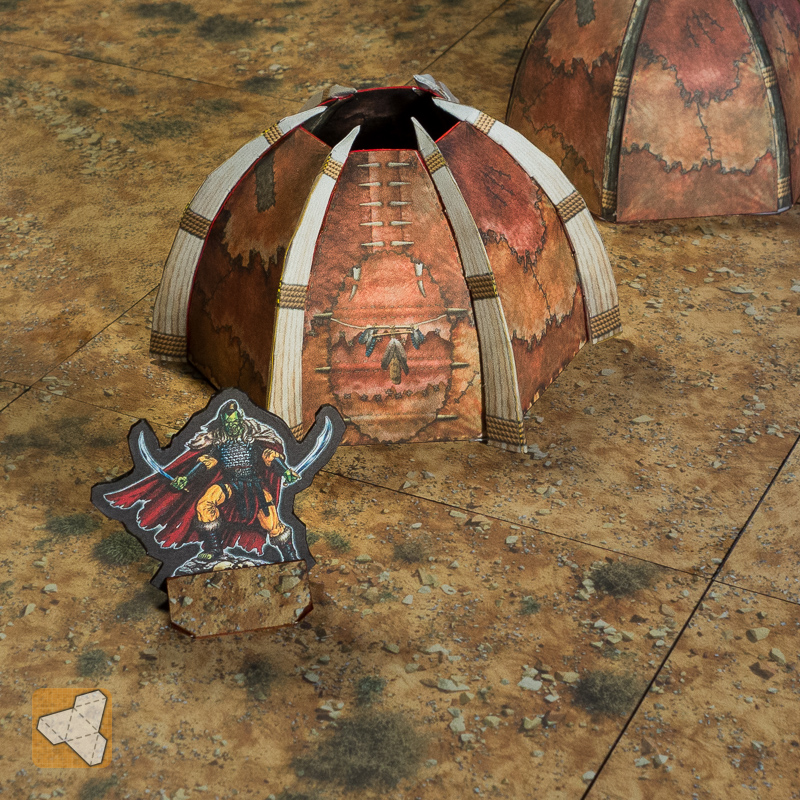 I think bravesirkevin 's great Orc captain looks so great with this hut! |
|
|
|
Post by printableheroes on May 19, 2017 10:06:26 GMT -9
Chiming in late. For my interactive PDF files I setup the art as buttons in InDesign and then export to PDF files. At the moment I use it for cycling color options for Paper Miniatures (as apposed to having a bunch of separate preset layers), but I see potential for using it to cycle object layouts in a dungeon tile (I'm really excited to try this out in the near future).
I imagine a PDF file where you open it up to a 5x5 dungeon floor tile. Click a few times and the floor tile cycle through options, then you click the "wall" button and it cycle through a few different wall configurations (corner, wallway, closed room, etc), then you click "objects" button and cycle through various "dungeon fluff" to populate the tile. Print. Then click a few more times, Print. Repeat.
I could see doing something similar for cycling wall details for buildings, objects on a book shelf or table, etc etc.
Anyhow, something like that I could see being fairly convenient.
|
|
|
|
Post by jeffgeorge on May 19, 2017 20:00:42 GMT -9
Chiming in late. For my interactive PDF files I setup the art as buttons in InDesign and then export to PDF files. At the moment I use it for cycling color options for Paper Miniatures (as apposed to having a bunch of separate preset layers), but I see potential for using it to cycle object layouts in a dungeon tile (I'm really excited to try this out in the near future). I imagine a PDF file where you open it up to a 5x5 dungeon floor tile. Click a few times and the floor tile cycle through options, then you click the "wall" button and it cycle through a few different wall configurations (corner, wallway, closed room, etc), then you click "objects" button and cycle through various "dungeon fluff" to populate the tile. Print. Then click a few more times, Print. Repeat. I could see doing something similar for cycling wall details for buildings, objects on a book shelf or table, etc etc. Anyhow, something like that I could see being fairly convenient. Yeah, you're using software that open-source cheapskates like me don't have. But your PDFs are really slick. Maybe if I actually make some money off my own tile system, I'll be able to plow the profits back into appropriate commercial software. |
|
|
|
Post by kgstanley81 on May 20, 2017 9:13:05 GMT -9
And picked it up last night, don't know when I'll try to make some, hopefully in the next week or so
|
|
|
|
Post by lightning on May 21, 2017 8:59:48 GMT -9
And picked it up last night, don't know when I'll try to make some, hopefully in the next week or so Thanks for the support! Hope you enjoy it!!! |
|
|
|
Post by lightning on May 22, 2017 2:12:19 GMT -9
I have added the tusks, cutfiles and instructions to the set. Clients will be notified automaticaly
|
|
|
|
Post by lightning on May 22, 2017 20:57:06 GMT -9
A little detail ... here is what my edging looks like. I tried to replicate the color pattern so much I even added the shadows of the rope :-) 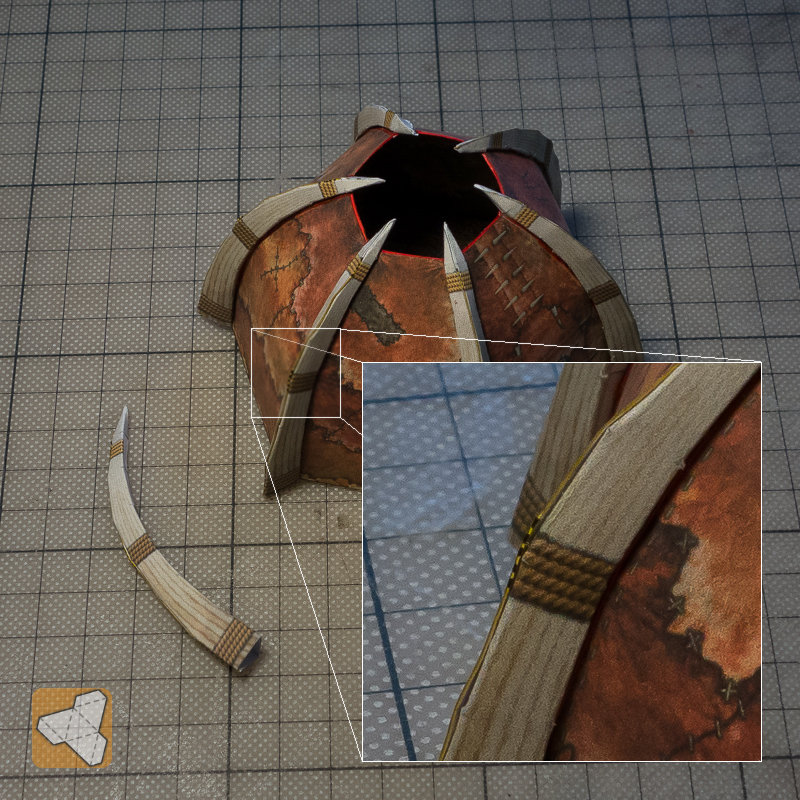 |
|
|
|
Post by yifferman on May 23, 2017 9:28:32 GMT -9
looks very good
|
|
|
|
Post by lightning on May 23, 2017 20:08:41 GMT -9
Started working on the base texture for the larger huts. This is a little evolution of the first steps of the first try. It is going in the right direction. I have the basic 3D mesh generation down. Need to work on getting the right sizes of the stones and then see if I can come up with some nice surface texturing.  |
|
|
|
Post by Punkrabbitt on May 25, 2017 19:22:00 GMT -9
OK, so I finally had a chance to go through your kit. The ground tiles alone are worth the price of purchase! I think this is a wonderful, great kit with far more flexibility than i will ever use.
Thank you.
|
|
|
|
Post by lightning on May 28, 2017 21:02:13 GMT -9
Thank YOU! :-) Glad you like it!
|
|
|
|
Post by lightning on May 30, 2017 4:55:12 GMT -9
Started working on the update of the large hut roof. Here is a comparison: old vs new  Now on the adding all the variations of shading and color! |
|
|
|
Post by lightning on Jun 1, 2017 22:02:00 GMT -9
While I am working on updating all the roof color variations, I am wondering if you guys can give me feedback on the saturated vs desatured versions. Which is your preference? Do you choose what appeals to you visually? Or do you also think about ink usage?
|
|
|
|
Post by wyvern on Jun 2, 2017 0:13:55 GMT -9
Visual appeal and intended use of the model. Ink usage doesn't really count for much, as I only print out what I need for a specific model project.
|
|
|
|
Post by Vermin King on Jun 2, 2017 3:57:15 GMT -9
|
|
|
|
Post by jeffgeorge on Jun 2, 2017 7:17:46 GMT -9
While I am working on updating all the roof color variations, I am wondering if you guys can give me feedback on the saturated vs desatured versions. Which is your preference? Do you choose what appeals to you visually? Or do you also think about ink usage? I think for most of us, appearance of the finished model takes precedence over ink usage. If you want to save ink, concentrate on making it so that the only things that print are absolutely necessary to assemble the model--avoid excess text and logos on layers that can't be turned off, and don't have the textures bleed more than a couple of millimeters beyond what is necessary to cover the exposed paper on the assembled model. But you knew all that already, of course. TL;DR: Don't sweat ink usage if doing so would detract from the appearance of the finished model, imho. |
|
|
|
Post by Punkrabbitt on Jun 5, 2017 10:13:20 GMT -9
The saturated ones look much, much better in my opinion!
|
|
|
|
Post by cowboycentaur on Jun 12, 2017 17:27:42 GMT -9
just got the orc huts! Im really excited about building a whole mess of them to put around the fat dragon Orc Watchtower
|
|
|
|
Post by lightning on Jun 12, 2017 21:34:28 GMT -9
pics when you're finished :-)
I started working on the large orc huts walls again after a week of creativity block and ... the printer stopped printing magenta. So I tutored myself via youtube on disassembling the printer head and cleaning it! A first test print looks like it is solved again!!!
The time I had to wait for the head to dry again, I already worked on improving the wall texture. The first try always gives me the clues in which direction to go ...
It will be some wood with clay between (for the desert/savannah version) and maybe a wooden logs version for other climates. Having it all in leather rags was just too much visually. Or should I add that too?
|
|
|
|
Post by lightning on Jun 14, 2017 20:58:13 GMT -9
Got the printer to print again. After the printer head cleaning and some dry time, it looks like it is back to its old glory again :-) I have been trying out some versions for the walls. First just logs, but it looked very boring. 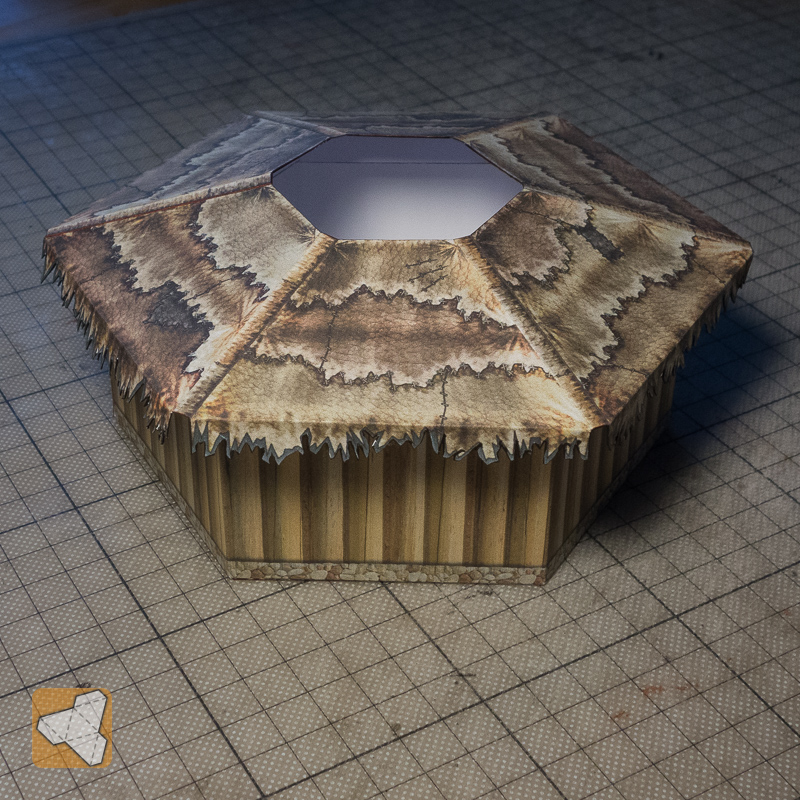 Then I looked up clay wall pics and worked on replicating that. It looks almost 100% like the original, so very happy with that but on the wall/hut, it looked a little too dark. 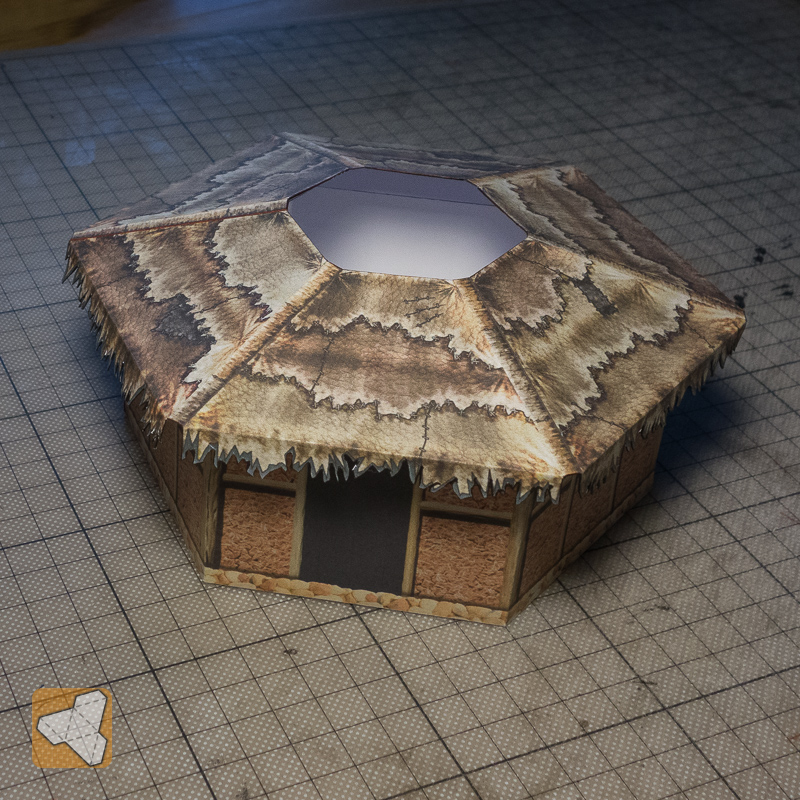 I then made a lighter, more sand color version. Lost some of the details (have to correct that) but like the tone best so far.  But what bothers me most are the straight lines. The roof looks like wild folk. The walls look like tame farmers. So right now I am sketching out a version where the wood logs are crooked branches where the doors and windows are located in branch forks. Wild folk hate straight lines!  ... or as the Austrian artist Friedensreich Hundertwasser once said: The straight line is godless! Well, what he meant is that there are no straight lines in nature. But the propaganda minister of the orcs hijacked it for his own purposes. |
|
|
|
Post by Vermin King on Jun 15, 2017 4:30:22 GMT -9
Would tumbled stone work?  |
|
|
|
Post by lightning on Jun 15, 2017 5:09:53 GMT -9
I think it would! :-) I started with the logs and clay wall by looking at the materials I see on my ground tiles. I also thought about the rocks for the tumble stone wall but somehow ended up working on the clay wall first. I want to have this rocks foundation at the bottom, so as soon as I am done with the upper wall, I will start perfecting the tumble stone texture. Once I have that, I can easily make it a full wall variation.
|
|
|
|
Post by Vermin King on Jun 15, 2017 6:44:37 GMT -9
Glad to help.
The problem with the clay is that it is too neat for orcs anyway.
I've got a couple ideas, but we are having server issues, so I can't go into it right now
|
|
|
|
Post by Vermin King on Jun 15, 2017 18:00:25 GMT -9
|
|
|
|
Post by lightning on Jun 15, 2017 21:32:22 GMT -9
The mud in my wall IS cracked. And it has straw parts worked in. Might have to up the details that they are better to see. I also thought of some smearing pattern. I don't think the wild fold would apply the mud in an orderly fashion. I have an idea how to make that.
To have some "decay" I think I will add some "holes" where the mud is falling of and showing the inner wattle/wickerwork.
The corners will be larger trees wood and the window and door structure smaller branches. In my first test render I made the corners too big and the inner structure wood too small so I have to go again today :-) But I like this design very much. It looks more wild and crazy!
|
|
|
|
Post by lightning on Jun 19, 2017 2:24:45 GMT -9
I thought my block was over but apparently it isn't. Don't ask me why - and maybe this is just a part of creative life that I have missed out until now - but I really have to push myself to continue working on this. And I still love them! Well, maybe it's just that summer has finally arrived and I enjoy going outside jogging and stuff. BUT today I have managed to push myself to work more in this so here is where I stand now :-) The straight wood from last version just look completely out of place with the wild folk so I tried out designs that would look more like a barbarian could have built that way. I am guessing they just gather broken branches they find (or break of a tree them on their own ) and then use that to build the framework. So this is my first draft on entrance and windows. 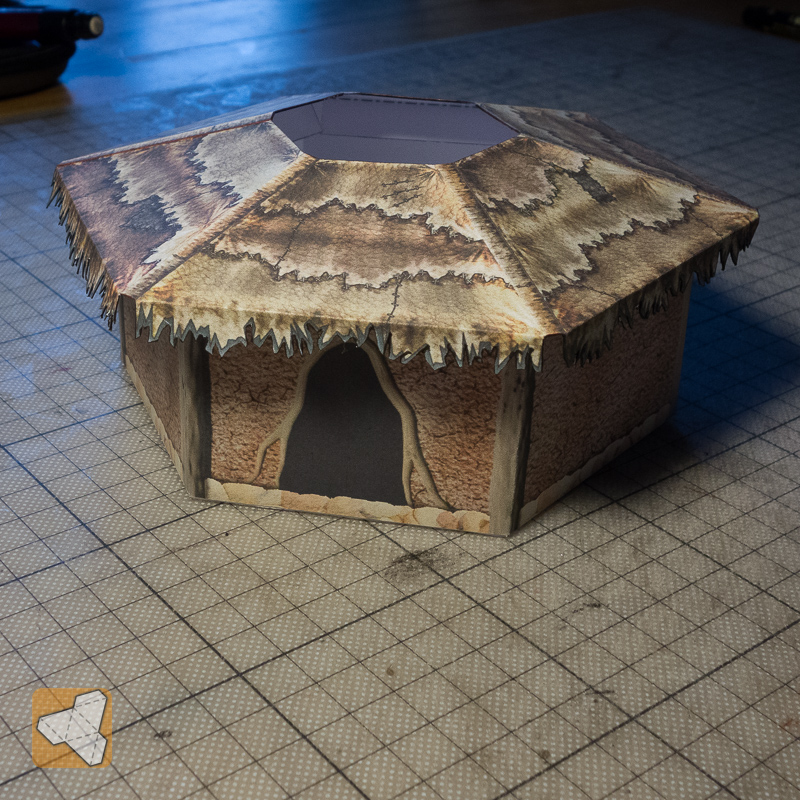 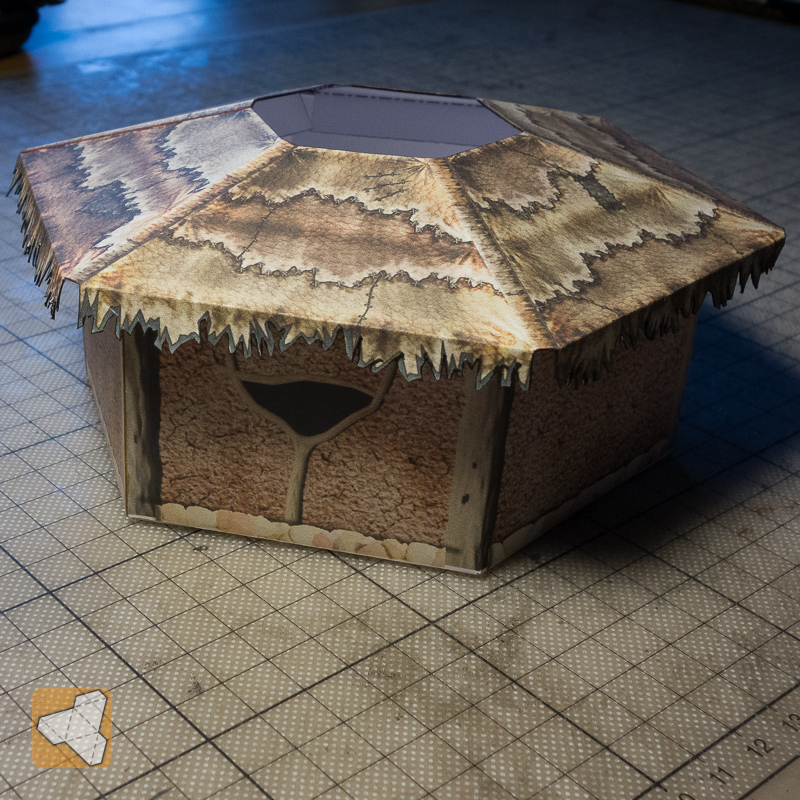  I also worked on the clay wall texture and made the details more readable. More details are still missing, like the ropes that hold the logs together and the foundation rocks are still the same mockup version but I think it is going in the right direction now. Any comments? |
|
|
|
Post by Vermin King on Jun 19, 2017 4:25:10 GMT -9
Definitely the right direction. I think the foundation stones would look better if they had one stone stacked a row higher where you have the wood uprights at the corners and maybe at the base of the window branches. And even fill, the inverted 'V' sections of the entrance with stone. Leave the stone out of the entrance.
I really like the new clay texture
We used to build forts in the woods when I was a kid. Except where we had a live tree as a corner, we would always need extra stone support at the corners and stone on the outside. These look like the corner uprights are placed in holes, so unnecessary, but they might want additional stone at the base. I think you can lose the foundation stones in the door entrance.
|
|
|
|
Post by lightning on Jun 19, 2017 6:47:50 GMT -9
... And even fill, the inverted 'V' sections of the entrance with stone... That's a great idea! OK, so then on to rocks then :-) Hopefully it will not take me weeks for that! |
|


 )
)


 ... or as the Austrian artist Friedensreich Hundertwasser once said: The straight line is godless! Well, what he meant is that there are no straight lines in nature. But the propaganda minister of the orcs hijacked it for his own purposes.
