|
|
Post by Vermin King on Jun 26, 2020 3:39:50 GMT -9
|
|
|
|
Post by Vermin King on Jun 27, 2020 7:18:12 GMT -9
Running a low fever yesterday and today. Had hoped to make a couple mirrored back figures to populate my clean build. And I really wanted a couple tubs. As I don't think I feel like developing tubs ( I think at this point, I want to do my own based off AirDave's inner/outer-tread wheels. Just adjust the height of the tub (width of wheel) and size things to fit in the cargo area. But luckily, this is a fairly easy build, so I think I am going to build as-is today. Oh, I never posted the partially furled sails  Not 100% happy with them, but I think they will look okay |
|
|
|
Post by Vermin King on Jun 27, 2020 16:47:23 GMT -9
Here's a gondolier (with gondola): 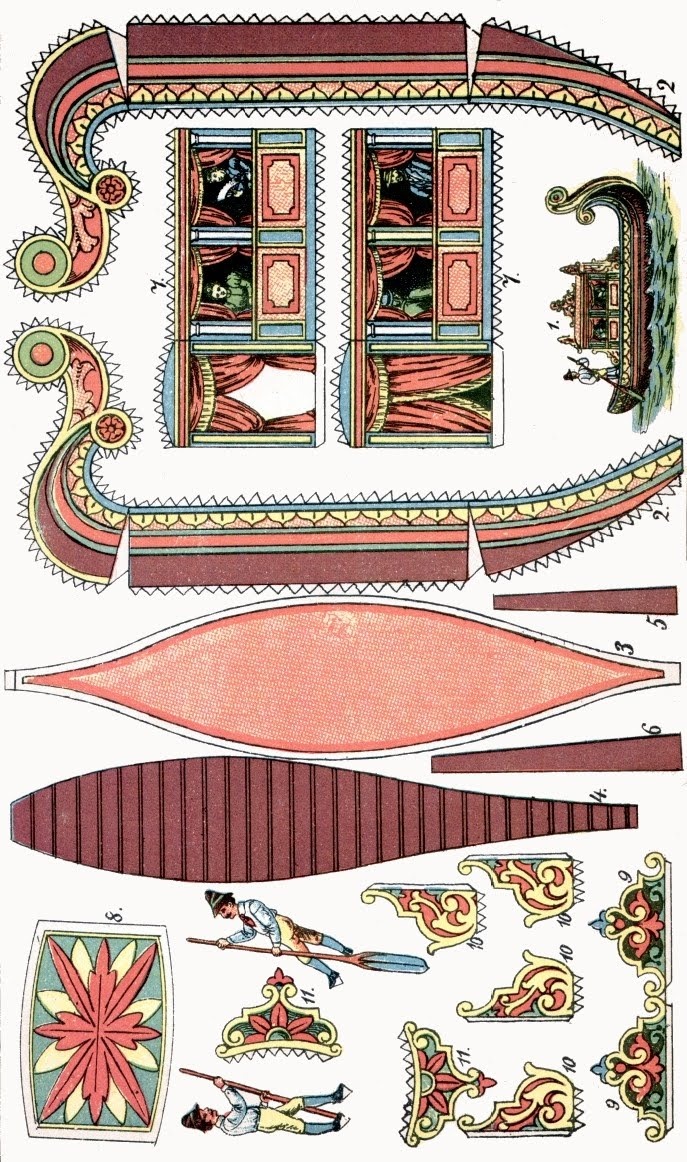 Greetings, Zephalo Joke is on me. I was coming up with boatmen and thought I might as well add the gondolier to the page. The two sides don't come close to matching each other  EDIT -- Fixed  |
|
|
|
Post by Vermin King on Jun 29, 2020 11:24:39 GMT -9
BTW, this project hasn't really stalled, but I am doing it in between stints on the Pirate project.
I have a concern with this that I do not want to have pop up on my Beauty Shot model. On both test builds, over time I think the glue shrinks. The inner and outer sides shift very slightly leaving an extremely thin white line. Barely noticeable in real life, but we all know how photos like to pick those things up. I was curious if this was due to the model's design, or if it is something related to the curved surfaces. Looking at the Narnia Dawn Treader and little pirate ships I did ages ago, I see that it is something that happens. So that it doesn't happen on this build, I not only edge, I am blackening the white side along the cuts about 1/8th of an inch in. That way when the glue shrinks over time, this one won't get the white lines. At least it won't be as bad.
|
|
|
|
Post by Vermin King on Jun 30, 2020 7:40:49 GMT -9
Well, I am ready for glue. As stated above, I did do some additional blackening beyond edging. And I think I will try not to combine steps as much as usual. One part at a time.  So at lunch today, I will glue the keel boards together, then later today glue the deck portions. Once these are fairly dry, I will glue the hull sides together. And then do the outer hull parts one at a time |
|
|
|
Post by Vermin King on Jun 30, 2020 17:58:52 GMT -9
No photo, but the basic boat is built and I'm letting it dry with a couple coffee mugs on the deck so that it will stay fairly flat. I put the rudder on (it just slides over the keelboard) and put the center plank across with a previously built mast and sail and it looks pretty good. But then I realized I needed to let it dry under weights, so I grabbed the mugs. I realized that on the end decks, I need to make the base tab into two, to allow placement of the mast support rings, so I will need to adjust the files
|
|
|
|
Post by Vermin King on Jul 2, 2020 4:15:16 GMT -9
Well, the water in the basement wasn't as bad as I was expecting, and I had the driveway back into shape before it got real hot, so I had some time to get back to this. One thing that needs explanation is best described with a photo. With this much flare of the hull, it will be difficult to get every boat the same. Yes, I know, with parts of the same size, how can this be? Don't ponder it too long. I now have three of these and they are all different widths. This one is the widest. When attaching the end decks, edge glue the pointy end tabs together and glue the tab on the sides of the vertical piece under the tab coming out the side of the deck. Once that is dry, it is a fairly solid piece. Since the amount of bowing is going to vary with build, you need to glue these tabs first, then glue the bottom tabs to the deck. Never mind, the Google Chrome 'Resolving Host' issue took a long time to 'resolve' for loading the forum, but it doesn't seem to want to resolve PostImage. I'll be back to this later, once Google wakes up and works EDIT -- Well, after not even being able to get on with Chrome to try again, I rebooted the computer, only I had to force it because Google wouldn't close. I guess it was trying to do something in the background. But things are working normal now.  Slide the deck piece to where it is square and the bottom of the vertical portion fits inside the hull solidly and glue the tabs in place. Then glue the hexagonal mast base inset by about the same distance from the panel as the hole topside is from that panel. Then put glue on the side tabs and fold forward and let dry in place. Rather than holding it, I used a rubberband on the other end to hold things while I moved on Also note the hole plug on that previously glued end deck. The rope loop. When you have cut out the hex for the mast to go through, glue the cutout to a piece of scrap card. Cut that out and glue again. Repeat. Then glue this under the rope loop. That way when the end masts are down, you have a plug to cover the hole |
|
|
|
Post by Vermin King on Jul 2, 2020 11:29:03 GMT -9
Let's see. Office closed an hour and twenty minutes ago and off tomorrow. My driveway is done and basement dry. I should be able to finish this up tonight.
As mentioned above, I didn't do a great job on cutting out the end deck holes on my second test build, but the rope loop hole plugs cover quite well on it, so it will be my center mast version. I just need to go on a whiteness hunt and fix anything found.
On the beauty build, the mast bases work quite well. I now have my partially furled sails done and mounted on the sail mounts. I need to do another set of masts, and then the workers, which should easily be done tonight.
This will then be a kit where a person can have many different mast combinations with removable masts, both tall masts or the short ones. It will also have full sail and partially furled sails, or you can slide them off and go with no sail, or you can mix and match. I really like the flexibility of it.
|
|
|
|
Post by Vermin King on Jul 3, 2020 6:57:53 GMT -9
|
|
|
|
Post by Vermin King on Jul 3, 2020 7:03:41 GMT -9
|
|
shep
Eternal Member
Red Alert! Shields up! LENS FLARE!!!
Posts: 1,260
|
Post by shep on Jul 3, 2020 14:40:01 GMT -9
Will you put those in a final PDF?
|
|
|
|
Post by Vermin King on Jul 3, 2020 15:10:29 GMT -9
They are already. I will drop this on Dropbox later tonight
|
|
|
|
Post by Vermin King on Jul 3, 2020 17:10:15 GMT -9
|
|
shep
Eternal Member
Red Alert! Shields up! LENS FLARE!!!
Posts: 1,260
|
Post by shep on Jul 3, 2020 21:13:31 GMT -9
Awesome! Now, I only need the time to print and build it... |
|
|
|
Post by vizenz on Jul 4, 2020 0:49:16 GMT -9
Great boats! Well done. At the moment I'm unfortunately have too much projects started (and planned) to get into a new paper adventure.
|
|
|
|
Post by Vermin King on Aug 18, 2020 6:02:53 GMT -9
Well, these will be my Kitbash for Papercuts. I need to add a link on the file directing to this thread for development and build questions. I am thinking I might collate the build into one post. Maybe over the next couple days I can get it done
|
|
|
|
Post by Vermin King on Aug 25, 2020 11:34:16 GMT -9
Well, it has been more than a couple days, but I worked a bit on Instructions! Me? Instructions? I also noticed that some of the parts placement on the pages should be different, just to flow better, and adjusted that. Needless to say, I have always referred people to my build threads, so the instructions will probably not be 'professional', but they should be better than fair. Unfortunately, some of the build pics are from the test versions. I should have taken the same photos while I was doing the final build EDIT -- I am also including some build notes to avoid issues. I've now done several boats, and not all were my designs, but I am seeing common issues from them all that I want to address in the instructions. If someone wants to build this to remember shep, I want them to have a great boat on the back end |
|
|
|
Post by monstersbtm on Sept 26, 2020 3:29:05 GMT -9
Thanks vermin king! I'm going to try to build one as soon as I can. Great way to remember shep, he would have loved it for sure! Your bragosso will surely be a great addition to any Venetian themed board 👍👍👍
|
|
|
|
Post by Vermin King on Sept 26, 2020 4:04:30 GMT -9
When you build it, make sure to darken the main boat pieces on the blank side about 10 mm from the edge and do the edges. As I mentioned in the thread, as the glue dries there will be some shifting of the parts. I see it on all of my boat builds, so it is just something that happens when two curved surfaces are glued back to back
|
|
|
|
Post by gothique on Jul 25, 2021 5:24:17 GMT -9
I would like to have one of these on my table. Two questions: How big is the finished model? Would 220gsm card or 60gsm paper be better for the sails?
|
|
|
|
Post by Vermin King on Jul 25, 2021 15:25:28 GMT -9
I used 199 gsm for the boat and 176 gsm on the sails ( 110 lb and 67 lb). It is 11 inches long from the keelboard at the bow to the back of the rudder
|
|
|
|
Post by gothique on Jul 26, 2021 3:51:55 GMT -9
Certainly not something that could maneuver into the lesser canals. I may need a smaller boat too ferry cargo to the crane house.
|
|
|
|
Post by Vermin King on Jul 26, 2021 4:37:08 GMT -9
I was going to do a sandolo for monstersbtm once, but between printer issues and time, I never finished it. Basically a slightly larger gondola without the pretty-ness. The top deck is different and the textures on the inner hull and floor are different.   Quite a few of them in the last image |
|
|
|
Post by gothique on Jul 26, 2021 9:00:33 GMT -9
I looked up some other images. It looks practical as a kit-bash, but may be beyond my meager talents.
|
|
|
|
Post by Vermin King on Jul 26, 2021 9:36:07 GMT -9
You could probably do it, but since I already have the research under my belt, I probably just need to find the time to plug away at it.
One of the main differences (besides no unnecessary adornments) is that the inner wales have the ribs exposed and there is a plain wooden floor running the length. The openings in the top deck are placed differently, too.
Yeah, I will try to get back to this tonight
|
|
|
|
Post by gothique on Jul 26, 2021 9:49:33 GMT -9
As with the Altane; it would be a beautiful addition to my little slice of Venice but I do not want to pressure you to create it.
|
|
|
|
Post by Vermin King on Jul 26, 2021 10:37:48 GMT -9
I've really got a bug to get something done in this media, but carving out time and being able to get in the right frame of mind with all the real life stuff going on has been hard. And then it is unlikely that I will be able to print it without having to do nine prints to get one use-able print.
But I will try, and it will probably be a good way to step away from all the hectic nonsense
EDIT -- On the Altana, I keep clearing up one geometry issue and creating a new one. I think the Sandolo would be a cleaner path to the finish line
|
|
|
|
Post by Vermin King on Jul 26, 2021 17:40:15 GMT -9
And still working. 372 leads that have to be called by Friday at 3PM, in a specialty Excel format that I could not open. Exhausted. No Gimp work tonight. Sorry
|
|
|
|
Post by gothique on Jul 27, 2021 3:31:47 GMT -9
And still working. 372 leads that have to be called by Friday at 3PM, in a specialty Excel format that I could not open. Exhausted. No Gimp work tonight. Sorry The real world comes first. |
|
|
|
Post by monstersbtm on Jul 30, 2021 19:00:00 GMT -9
Vk, gran calma e duri i banchi! This situation has eventually to come to an end. Probably these days aren't the best for the hobby but it won't always beike this. You are doing an incredible job with all of your Venetian themed creations.
|
|


