|
|
Post by cowboycentaur on Dec 22, 2018 12:41:14 GMT -9
Saw a request fir a visual interpretation of the waterdeep double decker dray carriages and found these with a quick google search. Theyd make a cool model, Another one for me to add to the pile of potential projects ill probably never get to   |
|
|
|
Post by cowboycentaur on Dec 22, 2018 12:56:49 GMT -9
Dang, phone browser wont let me add photos
|
|
|
|
Post by squirmydad on Dec 22, 2018 18:37:14 GMT -9
I love the look of those.  |
|
|
|
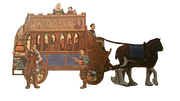
Post by cowboycentaur on Dec 22, 2018 19:58:20 GMT -9
This is the one specified in the dragon heist module. Looks like it could be a fairly simlle kitbash of a few wagons. Mostly verminkings probably.  |
|
|
|
Post by Vermin King on Dec 22, 2018 20:28:27 GMT -9
How much would you want it to look like the last photo?
The two photos above have rows of seats, where it appears in the last photo, there are benches along the windows on the bottom and benches running down the middle on the top layer. I have yet to build Matt Bergstrom's hearse, but the way he manages the chassis would simplify things a lot. The steps will be tricky, but there are a number of double decker buses out there and I think I remember a couple that actually had stairs. If there were an enclosed area under them with a sort of bannister rail above, it might not be too hard to do simulated steps. You know me and steps ...
I can picture a model T-based bus from a defunct site, but I can't remember the name of it right now. The Kallboys Routemaster has illusory stairs, and does the Paper Diorama buses. I even thought one of the old Czech models had it, but evidently not. Maybe I can find it tomorrow. The stairs is the hardest part.
|
|
|
|
Post by cowboycentaur on Dec 22, 2018 21:21:14 GMT -9
How much would you want it to look like the last photo? Im not that married to the design, i just saw the request for one, and what i saw on google kind of intrigued me. Would make for some fun gameplay shenanigans i think. |
|
|
|
Post by Vermin King on Dec 23, 2018 4:58:08 GMT -9
I thought maybe a fresh look at the old Shell Barre Omnibus might have it, since it shows in the construction diagram, but it only has a railing.  This is the only two-page Shell model, but in the construction diagram in the upper right, red shows the parts that are on this page, and it looks like it should have steps, but I don't see them. The YMJR bus doesn't have steps either. I'm going to check out some of the other models later today. |
|
|
|
Post by Vermin King on Dec 23, 2018 15:43:15 GMT -9
It's odd what strikes my interest. The most interesting part probably wasn't the actual vehicle, which is unusual, but that I would think that I have seen an old double decker bus with steps. Went through the hard drive looking for likely folders where it might be. Did find some models I had forgotten about. Then internet searches. Found a couple that I thought might have steps, but when you get to the folder, no steps. One that is on a defunct pirate site might have steps, but the site is gone. Can't say that it bothers me that much. So hunted through other pirate sites. No luck, but that doesn't mean there isn't one.
|
|
|
|
Post by cowboyleland on Dec 23, 2018 16:00:38 GMT -9
The striped rectangle in the bottom left of the Shell model is labeled "escalier" which means "stairs." I am not sure how they should curve around with the railing.
Or is the curve an illusion and the build has straight stairs?
|
|
|
|
Post by Vermin King on Dec 23, 2018 18:18:06 GMT -9
I suppose I could narrow the steps on one side. 90 degrees divided by ten steps...
|
|
|
|
Post by lightning on Dec 27, 2018 1:38:44 GMT -9
I want to do a couple of carts, wagons and coaches next year. But I need horses! Paper mini creators, have you heard? ;-)
These double deckers are very interesting. A steampunk version would tickle me to make!
|
|
|
|
Post by cowboycentaur on Dec 27, 2018 7:55:43 GMT -9
I want to do a couple of carts, wagons and coaches next year. But I need horses! Paper mini creators, have you heard? ;-) These double deckers are very interesting. A steampunk version would tickle me to make! Finishing the Horses (and equine varients), as well as elk and boar rideable mounts are a goal of mine for next year. |
|
|
|
Post by Vermin King on Jan 1, 2019 16:40:50 GMT -9
|
|
|
|
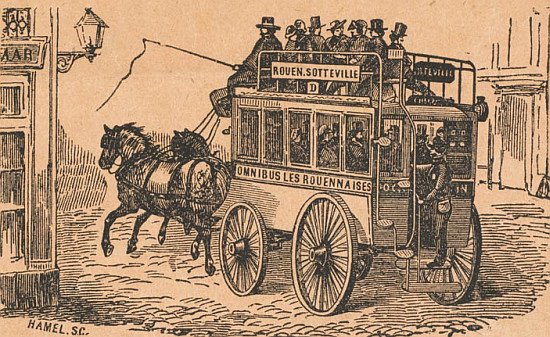
Post by Vermin King on Jan 4, 2019 7:07:34 GMT -9
 This is a side view, so I think they were assuming the driver's position is even with the sides of the cabin, which makes no sense (the front wheels have no room to turn). If this were inset (narrower than the cabin) like in the first photo of this thread, this can make sense. That's how I intend to proceed. I need to make some assumptions for dimensions. If I make the bottom of the omnibus the floor of the cabin (which is not how it is shown in the illustration because the folks in there are shown waste up in the windows), I think making the interior roughly six feet tall is the way to go. Then extrapolate the length by enlargement. Then make up a width that would allow bench seats along the windows where knees won't touch and minimal room for new passengers to squeeze through. I don't understand the trim piece that goes up diagonally from the front axle to the front of the roof. I think I will just make it a trim piece for the driver's box |
|
|
|
Post by Vermin King on Jan 4, 2019 19:28:13 GMT -9
Started work on the side piece  Using circle select, I don't think the rear wheel is actually a circle, so I think I will substitute other wheels, but keep the hubs. The spokes are hard to differentiate anyway |
|
|
|
Post by cowboycentaur on Jan 4, 2019 19:59:34 GMT -9
This is a side view, so I think they were assuming the driver's position is even with the sides of the cabin, which makes no sense (the front wheels have no room to turn). If this were inset (narrower than the cabin) like in the first photo of this thread, this can make sense. That's how I intend to proceed. I need to make some assumptions for dimensions. If I make the bottom of the omnibus the floor of the cabin (which is not how it is shown in the illustration because the folks in there are shown waste up in the windows), I think making the interior roughly six feet tall is the way to go. Then extrapolate the length by enlargement. Then make up a width that would allow bench seats along the windows where knees won't touch and minimal room for new passengers to squeeze through. I don't understand the trim piece that goes up diagonally from the front axle to the front of the roof. I think I will just make it a trim piece for the driver's box Its a fairly safe assumption, i think, that WOTC artists arent that concerned with accuracy of their horse drawn vehicles. Either that or theyll just say its magic. |
|
|
|
Post by lightning on Jan 10, 2019 0:05:22 GMT -9
Great pics! Have to save them all to my research folder!!!
|
|
|
|
Post by Vermin King on Jan 11, 2019 8:28:43 GMT -9
Well, we have winter weather moving in, so I have cancelled my travel plans. I hope to be able to work on this over the next couple days
I could have had a basic coach by now (even with my limited time), that could have had a ladder going up the back. Only I have been working on the stairs, instead of making it the last part holding things up. In the image, the stairs are open, but I'm going to have a sort of wainscot and rail in order to have something to glue the steps to.
That driver's box was a bit more complicated than I imagined it, so I want to approach it with fresh eyes and see if there is a better way to do it.
I also created a monster on the roof. It needed a bench going down the center which I tried to do as part of the roof. Making it a separate piece makes it a better approach.
We'll have to see how this goes this weekend, but I think I might possibly have a WIP done this weekend. I also want to do a version with a lift off roof and benches along the windows on the interior.
Backing up a little, part of the reason for the stairs work is that I want to see how it works out so that I will know where to put the rear door for the cabin and the opening in the railing for the upper deck.
|
|
|
|
Post by Vermin King on Jan 12, 2019 12:37:31 GMT -9
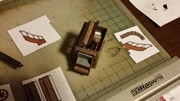
Well, dealing with snow and the morons that don't know how to drive in it has slowed me down today. I was supposed to work at 4PM, but they are closing early, so I don't have to go in, but I didn't know that until 2PM. So one end of my street is blocked by a tree down, but I got the limb that was blocking the other end out of the road, so I could get out. Only it allowed morons to get through and end up in a ditch further down and in my neighbor across the street's yard. Tried to get the one across the street out, to no avail. My Graymalkin's Omnibus file was getting too cluttered, so I renamed it 'Graymalkin's Omnibus Working' and I am starting to collate the pieces on the original file. Let's see how much progress I can make in the next 30 hours ... EDIT-- I knew that fresh eyes would help on the driver box, but I should not have deleted the old one. A lot of the textures would have transferred over. And the geometry of the different faces on the seat would have been the same. Too late now. Also worked on the stairs. I took the Shell-Berre omnibus stair casing and adjusted it to the geometry of the steps from the old BastelbogenOnline site, re-sized and textured to fit in with this model. That stair-casing has me puzzled. Mirror printing on the back would eliminate having to get an inner part to fit. I think I'll take a guess and do a reverse copy of the part with the width 95% of the outer part. Should be close. I still have to do the upper bench and axles, besides the inner part of the driver box, but here's where I am at.  |
|
|
|
Post by Vermin King on Jan 13, 2019 13:22:03 GMT -9
I thought I'd be building this by now, but I've been doing stints shoveling out the driveway, and I am hurting. As I was reviewing my WIP version, I realized that with smaller front wheels than back, I'm going to have to have a box between the floor and the axle, so I thought I might just steal the Vardo sub-chassis, but it is single yoke, not double team. So I'll have to cobble that together later tonight  |
|
|
|
Post by cowboycentaur on Jan 14, 2019 7:02:28 GMT -9
Holy moley this is looking awesome!
|
|
|
|
Post by Vermin King on Jan 14, 2019 7:14:02 GMT -9
Yes, I think as a WIP page it looks great. I think my logic on the stairs (taking the stairs from one model, resizing the steps and casing to fit this model, and taking the casing from the Shell model and getting it to fit the other model's dimensions) should stand, but until I build it, my confidence is only about 85%. About 95% positive that I will have to tweak this file after the WIP build. I didn't get back to the front axle sub-chassis last night, but hope to get this to the point of printing tonight. For taking a somewhat distorted one-side only view, I am very happy with where I am at. I just wish it would have moved faster...
|
|
|
|
Post by Vermin King on Jan 15, 2019 10:17:24 GMT -9
The hitch and fifth wheel arrangement of this has me stumped. On the Tudor coaches, I had a visual. On the Vardoes, I had images. On this I have to guess. It appears that the artist has a couple hounds that join to the shaft and whipple tree, so I want to mimic that somewhat. I really think for a gamer's purpose, I don't need to 'get it right', especially since this is more of a concept drawing, not an engineering blueprint, but I want it to make sense
|
|
|
|
Post by Vermin King on Jan 15, 2019 16:52:06 GMT -9
 Okay, this is from an artillery wagon from the late 1800's, but it has the two wooden hounds attaching to the post. Whipple tree in the same rough position. And it not only looks 'appropriate', but not overly difficult |
|
|
|
Post by Vermin King on Jan 17, 2019 10:43:10 GMT -9
Work sucks today, so I took a break. 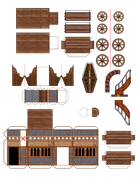 I may do a pole to go into the hole at the front of the hitch ... or just use a skewer And yes, I did two benches for the interior EDIT-- Adjustments  |
|
|
|
Post by Vermin King on Jan 18, 2019 1:30:14 GMT -9
Well, since I'm doing this 'with interior', I need to change the files a bit
|
|
|
|
Post by Vermin King on Jan 18, 2019 9:07:55 GMT -9
Yes, quite a few changes, but it is a bunch of little things. 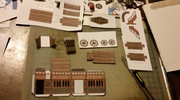 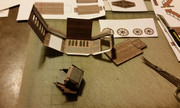 It is important to glue the top and bottom of the driver box insert first. Then glue to one side, then the other |
|
|
|
Post by Vermin King on Jan 18, 2019 19:49:16 GMT -9
I was doing some edging on the cut-outs for doing the interior, and caused a blotch. Kinda fried after a long night, so I decided I would be better off updating my files, being extra careful not to create any new issues. 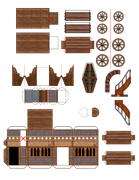 |
|
|
|
Post by Vermin King on Jan 19, 2019 8:37:18 GMT -9
|
|
|
|
Post by cowboyleland on Jan 19, 2019 10:00:03 GMT -9
I think the stairs are going to be the high light.
|
|