|
|
Post by Aestelon on May 19, 2009 6:25:13 GMT -9
My thoughts exactly. I've tried doing double-sided stuff before, but it's impossible to guarantee that everything will line up. You can do broad areas of texture, as I did with my dice tower to print on inside walls, but you need to allow plenty of overlap space for error. Something fine like a mini would be nigh-impossible to match up.
|
|
|
|
Post by Aestelon on May 19, 2009 4:40:24 GMT -9
It's a tricky question, and depends a lot on what sort of camera you have available to you. If your camera has the ability to do so, I'd recommend using your manual settings, and play with the shutter speed and aperture yourself, to see what gets you the best results. Also make sure your White Balance is set to suit the type of light you're using. If you don't have manual settings, then you may want to try coming back a bit out of macro mode, zooming in instead, and using the flash at a distance. You'll want to make sure your camera's nice and steady for that, of course. This shot here's not perfect, but was done at Incandescent setting, with a shutter speed of 60 and an aperture of F2.8. It's unmodified, so it's pretty big. 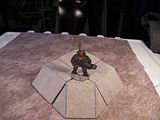 |
|
|
|
Post by Aestelon on May 18, 2009 7:46:01 GMT -9
Thanks for the tips. I don't think I've seen the glue sticks before, but then I haven't looked for them.  I'll have to have a look next time I'm going near Staples. |
|
|
|
Post by Aestelon on May 18, 2009 7:39:46 GMT -9
Thanks. Having a bottom also uses up more ink and card that you don't need to. Even the crossbraces seem to be unnecessary at this size, as they can quite comfortably accommodate even metal figs without. They 'd be useful for larger units and for successive layers, though.
|
|
|
|
Post by Aestelon on May 18, 2009 7:12:10 GMT -9
I do have one question to those of you who use matte photo paper. I'm having a go at using it to make 15mm figs (a 6x4 sheet of photo paper is exactly the right size to accomodate an A4 sheet at half size).
But I'm having trouble with gluing. The photo paper is nowhere near as porous as my normal cardstock, so my PVA just doesn't grip, and I need an alternative adhesive. I've heard mention of Aleene's tacky glue being used, but that's not available over here - does anybody have any more widely-available alternatives?
|
|
|
|
Post by Aestelon on May 18, 2009 4:23:30 GMT -9
Whoooarr... look at the handgrip on that! I wouldn't mind pulling on that trigger... Sorry, couldn't resist. Looking forward to seeing some fig designs, Nate. ;D |
|
|
|
Post by Aestelon on May 17, 2009 7:57:39 GMT -9
Sharp blades are a must, but the 110lb cardstock you're using should be absolutely fine - that's the weight I use, and I have no trouble cutting through it.
For the fine cuts and deep corners, I find the easiest way is to start in the corners and press down through the card with the tip of my scalpel, then draw it back.
For really thin pieces that you risk bending if you pull the blade with any pressure, I use a series of gentle stabs, pressing down through the card, then releasing the pressure, drawing back a couple of millimetres, then stabbing again.
You probably know this already, but a cutting mat is incredibly handy too, and saves you a ton of blades.
|
|
|
|
Post by Aestelon on May 17, 2009 5:22:16 GMT -9
So, something like this, then? 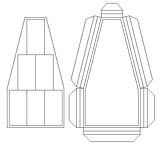 |
|
|
|
Post by Aestelon on May 17, 2009 5:12:37 GMT -9
Excellent summary, Mojo! I was just puzzling how best to do a tutorial, and you've pretty much summed it up in one photo! ;D For myself, I use a scalpel to cut out, with a 10A blade, and do any scoring by running the back of the blade along the line. Aside from that, my system is exactly the same. Also, since I adhere to flat basing, I remove the tabs from the feet. Note that if you do this, it's best to remove the tab early on in the cutting process, as it's very difficult to keep the fig still enough to cut straight if you leave it till the end. |
|
|
|
Post by Aestelon on May 16, 2009 12:20:31 GMT -9
Thanks. These slopes are 45 degrees, so figs won't easily stay on them. But I intend to knock out some 30-ish degree ones as well, so they should hold them just fine.
As for stacking, they sort of do, but not overly well, since the pieces are obviously about the same size, so they'd need a bit of stretching to fit over another piece. Plus the tabs being inside makes it a little harder, too. It works to some extent, though - the slope pieces certainly fit inside each other reasonably well.
To be fair, though, each component can be disassembled and reassembled in a matter of seconds.
|
|
|
|
Post by Aestelon on May 16, 2009 10:05:23 GMT -9
I was about to chuck out an empty cardboard box earlier when I noticed it was one of those glueless jobbies that holds together only with locking tabs, and that got me back to thinking about the folding terrain malarkey. Taking a little cue from the box, I redesigned my original hill pieces, which didn't hold together very well. Now they do. I may extend some of the slot tabs along a bit to improve the strength around the slots, but I think I'm onto something. Here's a shot of a pageful of components, including a 2x2" riser, two slopes and a corner piece. 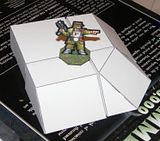 And here are the corner and one of the slopes opened up, to show how they come in net form. They're hollow-bottomed, so they don't take up much space, and also means you can easily get at the tabs to disassemble them. 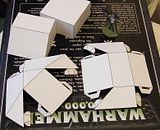 Dead easy to cut out and assemble, and so far they appear to be pretty sturdy. For larger pieces, you could always increase the load-bearing ability simply by adding a cross-brace (two strips of card slotted together in a X-shape) and placing that under the block. I'm going to look at making a few other shapes and see about texturing them. The system should work just as well for buildings too. |
|
|
|
Post by Aestelon on May 16, 2009 5:40:51 GMT -9
Looking good, Mojo! Nice idea, Joe, but I think how good it looks would depend on what troops you're using. I think with more monstrous ones, boosting the size of the ones in charge helps them stand out as those that can bully their way to the top. With the likes of humans and elves, though, it would probably just make them stand out as unnatural freaks. |
|
|
|
Post by Aestelon on May 16, 2009 3:01:43 GMT -9
Try link again, GOR - like I said, it worked fine for me and took me straight to the page with the BM link on it. If it doesn't work, Jabbro's is a good suggestion. Copy and paste the link, and remove everthing after "customer-service/". That'll take you to a menu of customer service options. Click on "Toy & Game Instructions, then select the B list. There's a lot of them, but if you click to show 50 items a page and go to page 5, it's about halfway down. This should be where you end up. |
|
|
|
Post by Aestelon on May 15, 2009 15:44:20 GMT -9
Yep - worked fine for me, too.
|
|
|
|
Post by Aestelon on May 15, 2009 10:16:45 GMT -9
*stage whisper* I'll be honest with you... I have no idea. That's why I was asking Baddie for clarification - this just seemed the most sensible way to do it, so I knocked it out.
If there's a different, rule-specific arrangement, I can tweak it easily once I know what it is.
|
|
|
|
Post by Aestelon on May 15, 2009 9:03:00 GMT -9
Cool beans - I didn't recall anybody mentioning it before, so I thought I'd throw it out there. For illustrative purposes, here's one of Jim's old alien stealth troopers base-edged with the appalling grey paint. I was a bit annoyed when I found out just how poorly it adhered and covered, but it was only 99p - and now it has a purpose! 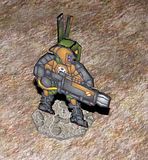 |
|
|
|
Post by Aestelon on May 15, 2009 5:27:16 GMT -9
Something like this? This isn't the full-sized doobrey, mind, just an illustrative screengrab. 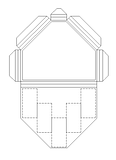 |
|
|
|
Post by Aestelon on May 15, 2009 4:35:25 GMT -9
Actually, I think I've nearly done it, if I've got the idea right. Basically I've made a base with five slots for cavalry bases, arranged in a 'V' formation. Would that be about it? Modding it for infantry will be a doddle, too.
|
|
|
|
Post by Aestelon on May 15, 2009 3:36:10 GMT -9
I've noticed that even with all those of us bucking the system with our rebellious flat basing, all the models I've seen still seem to be edged with the same black ink as used for the rest of the minis. As neat as this looks, I find it a little jarring personally, so I thought I'd offer an alternative solution. Use a little paint. If you paint round your base using a colour more closely matching the main colour, it blends much better with your terrain. It doesn't have to be an exact match, and it doesn't even need to be good paint (I'm using a charcoal grey Anita's acrylic craft paint, which is the cheapest, crappiest acrylic in the world, and useless for all practical applications, to edge my F&T Slag2 bases).It's surprising what a difference it makes. I shall demonstrate when the missus gets home with the camera. |
|
|
|
Post by Aestelon on May 15, 2009 3:25:14 GMT -9
I've just spotted this thread. If you can give me a better idea of what you're after (I think I've got an idea, but I could do with having it clarified), I'm sure I can knock out a template for you in a few minutes.
|
|
|
|
Post by Aestelon on May 15, 2009 3:22:22 GMT -9
Just having a read back through old threads, and realised a quicker alternative to the normal bucket fill that still saves ink, and I'm surprised I didn't mention it. Import the texture into your favourite image editing program on a separate Multiply layer, which allows the black lines of the bases to show through.
Select the layer with the base linework on, and use the Magic Wand to select the background, outside the bases. Re-select the layer with your texture on, and hit the Delete key. Most of the texture will disappear, leaving just that inside the bases.
|
|
|
|
Post by Aestelon on May 14, 2009 15:23:01 GMT -9
Were money not an object, I'd love to, but right now that's really not an option.
Actually, I just looked up the costs for a laserjet, and the cheapest printer I could find was £100, and even the third-party inks were close to £50 per colour! Definitely a long way down the road...
|
|
|
|
Post by Aestelon on May 14, 2009 10:43:19 GMT -9
I tried a different 'varnish' - Klear acrylic floor polish - and had the same problem as with the DuraClear; the water content caused the ink to bleed a little as the brush moved over it - it didn't bleed much, but enough for it to bother me.
I'm thinking of trying something no-one's mentioned - good old-fashioned hairspray. It's served many people well as a fixative for pencil, pastel and charcoal drawings, and I'm wondering if it might do a similar job in preventing ink run. I'm just going to see if I can pick up a cheap can from the corner shop and give it a try; if it does works and allows me to use the Duraclear without ink run, then I'll have a winner.
<EDIT> Nope, that's a bust. I still get the dark ink streaking into the light when I brush on the varnish. It's a pity, though, because I like the slight sheen and enhanced colours that the varnish gives the streaky mini. Do those using spray varnish find they get that? If so, I may have to invest in one.
|
|
|
|
Tiling
May 13, 2009 16:45:17 GMT -9
Post by Aestelon on May 13, 2009 16:45:17 GMT -9
Looking very cool now. I think the only other thing you could do with is trying to set up the edges so they can form as seamless a transition between tiles as possible.
|
|
|
|
Post by Aestelon on May 13, 2009 9:42:57 GMT -9
Yeah, as far as I can tell, the upshot's pretty much the same, except you can't seem to give an outline to an object clipped in this manner; you have to create a separate object to serve as the outline, as Dave has here. If you do the 'Object to Pattern' and fill, then you can keep the outline properties, just as if you'd filled it with a solid colour or a gradient. The other advantage to OtP is that once you've created the pattern, it's there in the library so you can apply it to whatever different objects you like in future. As you say, though, Jose, this way's probably a little quicker if you only need to use the pattern once, and it allows you to pick a specific area of texture if you want to, so I guess you don't pays yer money, but you takes yer choice.  |
|
|
|
Post by Aestelon on May 13, 2009 2:39:59 GMT -9
Thanks for that, Jim. They'll serve well as posing inspiration even for those of us not designing in vector.
|
|
|
|
Post by Aestelon on May 12, 2009 19:36:35 GMT -9
Try again; I downloaded it and it opens fine.
|
|
|
|
Mage
May 12, 2009 19:35:33 GMT -9
Post by Aestelon on May 12, 2009 19:35:33 GMT -9
Yay! ;D
|
|
|
|
Post by Aestelon on May 12, 2009 19:34:12 GMT -9
I've not explored it properly, but I've just had a bit of a play and a look at the manual. If you look on the menu under Object>Pattern>Objects to Pattern, you can convert a selected object (including an imported bitmap) into a pattern. You should then be able to use it as the Fill for any other object.
|
|
|
|
Mage
May 12, 2009 17:19:45 GMT -9
Post by Aestelon on May 12, 2009 17:19:45 GMT -9
Brilliant. I'd love to know how it turns out for you. Meanwhile, Beau, give this one a crack. I've pulled down the brightness a fair bit, and upped the contrast. I didn't really want to bring the cloak right down to black, though.  |
|


 I'll have to have a look next time I'm going near Staples.


