|
|
Post by Vermin King on Mar 31, 2020 14:50:48 GMT -9
|
|
|
|
Post by alloydog on Mar 31, 2020 19:36:48 GMT -9
That looks really good! I like it. Not sure of the current size, but it looks like it would suit us 15 mm guys! I was going to reply "Actually, it would make a good skirmish location - with all the arches and so on, you could easily have a five or six figures a side, shooting crossbows, pistols, what-ever at each other. Then I read down a bit: So, I think you answered your own question! I think it could be made modular, for easier storage. It has four sets of archways, so they could be broken into two or even three pieces. The main brigde roadway could also be broken up. The main challenge, in my mind anyway, would be how to fix the pieces together, so it doesn't move or come apart during play. Why? It's not like you've anywhere else to be! Useless you're not under lock-down like most of us...  |
|
|
|
Post by squirmydad on Apr 1, 2020 8:26:55 GMT -9
The main challenge, in my mind anyway, would be how to fix the pieces together, so it doesn't move or come apart during play. Bobby pins work nicely, or a slot and tab junction system. |
|
|
|
Post by Vermin King on Apr 1, 2020 16:22:23 GMT -9
You know you guys set me back a bit on this. I originally saw this as having each side divided into three sections that glue together. The railings at the top of the sides would be simple fold-overs. The inside portions would have tabs for the bridge floor to sit on. The shops on either side of the central walkway would attach to the central arch for that side, and just sit on (or be glued to the bridge deck. If I can design this with a 'former' type arrangement going down the center of the bridge, they should be able to sit on the deck and still be fairly solid ( maybe have them slot into the decking ).
The length of the arch makes it very difficult to think of as modular, but if you were to use bobby pins to connect the shops to the arches, they could be modular. If the tabs the deck sits on had slots for the decking to slot into, the main bridge could be fold-flat, I think. If the formers slot together and not glued, they could come apart for storage.
But the steps going down to the quay-wharf areas and the steps going down from the ends to the main street will require a lot of thought. I suppose those steps could be modular, though.
Hmmm
|
|
shep
Eternal Member
Red Alert! Shields up! LENS FLARE!!!
Posts: 1,260
|
Post by shep on Apr 1, 2020 22:50:51 GMT -9
If you can make this bridge fit into a shoebox for storage, it would be perfect...   |
|
|
|
Post by Vermin King on Apr 2, 2020 3:46:45 GMT -9
For 15mm, if you have big feet, maybe
|
|
shep
Eternal Member
Red Alert! Shields up! LENS FLARE!!!
Posts: 1,260
|
Post by shep on Apr 2, 2020 8:52:03 GMT -9
For 15mm, if you have big feet, maybe Size 45 (should be a US 11)... but nope, Carnevale sports 30 mm minis |
|
|
|
Post by Vermin King on Apr 2, 2020 13:20:21 GMT -9
I think that stepping back to the enlarged postcard model (that I know is buildable) can help to illustrate some of the things I'm having to work out. 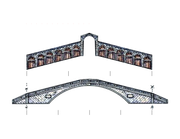 The dots and dashes represent markers for the main structure of the bridge being 24 inches long. The dots at the top would represent 1 inch increments. The middle dashes would be eight inch increments. The dashes at the bottom would be six inch marks. If the shops were horizontal, each section would be 11.9 inches long. Oops. The break off points don't make a lot of sense. Adding a photo of an existing model might help.  If the 24 inch idea goes from the edges of the end walkways, that still only reduces the shops length to 11.5 inches. I am leaning towards making the actual bridge section 18 inches by 8 inches now The shop rows are the limiting factor. Even reducing it like this, the bridge deck should be a good playable surface. Exterior walkways would be an inch wide, so the shops would be 2 inches deep, leaving a 2-inch walkway down the middle. Shop and central arch heights will have to be increased. Just scaling up, the tall side of the shop would be 2 inches tall, but the higher side would only be 1 1/8 inch. Increasing the shops height by half an inch would make the shops look more appropriate with figures nearby, without thoroughly looking too tall. Now for the bright side. The 15mm version wouldn't be limited by page size, so it could be proportionally larger to figures than the 28mm/30mm version |
|
shep
Eternal Member
Red Alert! Shields up! LENS FLARE!!!
Posts: 1,260
|
Post by shep on Apr 2, 2020 20:21:47 GMT -9
Sounds great, however, Carnevale operates with 30, 50, and 60 mm bases. So, the outer walkways would have to be 30 mm wide, and the inner one 60 mm, to work with this game...
|
|
|
|
Post by Vermin King on Apr 3, 2020 5:28:42 GMT -9
Needless to say, going from 24 inches to 18 inches was a tough decision for me, but I will have to check things to see how I can turn my 2.54 cm dimensions to 30mm. It should be do-able, but I will have to check.
I do want it to be usable for the Carnevale community, but I want it to be a fair representation of the structure and don't want to have the different ratios too much out of whack.
Not sure how much I am going to get done on this today. Fever was back up last night and I am feeling a tad 'puny' today, though my fever is back down again. And the blasted cough is back
|
|
shep
Eternal Member
Red Alert! Shields up! LENS FLARE!!!
Posts: 1,260
|
Post by shep on Apr 3, 2020 7:34:23 GMT -9
Needless to say, going from 24 inches to 18 inches was a tough decision for me, but I will have to check things to see how I can turn my 2.54 cm dimensions to 30mm. It should be do-able, but I will have to check. I do want it to be usable for the Carnevale community, but I want it to be a fair representation of the structure and don't want to have the different ratios too much out of whack. Not sure how much I am going to get done on this today. Fever was back up last night and I am feeling a tad 'puny' today, though my fever is back down again. And the blasted cough is back Your health comes first! This does not need to be finished any time soon... Also, the plus in width of .46 cm on each side and .92 cm in the middle should not throw off the overall proportions of the entire bridge too much, I think. In total that's just shy of 2 cm. In regard to the length of almost 46 cm, I don't think anyone will notice the extra width... |
|
|
|
Post by Vermin King on Apr 3, 2020 8:49:34 GMT -9
I would still like to keep it as proportional as possible. Expanding the length and width will also increase height which will help disguise my increase on shop height. This could be a very good thing
|
|
|
|
Post by Vermin King on Apr 7, 2020 8:30:52 GMT -9
I've tried a couple different ways to do the rescale, but each time is leading to a dead end. I hope it is from poor focus from being ill and that I can get back to making progress on this again. I'm reasonably sure that working from the postcard model and then adjusting it to fit my textures is the way to go. I know it looks white today, but in the old paintings it is a sort of a light rosy tan. I also saw some decorating stone for sale called 'Rialto' that is close to the shading in the old paintings, so I am going to use this as the guide to my coloring. The only thing that limits the size really is the sections of shops. I would like to keep each shop section as one piece, but not sure that is possible. We'll see
|
|
shep
Eternal Member
Red Alert! Shields up! LENS FLARE!!!
Posts: 1,260
|
Post by shep on Apr 7, 2020 8:38:41 GMT -9
The marble used to decorate the bridge is white, but this special stone has a rosy hue under the right conditions, meaning the correct lighting. Basically, just like the Ca' d'Oro, the white turns rosy at dusk and dawn, when everything else is washed in orange and gold... At least that's the explanation I found in some books about Venice.
|
|
|
|
Post by Vermin King on Apr 7, 2020 8:54:23 GMT -9
I was going to shoot for something of this hue but lighter  |
|
|
|
Post by Vermin King on Apr 7, 2020 18:58:27 GMT -9
I was hoping to keep the part count down somewhat by doing things similar to the postcard model. I had already planned on doing the shops separate from the arches, which allows me to get a line of shops on one page (sorry, not cutter-friendly), but not quite big enough. So each of the four shop groups will have to have separate end pieces. Each of the arches will have to be three/four parts.
Dangit! Just remembered that A4 is narrower than letter. What I came up with tonight won't work for most of the world. On the other hand, if I do them as a round tube with a rounded top, I should be able to break it up so that top and one side are together, other side and bottom together. If I format these parts diagonally on separate pages, I might be able to get the needed length.
In my original thoughts on this, I thought the sides of the bridge and the structural formers would be the limiting factor for what can be done. Boy, was I ever wrong
|
|
shep
Eternal Member
Red Alert! Shields up! LENS FLARE!!!
Posts: 1,260
|
Post by shep on Apr 7, 2020 19:35:58 GMT -9
I was going to shoot for something of this hue but lighter Looks like typical morning light... If you pale it by several degrees, this should be just the right hue...  |
|
|
|
Post by Vermin King on Apr 8, 2020 9:01:00 GMT -9
By breaking the shop section up, I can enlarge the basic plan to 320% and fit on both letter and A4. Shops will be 9 1/4 inches long. Shop doors will be 1.1 inches on short side, 1.3 on the tall side, but I will be able to make them 1/2 an inch taller without it throwing proportions off worse, if I design smaller. And the exterior walkways will be over 30mm. I didn't get the central walkway width, but I think it should be about 65mm.
Been a while, but I think I am finally making progress
EDIT --
To enlarge to that point, I figured on having one side attached to the roof and the other attached to a base, but doing it that way, I don't have room to add the ends to the page. I am going to try side/floor/side and the roof separate. If it works, the roof page should accommodate the ends on the same page. I am hoping that I can work the arches in, but it would probably be better to have the arches as separate pages. We'll see
EDIT #2 --
Though I am using the postcard model enlargement to ballpark the sizes, once I get the rough sizes, then I will make up the parts true. The original model was not completely square, but being so small, the variances resolve in the fold lines for the most part. Enlarging to letter size, then enlarging 140% to become a three-page model, made that more difficult. Enlarging another 300% means it needs a complete redraw. I mentioned elsewhere that my photos are close, but do not quite match the slope of the steps on either end of the bridge. Even so, with the month 1/4 over, I am just going to use the original model's slope and make my textures fit.
Going back to the textures, I intend to mostly use textures from old paintings as my guide, and sketches. A lot of the lines on the postcard model are similar to how the bridge looks recently, not in the paintings, so I will adjust. I might even use numbered parts for the layout instead of my original thought of N, S, E, W, NW, NE, SE and SW. Numbers make more sense, especially since the bridge doesn't go east-west
|
|
|
|
Post by Vermin King on Apr 8, 2020 16:32:36 GMT -9
I actually am a little shocked that my build of that enlargement was buildable, now. I got the correct angle for the sides of the shops from the angle on the bridge sides. I laid out the correct angles on one side to get clean geometry (in red so I could easily remove the textures), then I flipped it to get the other side. Only look how far off the side at the top left is from the other side. I wish I hadn't already removed the textures on the first side 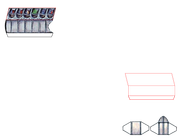 How the heck did I build it? As I examine it, I can see the wonky roof and some skewed walls. They don't show so badly on a micro build, unless you look for them. I really felt like I needed to get clean geometry before enlarging, and I think I was correct. Now I think I am going to have to do a white build before enlarging, too. It's not going to just be cleaning up the lines on it. I need to get it symmetric and correct before proceeding |
|
|
|
Post by Vermin King on Apr 9, 2020 6:11:10 GMT -9
Canaletto, an artist from the period covered in Carnevale, had a painting that I can no longer find that is similar to this one by Mariesch. 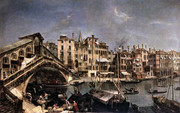 When I originally saw the painting, it was similar to this one, so I didn't save it, but his was at a higher elevation, which would have been handy for developing my roof texture and some of the side detailing. If I get to the battlemap stage on this, this painting will be a wealth of info for the quay/wharf. During the 1800s, that area on the far bank was used as a fish market  |
|
|
|
Post by Vermin King on Apr 9, 2020 8:49:48 GMT -9
Worked on the roof over lunch. Not sure if I am happy with the end, but I'll decide that after the test build 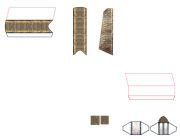 It ended up with a coppery look that probably isn't correct, but I like it and it probably isn't 'wrong', just not as right as it could be, but I think it should look good. Before I apply the side textures, I need to add to the height. I might just finish up my end pieces as far as geometry, then enlarge before applying the wall textures. That is probably the best way to do it |
|
|
|
Post by Vermin King on Apr 9, 2020 15:58:40 GMT -9
Eh, not as much progress as I'd hoped, but I added some height to the walls and the wall heights are equal. Width of the pieces is all verified.  I don't think the extra height will keep me from getting the 320% enlargement I need, but we'll see. Not sure if the ends will fit on the pages along with the enlarged walls, but if the ends have to be grouped on a separate page, that should still work. Once I get these parts laid out, I am going to design the arches before texturing any of it. And I will probably even start on the bridge sides and deck parts before texturing. Gimp will not allow me to have a page large enough to lay the parts out at full size and then part it out to put on Letter-sized pages, so I am going to space letters along the length of the long parts. That way I can keep track of where I am as I enlarge them. Once I get the long parts enlarged onto separate pages, I can then figure the best way to divide them without having join lines that are too obvious. EDIT -- This view would make it look a bit more comprehensible  I do believe this is going to have more pages than even the Ashbrooke-Stein Dodecagon House. I just hope it is nearly as good as I see it in my head I am still having issues figuring out how the ends of the bridge should be done. The buildings on three corners of the bridge were built after the bridge, so they have non-standard geometry. It would be a shame to have the bridge and no buildings to go around it EDIT #2 --  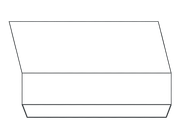  The NE and SW Shops will be mirrors. Thus far, I'm up to ten pages, and I don't even have the arches yet |
|
shep
Eternal Member
Red Alert! Shields up! LENS FLARE!!!
Posts: 1,260
|
Post by shep on Apr 9, 2020 22:24:26 GMT -9
I am still having issues figuring out how the ends of the bridge should be done. The buildings on three corners of the bridge were built after the bridge, so they have non-standard geometry. It would be a shame to have the bridge and no buildings to go around it. Once you've done the ramps on each end, just post the angles the connecting streets and the Grand Canal would have to them, and I'll try to take care of the rest. The houses will most probably not look like the real buildings connecting to the bridge, but they will fit in place... Also, don't worry about the page count. It's a huge bridge, so it will be a huge file... |
|
|
|
Post by Vermin King on Apr 10, 2020 5:17:13 GMT -9
Well, that bugged me that I couldn't find that Canaletto painting, so I was reading up more on him last night. They have quite a few of his paintings in the Royal Collection and in the Royal Private Collection, but no Rialto Bridge paintings. The Royals probably consider the Rialto as beneath them, merely a tourist destination. Never found the painting I was looking for, but I am starting to wonder if using him as my reference is a good thing. Correct period, but he often did capricci, 'what-if's'. That explains some of the differences I saw in windows, for instance. But I still have to consider his work as fitting the period.
|
|
|
|
Post by Vermin King on Apr 11, 2020 4:42:30 GMT -9
Had back issues yesterday which totally distracted me from this sinusitis/bronchitis issue. Couldn't really concentrate much, so no progress. Well, little progress. In re-examining my bridge textures and the Canaletto paintings, I realized he used what has been described as 'pre-impressionism'. More blobbiness on things in the distance or in shadow. One of the things I knew I didn't want to do was ignore the bas-reliefs on the bridge. On the postcard model, they used a very simplified Gabriel in all four primary locations. The four, well, five, primary bas-reliefs are easy, but I wanted to grab the others and found them last night. On the Annunciation side, there is a dove/the Holy Spirit on the bridge arch keystone. On the Saint Marc/Saint Teodoro side, there is a lion head. On the arch between the shops, the keystone has the head of a bearded man. Not sure who that is supposed to represent, but it needs to be there.
To be fair to the postcard model, at the original length of 2 1/2 inches, details wouldn't be visible, but at nearly two feet, they will be. I played with turning the bas-reliefs into gray-scale illustrations that I can lay over the versions from the paintings. I need to add a brown tint to these before overlaying, though. After overlaying, I would then adjust opacity so you can see them, but not look like something pasted on. Gray made a good proof of concept, but did not have an acceptable result.
And my blasted fever is back, as is the cough, sneezing, achiness. Razzum frazzum riggem biggem rum rip
EDIT --
I have also done some work on the balustrades. The painting balustrades left me feeling that they needed to be enhanced, so I'm using the overlay and adjust opacity method on them as well
Maybe I can get some more done on the geometry today
|
|
|
|
Post by Vermin King on Apr 11, 2020 17:04:34 GMT -9
And fever is as high as it has been during this. Only urgent care closed an hour ago. I did learn a little about materials reading about the restoration a few years back. The 6000 tree trunks driven into the ground for a base on each end were Adler. The roofs are actually lead, not copper. The white stone is not marble, but Pietre d'Itria. If this was exposed to heat and pressure it could become marble, but it hasn't, so it isn't. Itria stone comes from what is now Croatia and is highly suited for its use throughout Venice. It is dense, resistent to erosion, bracken and salt, and as it ages, it turns from beige to a gray that is almost white. It is also fairly reflective making it shine in the sunlight, moonlight and torchlight. This stone was placed over a brick superstructure. Now, the steps have been referred to as sandstone. If so, it is a dense sandstone, like Itrium Stone, but it isn't like any sandstone around here. I'm still going to do some more research. I think that these articles should help, since I don't feel like doing much of anything else. www.sciencedirect.com/science/article/abs/pii/S1296207418303868www.theartnewspaper.com/news/exemplary-rialto-bridge-restoration-project-finishes-on-timeweb.wpi.edu/Pubs/E-project/Available/E-project-121611-063819/unrestricted/Final_Report_B11_Maint_2.6.pdfI was trying to determine whether to make the central arches taller proportionally or simply adding height. I think it has to be proportional. I am trying to decide whether I should mess with the bridge deck. The postcard model has the arches too narrow. Making them taller will only enhance how narrow they look. Not something I am deciding tonight |
|
|
|
Post by Vermin King on Apr 12, 2020 9:59:24 GMT -9
As is often the case during reconstructions and restorations, more damage is done than the previous damage that was being fixed. Such as work done in Egypt, the Acropolis, Pompeii and of course Venice. I wish the wiki set up in that last link was still available, even if only on Wayback Machine. Some of the info, taken down in December, 2012, would have been interesting. Not just on buildings, paving, etc., but I saw references to not going too overboard in thinking new is better.
My gut told me that the pavers weren't sandstone or marble, but now I have found out the material used on the streets, piazzas and bridges is a material called trachyte, an extremely fine-grained volcanic rock quarried in Colli Euganei, the Euganean Hills. Still is today. Unlike the Itrian Stone, you can actually see the Euganean Hills from the northern edge of Venice. Lord Byron praised the wines from this region, of course he always struck me as one who would praise anything that the listener was ever likely to get a chance to try, in order to make himself look better. I could be wrong.
Trachyte is normally light in color, but it can be quite dark as seen on the Bridge and the Piazza San Marco. The trachyte pavers are then hammered on the surface to give the smooth appearance, but simultaneously making them more slip resistant. Funny, until I read that I had forgotten that in my brief time there, we had a rain shower, and I cautioned my girlfriend that the stone looked slick, only to realize it wasn't. Now I know why. The masegni are designed to be slip-resistant and the material is salt-resistant. This also explains the edge strips on the steps. Dark trachyte was used for the mass of the steps while lighter trachyte was used for the lighter step edge for safety.
Sometimes those ancient folk knew an awful lot
|
|
|
|
Post by Vermin King on Apr 13, 2020 7:04:57 GMT -9
Well, fever back down today. I was extra careful working yesterday on the arch. Started a new work page for the arch, and that is a good thing. My original pieces developed for the arch were still on my Shops Workpage.
Yes, I messed up part of my work, so at least I can go back to the original.
The problem is from my increase in height. The height to the top of the shop wall is a given. The height to the top of the new shop walls is a given. It's the part of the arch that is above that where the problem is. Compounded by my attempt to make the top of the arch more life-like. On the postcard model, the roof ends with the outer wall of the arch, ignoring the corbeling. I am attempting to make the corbeling a panel that goes from the edge of the roof overhang, slanting back to the wall. Yesterday's attempt at this did not allow enough room for the shop roofs under the corbeling.
Oddly enough, it hit me last night that the easiest way to work this out would be to invert the arch in Gimp, the base being at the top and the roof at the bottom. I'll see if it works tonight.
I had mentioned making a change to the bridge deck, but didn't explain. I think I still might widen the arch footprint which would require geometry changes to the sides of the bridge. As the month is almost half over, I think I am going to have to ignore that proposed change
|
|
|
|
Post by Vermin King on Apr 15, 2020 5:10:18 GMT -9
By breaking the shop section up, I can enlarge the basic plan to 320% and fit on both letter and A4. Shops will be 9 1/4 inches long. Shop doors will be 1.1 inches on short side, 1.3 on the tall side, but I will be able to make them 1/2 an inch taller without it throwing proportions off worse, if I design smaller. And the exterior walkways will be over 30mm. I didn't get the central walkway width, but I think it should be about 65mm. Been a while, but I think I am finally making progress EDIT -- To enlarge to that point, I figured on having one side attached to the roof and the other attached to a base, but doing it that way, I don't have room to add the ends to the page. I am going to try side/floor/side and the roof separate. If it works, the roof page should accommodate the ends on the same page. I am hoping that I can work the arches in, but it would probably be better to have the arches as separate pages. We'll see EDIT #2 -- Though I am using the postcard model enlargement to ballpark the sizes, once I get the rough sizes, then I will make up the parts true. The original model was not completely square, but being so small, the variances resolve in the fold lines for the most part. Enlarging to letter size, then enlarging 140% to become a three-page model, made that more difficult. Enlarging another 300% means it needs a complete redraw. I mentioned elsewhere that my photos are close, but do not quite match the slope of the steps on either end of the bridge. Even so, with the month 1/4 over, I am just going to use the original model's slope and make my textures fit. Going back to the textures, I intend to mostly use textures from old paintings as my guide, and sketches. A lot of the lines on the postcard model are similar to how the bridge looks recently, not in the paintings, so I will adjust. I might even use numbered parts for the layout instead of my original thought of N, S, E, W, NW, NE, SE and SW. Numbers make more sense, especially since the bridge doesn't go east-west I had no notes as far as the enlargement size attached to my files, so I was glad to see I had the 320% listed here. I thought that was what I was shooting for, but wasn't sure. The arch itself has some key points that need to match up, so I am breaking my original idea to get the parts and then apply texture to the parts. The easiest way to do the portico/arch was to use photos, not paintings, so if I am going to get this done, I think I need to go that route for everything. Off-white here we come. I think most folk who only know the structure from recent photos or as seen today would probably be happier with that anyway. I am not going to do a white roof however, but I will desaturate the 'copper' roof to look more like lead. BTW, my current version of the connector arch will be 3.4 inches long. The arch opening will be 2.3 inches. Should be adequate for a based figure to fit into. Use bobby pins or paperclips to attach the arch to the shops |
|
shep
Eternal Member
Red Alert! Shields up! LENS FLARE!!!
Posts: 1,260
|
Post by shep on Apr 15, 2020 6:47:09 GMT -9
2.3 inches schould be almost wide enough for 2 minis...
|
|


