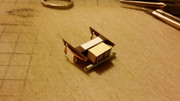
|
|
Post by Vermin King on Feb 2, 2017 8:34:01 GMT -9
Between Curse of Strahd and a modeler friend of mine in Wales, colorful Vardos have become a bit of a priority. I've been picking up a lot of information and images on these colorful wagons, including 3-views. Not quite '3-views', because many of the top and ends are interior, but looking at the layouts has allowed me to extrapolate exterior. I originally thought I could do a body shell to fit over the chassis of the Tudor Coach and change out the hitch to a yoke, but the build is quite a bit different, so I am starting over from scratch. Instead of a chassis, it will have a fore carriage box and a cradle for the rear axle, glued under the cabin. I think that a pot box behind the rear axle and a cratch and cratch cover should be options, as well as a mollicroft option. We'll see. As luck would have it, one of the Reading vardos has front, interior and side views. It appears to be built off the plan that I found for the Readings. I scaled the plan side-view with a cleaned up and straightened view of the actual wagon, and they are very similar. 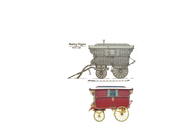 So, my plan is to do a Reading in two colors, a Burton in two colors, and a Ledge in two colors. If I start to lose interest, which I expect, I'll skip the Bow Top. If I do a Bow Top, I might as well do a Pot Cart and Open Lot, because the Bow Top and Pot Cart would use the same carriages as the Reading and Ledge, and the Open Lot would have the same under-carriage as the Burton A lot of famous folk have owned these. John Lennon had one. There are some good images of the one that was part of the Hearst estate, the latter is one I might do, but it is so decorative, I doubt that anything like that would have been Out and About, unless you were the King of All the Gypsies. In reading about Gypsy encampments, when they stopped, there usually were tents. Who knows, by the time this gets wrapped up, you might be able to put together a rather grand caravan. Oh, yeah, I hope to come up with Vanner horses to go with it. |
|
|
|
Post by cowboycentaur on Feb 2, 2017 14:35:18 GMT -9
Gonna have to name you the wagon master here pretty soon, 😉
|
|
|
|
Post by Vermin King on Feb 2, 2017 16:54:19 GMT -9
|
|
|
|
Post by cowboyleland on Feb 2, 2017 20:09:51 GMT -9
I have always found vardos charming. There was a "gypsie" caravan adventure in an old (early 80's) issue of Dragon. They called them "Rovers." I think there might have been paper models involved, but I could be wrong.
Edit: I went googling after I posted this but I had no luck finding the adventure or any of the models I thought I remembered.
|
|
|
|
Post by Vermin King on Feb 3, 2017 13:00:18 GMT -9
The views of the ends of the Reading were very small files that I cleaned up during lunch today. I got the front darkened, but not the back yet. I am not sure it is necessary since I am going to be working mostly from photos. In scaling these up with proportions locked, it does seem rather obvious that they came from the same source. I wish I knew what that source was. It's going to take a little thinking here. The sides and ends slant, yet axles, the pot box and the roof end caps are all vertical. And, of course, the wheels. The roof is going to have a flat area in the middle, so I have to adjust the roof end caps and the tops of the end walls, which should be no big thing. On the Tudor Coaches, I did that to make assembly easier. For the vardos, it will help in designing the optional mollicroft (the raised part that looks like an 1800s Pullman railway car). I'm still deciding what is the best way to simplify the undercarriages. I think I'm going to have boxes with enough texture to represent the springs (as viewed from the ends) and other paraphernalia, with springs that glue onto the boxes. I'm not sure if they can be incorporated into the box and still look right, but the leaf springs are visible on every picture I have found, including a painting by Van Gogh, so I feel like they really ought to be there. I had thought to include them on the wheel parts, but they really don't extend that far out. I'll probably try this three or four ways.  In my mind's eye, when I think of these, I usually think of Readings or Ledges. Bow Tops, while around in the late 1800s didn't really become that common until the early 20th century. Burtons are very plain and simple and I feel they were probably 'starter-homes' until one could afford or inherit something better. One thing to note is how the real vardo's front undercarriage is different than the plan, but if you copy the real one and overlap it with the plan in Gimp or whatever, you can turn the copied layer on and off and see just how similar these are |
|
|
|
Post by Vermin King on Feb 3, 2017 14:00:53 GMT -9
Here's a little bit of an idea of the different styles. The Reading 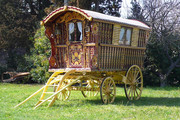 The Ledge 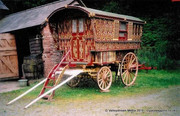 The Burton 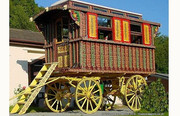 The Bow Top 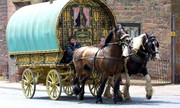 Note the vanner horses in that last photo. Most of the vanner horses in use from the 1700s on are descended from ... Irish Bog Ponies! These little buggers were preferred equines for hauling stuff. After the wars, they would sell them to the locals. They were then bred for specific traits, especially the 'feathers' on the feet Yeah, I'm probably over-researching all this |
|
|
|
Post by Vermin King on Feb 3, 2017 16:14:42 GMT -9
|
|
|
|
Post by radoslawkamil on Feb 4, 2017 5:21:21 GMT -9
|
|
|
|
Post by Vermin King on Feb 5, 2017 17:05:10 GMT -9
It has been on my to-do list for a long time printed at roughly 50% judging by the sizes of the coffins and driver.
I meant to have things ready to start a test build tonight, but had some issues with wheels and trying to decide on matching the plan or the real wagon.
Also was trying to troubleshoot my parents' phones. As it turns out, that was a line problem, so my efforts only proved it was a line problem which the phone company verified. I have an idea to solve the wheel problem, but haven't tried it yet.
Is it possible to get a little more info on the travelers in the Curse of Strahd?
|
|
|
|
Post by radoslawkamil on Feb 5, 2017 17:08:53 GMT -9
Vermin King I feel You lol. I have printed a lot of things and make my own long to do list  But I also get time to rediscover old hoards and find a lot of very good minis designs:) I am happy I find this place  |
|
|
|
Post by Vermin King on Feb 5, 2017 17:26:29 GMT -9
As I have said many times, there are many treasures to be found here
|
|
|
|
Post by radoslawkamil on Feb 5, 2017 17:44:01 GMT -9
Some very hidden in old posts,hoard files,links. Also many,many are broken or lost but still is so many of great work to be found:) I try find Papercuts submision files but most are gone and they not avaliable from onemonk. Only photos are there. I finish cutting Terra Force Space Troopers and run out of spare blades:( Sadly cant find any store and need to buy them from internet. It will take few days brake from cutting.
|
|
|
|
Post by cowboycentaur on Feb 6, 2017 11:08:20 GMT -9
It has been on my to-do list for a long time printed at roughly 50% judging by the sizes of the coffins and driver. I meant to have things ready to start a test build tonight, but had some issues with wheels and trying to decide on matching the plan or the real wagon. Also was trying to troubleshoot my parents' phones. As it turns out, that was a line problem, so my efforts only proved it was a line problem which the phone company verified. I have an idea to solve the wheel problem, but haven't tried it yet. Is it possible to get a little more info on the travelers in the Curse of Strahd? What info exactly are you looking for? They're called Vistani, basically a lot of the gypsy stereotypes from fiction. |
|
|
|
Post by Vermin King on Feb 6, 2017 11:53:31 GMT -9
Thanks for that info. I hope to have something printed off tonight to see what I need to adjust. Still working out the front and back undercarriages
|
|
|
|
Post by Vermin King on Feb 11, 2017 20:35:11 GMT -9
Ach, forgot the stovepipe. I'll put that in the file and will print off tonight and clear coat.
I'm wishing I had started with the Burton instead of the Reading. All those odd-angled edges were a total pain. The Burton is the one above with right angles.
Not going to be an easy build, but if I do a step-by-step walk-thru, and arrange the parts on two-pages, organized by the build order, I think anyone who wants a pretty little gypsy wagon should be able to build it. Once I build this one, I will be able to figure out how to simplify it. Once I am sure of the geometry, I'll be able to whip out other Reading-style bodies rather quickly. For the simpler version of the Reading, if the ends are vertical with sloping sides, it would simplify things a lot.
I'm also trying to work out the Bow Top. It does have straight ends, so it may end up being fairly simple.
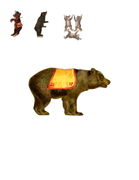
On a 'gypsy' theme, I have a couple requests -- a fortune teller and a dancing bear
|
|
|
|
Post by Vermin King on Feb 11, 2017 22:37:21 GMT -9
|
|
|
|
Post by Vermin King on Feb 12, 2017 9:54:21 GMT -9
Decisions, decisions.
I know the main roof needs to be tweaked, and then I'll have the two sides and roof as one piece. I also need to determine the proper length on the mollicroft roof. I am tempted to start on this section, but in the finalized model, that isn't where to start.
So, I think I will do this in the proper build order. Then when I see what tweaks need to be made to the cabin, I will build the revised version and glue the other built sections to it, instead.
I know a lot of you are intimidated by the advanced wheels. I'm going to show the easy way to build them. And I hope you will at least try them once, and then decide whether you would want to do them on any other builds. I know, 24 parts to build 4 wheels, with 4 spring pieces, two axles, a spacer for the rear axle, two boxes for the front undercarriage, a front spacer and the two parts to allow the front axle to swivel is a lot of complication for just a gypsy wagon, but none of these are going to be difficult. I do intend to do a simpler version. The simplest versions won't be the Reading, though I do have an idea for that, but let's get this one built and finalized first.
|
|
|
|
Post by Vermin King on Feb 12, 2017 12:55:24 GMT -9
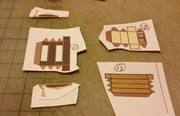
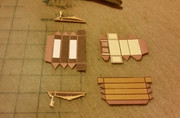
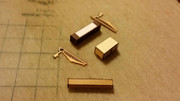
And I found an error ... fixed. Also made a file of Number Icons  On the updated file, I have the parts numbered now which will help with build order and instructions 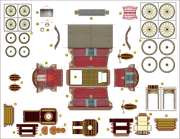 Starting with the wheels: Front, #1, and Back #2. Also it is time to do the spring fold overs, #3 and #4 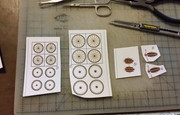 The wheel detail parts will wait until the glue is well-dried, and the parts well-pressed. 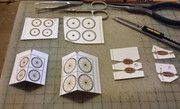 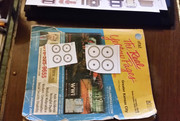 I keep old phone books around for a scoring base, and to put flat parts into as a press, by putting them next to the spine. I'll also put other phone books on top for added weight Next step will be the front undercarriage. |
|
|
|
Post by Vermin King on Feb 12, 2017 14:47:52 GMT -9
Well, this is why on many forums there are all sorts of comments about model designers that never do a test build. I numbered the parts based on how the parts get assembled, not prepped. You can't build in order if you are waiting on parts to dry. In this case the hub of the flat axle and the yoke trees need to be glued, pressed and dry before the front undercarriage can be assembled. So, I re-numbered the template and things are drying. 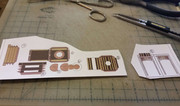 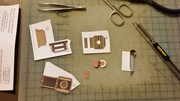 |
|
|
|
Post by cowboycentaur on Feb 12, 2017 17:53:26 GMT -9
Beautiful!! Can't wait to give them a try!
|
|
|
|
Post by Vermin King on Feb 12, 2017 18:11:15 GMT -9
Been a bit sidetracked today, so only worked on it in spurts. Haven't glued the front undercarriage together, but each piece is together, and in dry-fitting, it all looks good. I have spent more time figuring out how to photograph things to best illustrate construction, and trying to set things up for straight-forward construction.
And dealing with cats ...
|
|
|
|
Post by Vermin King on Feb 13, 2017 18:12:12 GMT -9
As mentioned above, renumbered the parts and have been playing with different ways to show construction. Here's what I came up with for the front undercarriage 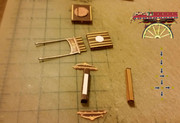 And this is what it looks like built. 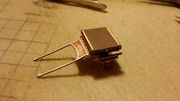 Laying out the actual parts showing how they roughly go together, a photo of the real wagon section we are modeling, and a flow chart showing top-down how the parts go together With text instructions, will this work? |
|
|
|
Post by Vermin King on Feb 13, 2017 19:08:35 GMT -9
|
|
|
|
Post by Vermin King on Feb 14, 2017 9:17:12 GMT -9
Worked on this a bit at lunch. Cut out folded and edged. Dry fit seems to be good, but I'll find out tonight when it is glued. And yes, I know the roof is too wide for the body. I gave it a guesstimate, making sure it wouldn't be too narrow. When this is built, I'll know how much it needs shaved, then I can fix the template so that the sides and roof are one piece. 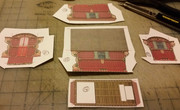 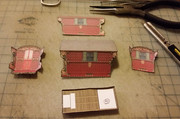 Something I am very pleased with is that I had planned on connecting the four walls, then gluing the rear floor tab to the back wall. Glue along the bottom edge of the side walls, pivoting the floor into place, then attaching the front floor to the floor piece with the decorative part folding down to finish that off. The plan looks like it will work out very nicely. On the walls, the decorative porch brackets are used as the tabs. Once glued, I will probably go ahead and finish off the optional detail pieces before finishing off the wheels Remaining detail work consists of the roof end pieces, the cratch, the mollicroft and the stove pipe. If I were just building this, it would be done this evening, but trying to get adequate photos, adjusting the template, develop instructions, and making sure everything is correct takes a bit longer. On about 45% of the photos I have seen on real vardos, there is a lamp vent. Less than half. It's just a small piece that I can digitally place on the roof. I'll probably go ahead and do that, too, or it can be a flat glue-on. Not sure. I should probably make a brake wheel for the front. I think this was a late 1800's innovation, but it is on almost all of the wagons, so it will be just one more optional piece. This has been a really good build thus far. Probably the best part is that things that I thought would be difficult are just fitting together with no struggles. I think I may just gift this one to cowboycentaur when it's done, since he lives close. I plan on doing an even more detailed one for myself, doing layers for things like the shutters, recessed doors and windows, and raised standards all around |
|
|
|
Post by Vermin King on Feb 14, 2017 15:26:17 GMT -9
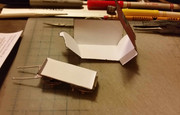  Updated the file. I think that the mollicroft is the only thing left to adjust. Maybe the stovepipe needs to be smaller, but we'll see. I'd have to call this test build fairly successful. I'll probably recolor this guy for the final test build, just to look different |
|
|
|
Post by Vermin King on Feb 14, 2017 17:14:18 GMT -9
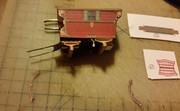
And then the badness happens. The cratch is too fiddly, though the outer dimensions are correct. On my repaint, I'll have the re-worked cratch and use it on this one. I poked some little holes for the rope to have the cratch in the down position. You can see the threads dangling in the above photo. The porch roof end caps are also not wide enough. I didn't allow for the thickness of the cardstock. On this one, I'll just use marker on the back to cover the white. Now that I'm having to make some adjustments, I don't think I'm finishing the wheels tonight. I need to update some parts. 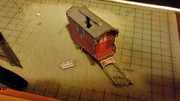 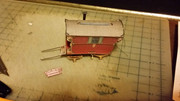 I think I'm going to shorten the stovepipe, too |
|
|
|
Post by cowboycentaur on Feb 14, 2017 19:08:49 GMT -9
This thing looks beautiful man, you've done an amazing job so far!
|
|
|
|
Post by Vermin King on Feb 14, 2017 19:40:35 GMT -9
I've got the cratch frame redesigned. It is a fold-over. On one side it has the back end pattern between the spindles, for use in the upright against the back position. If you choose to have it suspended in the open position, I have a canvas texture between the spindles. So for those who don't wish to cut out spaces, you don't have to. If you choose to cut out the spaces, the spindles are wider and the spaces are fewer and wider still. And it looks good. I shortened the stovepipe a little. In the photos, they seem to stick up higher than I thought they would.
I think the mollicroft needs to be higher and wider. It's one of those things where looking at plans and photos, the dimensions should be correct, but it doesn't look large enough, so I'm going to take a little liberty with it and make it so that it looks right. The length looks right, but the height and width look wrong.
I was questioning whether I should do the advanced version first or a simpler version. I am glad I did this one first. I can now see how to do the cabin and frame in an easy fashion, and how to do simplified undercarriages that can still allow for a pivoting front axle. Some of the detail work can be done graphically.
I wish you could see the undercarriage in person. Photos don't do it justice.
|
|
|
|
Post by Yiannis on Feb 15, 2017 14:47:12 GMT -9
OK, Johnny to you VK. 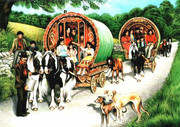 Very interesting thread VK. I look forward to building this when finished. |
|
|
|
Post by Vermin King on Feb 15, 2017 15:10:32 GMT -9
Hey, Johnny. Glad you checked this out. Nice painting
Printed out what I hope will be the final version of the Red Reading, with the extra cratch for model number one. The clear coat is drying. I did a quick attempt at a repaint of this, but it was extremely unsuccessful. Emphasis on Extremely. For other colors, I think I will stick with adjusting photos or actual vans. There's a green one that I particularly want to do. If this test build is successful, I'll post the model. But in the meantime, it's time to do the wheels on the first print.
I started on the front wheels, but the space is triangular. The trick is to keep your knife at a comfortable position to make an almost straight cut. Make one cut, then rotate the wheel. Don't sacrifice your comfortable position by changing your hand position. If you follow this method, you'll have the rim cuts done on both wheels in less than a minute. To cut the spokes, start the cut at the hub and work outwards, then rotate the wheel. Less than a minute per wheel. If there are any issues in popping out the spaces, give a little jab of the knife to complete any cuts that didn't get fully cut.
I forgot to send photos to the computer, but I'll do that on the larger back wheels.
If anyone wants to try this, I'd like to have another set of eyes on it before I release it. Just send me a PM
|
|


