|
|
Post by Yiannis on Feb 15, 2017 16:22:20 GMT -9
They weren't all gaudily painted y'know ... 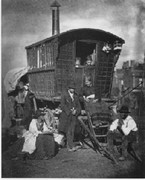 I'm pretty sure the seated woman is Great Great Grannie. Long Walks Woman, or just Injun Annie to the Roma. |
|
|
|
Post by Vermin King on Feb 15, 2017 17:27:01 GMT -9
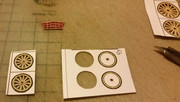
Honestly, I'd forgotten that these wheels all have a 'V' shape at the hub. Just remember to rotate the wheel, not the knife.
That is an absolutely great photo. And it makes me want to ask a lot more questions. Do you know what color it was? The square pattern is one I only saw from photos of two eras - pre-1900 and during the 1920's. Does this photo fall into either of those two time frames? Is that a partial view of another wagon behind this one, or is it a cart? Thanks for sharing
|
|
|
|
Post by Vermin King on Feb 16, 2017 17:17:47 GMT -9
|
|
|
|
Post by Vermin King on Feb 16, 2017 18:21:44 GMT -9
|
|
|
|
Post by Vermin King on Feb 17, 2017 17:26:45 GMT -9
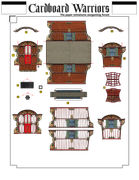
I have my fingers crossed. I have made changes to the files to fix the issues that cropped up. But I was trying various ways to recolor it, since I didn't want two essentially same vardos. I also didn't want to take a different Reading-style and create a new cabin. As this was designed from photographic images, the normal ways of removing color or recoloring failed miserably. I also needed to make the rims narrower. I happened to try playing with the Cartoon filter to prepare it to use Threshold to remove the color. It appears that each part needs separate handling, but so far, it looks promising
|
|
|
|
Post by Vermin King on Feb 26, 2017 17:26:17 GMT -9
My weekend did not go as planned, but I did do the final tweaks as far as the brakes and mollicroft. I also did a thorough vacuuming on both floors of my folks' house and I think I got all the rose thorns out of their dog's hide.
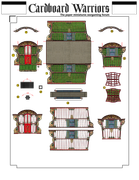
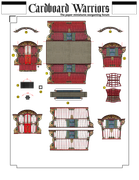
I also did some recolors, for those who don't want only red vardos, and without moving to the green one I want to do, I came up with Yellow, Gold and Brown versions of this one.
And the files are too large to upload. Back in a zip with jpg of the files
|
|
|
|
Post by Vermin King on Feb 26, 2017 17:41:31 GMT -9
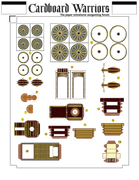
    I have also set up all but the Brown version according to build order in a cutter-friendly format. I had planned on finishing the Brown version tonight. These little guys are now going to be two-page models, page one being all the base parts (up through #15) and page two is the cabin and detail parts. Page one is the same for each version, page two will be Reading p2 Red, Reading p2 Yellow, etc. Parts are also being labeled as to what they represent. I've also started instructions Now if I can figure out how to get the files to be small enough to post ... |
|
|
|
Post by cowboycentaur on Feb 26, 2017 21:12:46 GMT -9
having some trouble with the front axel, could you show some more detail how pieces 6 7 and 8 go together?
|
|
|
|
Post by Vermin King on Feb 27, 2017 5:03:44 GMT -9
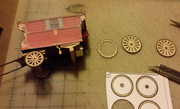
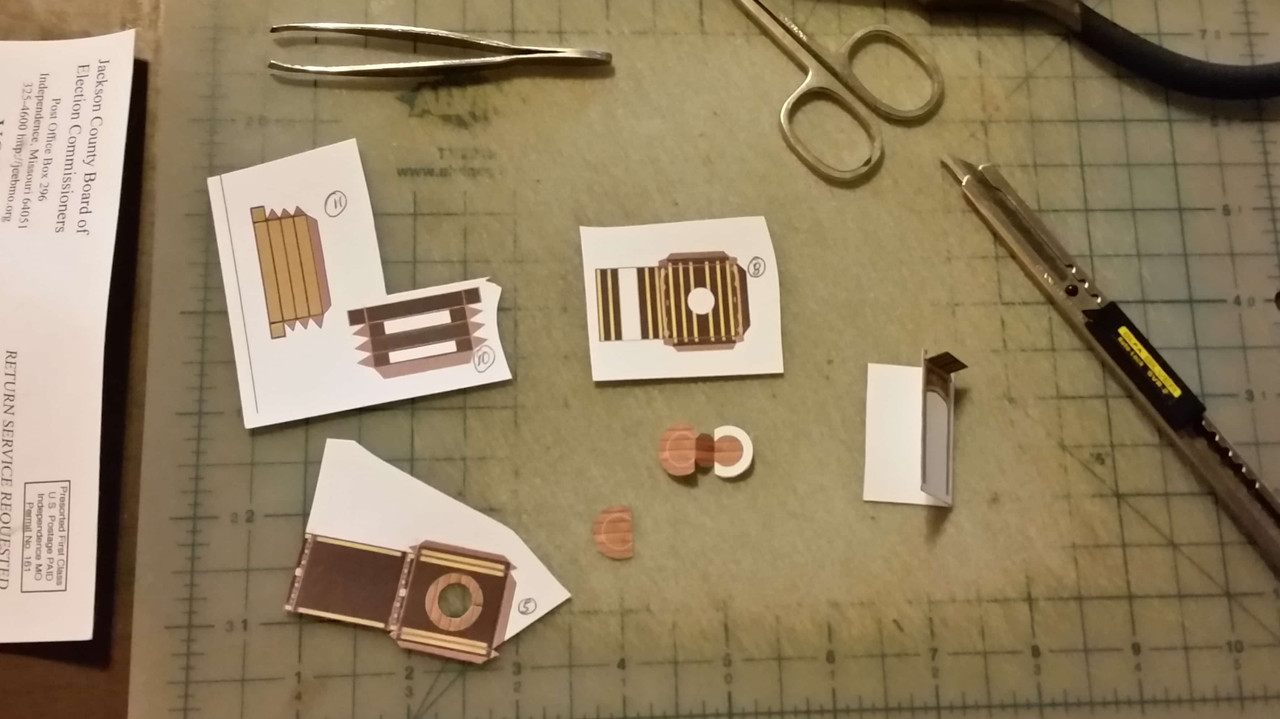 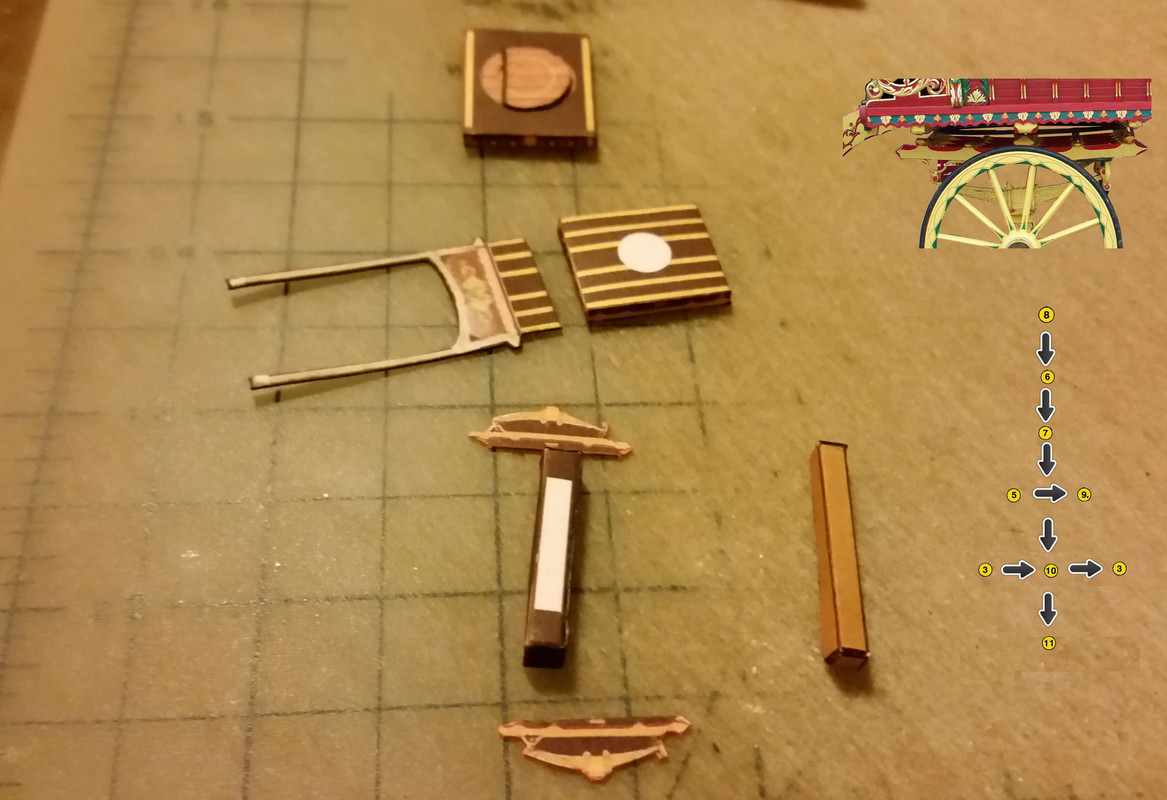 On part 8, cut out the 'X' circle and the red line. On part 6, both sides of the center almost-circle part get glued to the faces. The wood-textured face should be on top, though for this model, that isn't important. It doesn't show. Josh's diagram on www.paperposeables.com/2011/09/sweet-robo.html shows how the part 6 should look. Part 7 is just glued on top of the wood-textured face to give an extra thickness between Part 8 and Part 9. Once 6 and 7 are dry, thread the flat axle into the hole in Part 8. Then you can glue Parts 8 and 9 together with 7 gluing to the white circle on Part 9 (after having the yoke glued to 9) The top photo shows how the axle should be glued. The second photo shows the components laid out as they fit together. The numbers on the right are the part numbers and how they line up to get you to the inset photo above the numbers Helpful? |
|
|
|
Post by Vermin King on Feb 27, 2017 7:49:43 GMT -9
I'll do a detailed walk-through on the flat axles tonight
|
|
|
|
Post by cowboycentaur on Feb 27, 2017 12:36:50 GMT -9
I'll do a detailed walk-through on the flat axles tonight Appreciate it man, yeah I'm just not picturing how it's supposed to go in my head |
|
|
|
Post by Vermin King on Feb 27, 2017 15:45:33 GMT -9
This should help. After you've done a flat-axle build, it all makes sense. I still think it is amazing. Here's all the parts you need to build the front undercarriage  You will need the springs and yoke, so let's prepare them first   Now, 6,7 & 8 are the parts that need additional instruction. Start by cutting out the circle in part 8 and the slit, making the slit the width of the red stripe. 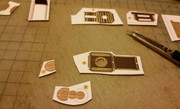 Cut out 6 & 7, fold part 6 as shown, edging is probably optional. I don't see how these parts will show 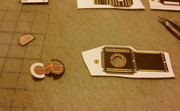 Glue the middle section to one side. 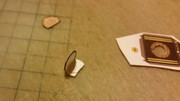 Then glue the other side. 'Dog ear' the corners on one side to help thread into the hole. 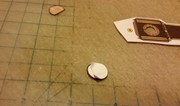 Glue 7 onto the other side. Not only does this give things better clearance, it helps make the whole thing sturdier. 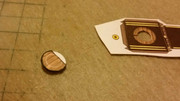 Now thread the axle into the hole in part 8. Try not to do this with a camera in one hand. 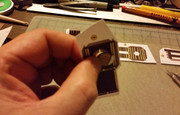 The next two photos show the axle partially threaded, top view and bottom view. 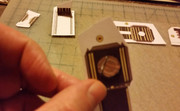  The easiest way to get this threaded is to pinch the axle between thumb and finger and with the camera hand rotate part 8  And there it is.  Now build part 8. once built, rotate the axle so that the flat edge is at the front |
|
|
|
Post by Vermin King on Feb 27, 2017 16:58:27 GMT -9
This is probably a good time to mention one of my favorite tools. Dave Winfield of Koolwheelz fame did some tutorials on building some of his models and he had a big discussion on the best way to get straight folds -- needlenose pliars.  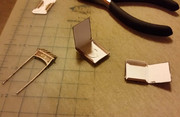 By using needlenose pliars along the fold line, it is very easy to get straight folds even on narrow parts. I wish I'd known this when I did Patrick Pasqual's ZZTop Eliminator |
|
|
|
Post by cowboycentaur on Feb 27, 2017 19:08:21 GMT -9
This is probably a good time to mention one of my favorite tools. Dave Winfield of Koolwheelz fame did some tutorials on building some of his models and he had a big discussion on the best way to get straight folds -- needlenose pliars. By using needlenose pliars along the fold line, it is very easy to get straight folds even on narrow parts. I wish I'd known this when I did Patrick Pasqual's ZZTop Eliminator Haha I've been using my needle nose for fiddley folds for awhile now. Thanks for the photos! Really helps, I just wasn't figuring out how #6 worked but I think I've got it now. |
|
|
|
Post by Vermin King on Feb 27, 2017 19:28:01 GMT -9
When I built my first Sweet Robo, I made the slot just one cut. On another forum, someone suggested that the slot works better for threading the axle if you 1) Cut the circle, 2) Make a cut down both edges of the red line, and 3) Make a perpendicular cut at the end to remove the thin red rectangle. Josh doesn't mention that. Maybe that's why he has switched to the Pop-Locks. I just don't like the look of Pop-Locks.
Once you do one model with the Flat Axle, you just start thinking of all sorts of uses for it.
I meant to do the step-by-step on the whole front undercarriage, but did you see that Jayhawks game?
|
|
|
|
Post by Vermin King on Feb 28, 2017 15:47:35 GMT -9
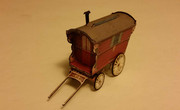
By the way, should we have a bender tent?   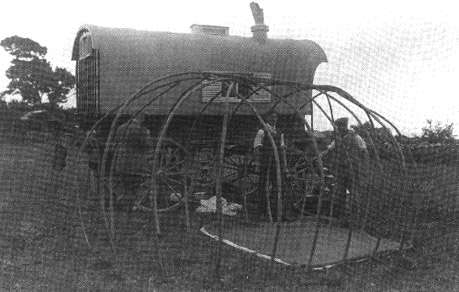 Before the rise of vardos, the Roma and Travelers used carts and dray wagons. Here's one of the carts and on the far side you can see the bender tent he is taking with him 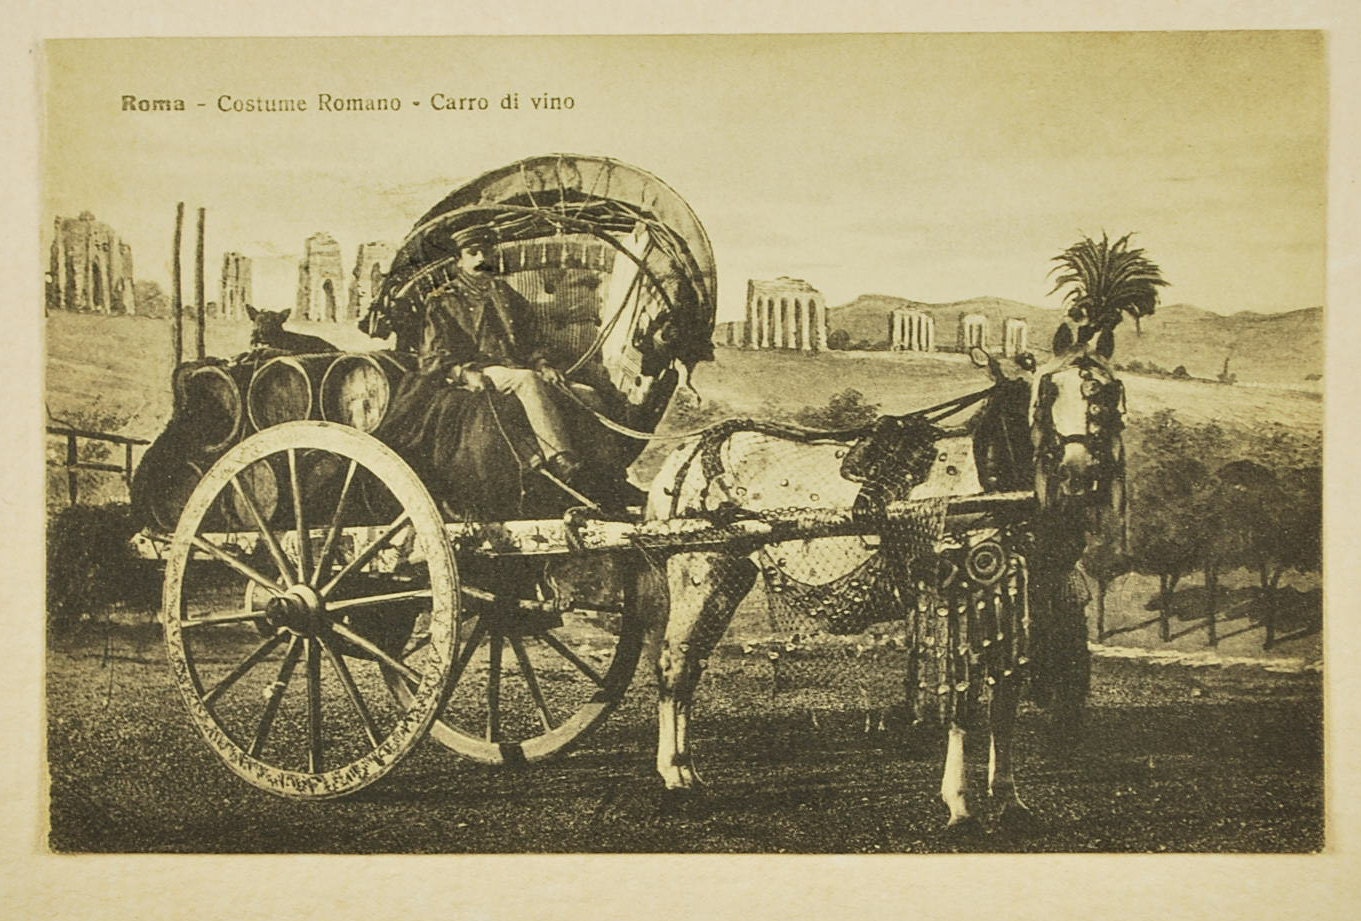 |
|
|
|
Post by cowboycentaur on Mar 1, 2017 21:20:31 GMT -9
 Got my first one built! |
|
|
|
Post by Vermin King on Mar 2, 2017 5:03:24 GMT -9
Outstanding! It looks like I need to make the roof end caps just a bit wider. Doesn't look bad, but the top is supposed to fit almost flush with the roof. I also remembered last night that I don't have steps for these. I need to add those to the optional page.
That looks really good there. Once the undercarriage is done, the rest goes fairly quick. Did you add the cratch to the back?
|
|
|
|
Post by Vermin King on Mar 2, 2017 11:15:48 GMT -9
|
|
|
|
Post by cowboycentaur on Mar 2, 2017 12:29:40 GMT -9
I did I was just getting sleepy and forgot to take a pic of it. Wasn't really sure where to place it as there wasn't a clear photo of the back, at least I didn't notice one.
I do think either the floor of the wagon or the sidewalks needs wider tabs to glue to, I had some difficulty getting the little 2mm surface area to stay together.
Of course I could have just cut them that way myself but it didn't occur to me until I had already cut them out. Next wagon will look much better.
I doubled up on the paper thickness of the outer wheel rim, and quadrupled thickness on the hub. I'm rather happy with how it ended up looking.
|
|
|
|
Post by Vermin King on Mar 2, 2017 12:47:34 GMT -9
I was trying to have a good way of having the floor recessed to make it at the proper height. At one time I had the floor, sides and roof as one piece, crimping the trim parts on one side and the thin tab only on one side. That made layout difficult, and didn't really simplify the build. I had another version that omitted the trim on the base, and had tabs that go up and glue to the sides, but it was difficult to get the placement straight. This was the best way I could figure out how to do it and still have the floor of the cabin recessed. On the Burton, the floor lines up with the bottom of the sides, so it will be easier.
An odd thing about the actual wheels on these. The spokes extend outwards from the wagon. The center of the rim should be directly in line with the outside of the hub. This was done to allow more stability in cross-country travel. You would really be cursing me if I'd try to include that in the model.
Were you successful with the flat-axle?
|
|
|
|
Post by Vermin King on Mar 4, 2017 16:02:45 GMT -9
Well, I've pretty much decided on the Burton I intend to do. It has a lot of the things you look for on a Burton and there are quite a few photos. It is in the process of restoration, but it looks like they tried to do a faux-vintage photo with it. 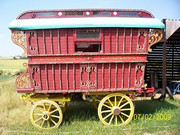 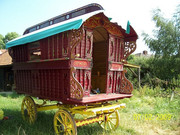 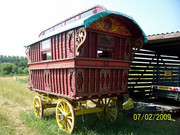 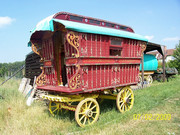  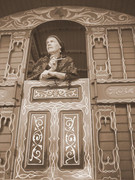 Burtons usually had the waist board, almost a rectangular box for the cabin, and wheels underneath (though the more modern versions extend the wheels out a bit for stability). Burtons almost always had the mollicroft (the skylight thing) and on many, there is an offset at the waistboard. The walls are vertical going up to the waistboard, and almost in a clapboard fashion, the upper wall has an overlap on the outside of the lower wall, giving a little more shoulder room inside. Besides doing a couple colors, I also want to do the two-windows-on-each-side version. The number of ribs makes this seem feasible. I might also do a version with more panels, once I have geometry worked out.   |
|
|
|
Post by Vermin King on Mar 15, 2017 4:53:15 GMT -9
This little guy inspired another modeler to do some Studebaker wagons (work in progress)   I think that it would be easy to convert one of these into Gordon's Travelling Emporium, from the Wild Wild West TV show pilot, Night of the Inferno 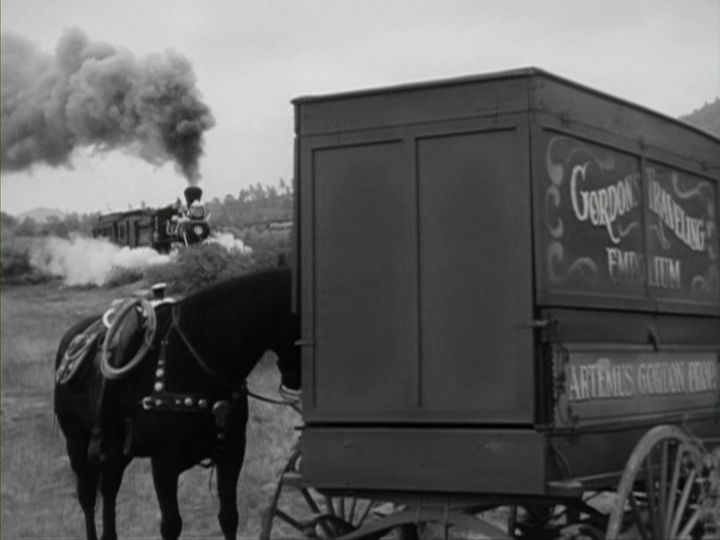 I think it should be dusty green |
|
|
|
Post by cowboyleland on Mar 15, 2017 9:38:40 GMT -9
I wonder if the Wild West Wagon could have a pop-up steam-punky element.
|
|
|
|
Post by Vermin King on Mar 15, 2017 11:11:12 GMT -9
Of course, it could. It's Artie's wagon, and if you watched the show much, the panels flip around, and it could be used as a paddy wagon, and there was an episode with a gatling gun. Steampunk would not be out of place.
|
|
|
|
Post by cowboyleland on Mar 15, 2017 12:49:13 GMT -9
I was born in '67 so I kinda missed the show. It didn't stick around in re-runs in my part of the world. I watched some episodes on youtube (I think) looking for inspiration for my clock-punk Venice campaign.
|
|
|
|
Post by Toman on Mar 15, 2017 13:08:40 GMT -9
I seem to remember watching a few episodes of the wild wild west(or maybe it was Gun smoke) with dad as a kid. would be cool to have something like that, especially a Gatling gun wagon, or just a Gatling gun.
|
|
|
|
Post by Vermin King on Mar 15, 2017 13:56:36 GMT -9
James Bond in the old west. It only lasted five seasons. Congress was on a roll to limit violence on TV, and it was sacrificed, in spite of its popularity.
I vaguely remember the back and sides dropping down with the gatling gun in the back. The wagon wasn't in that many episodes, but I remember a few times. One time they changed the markings by rotating the panels (like a DB5 license plate), another they pulled down new signage like a window shade, and another time by sliding the one panel out of some grooves and sliding in a new sign. And the different wagon configurations gave Ross Martin a chance to play a different character.
World domination, larger than life villains, lots of action, horses and trains. How could it not have been popular
|
|
|
|
Post by Vermin King on Apr 17, 2017 17:27:04 GMT -9
Well, no progress on Wild Wild West or additional vardos, but for those that don't like the fiddly undercarriage, I'm playing with a more simple undercarriage inspired by the Girl Genius online comic at www.girlgeniusonline.com/comic.php?date=20050328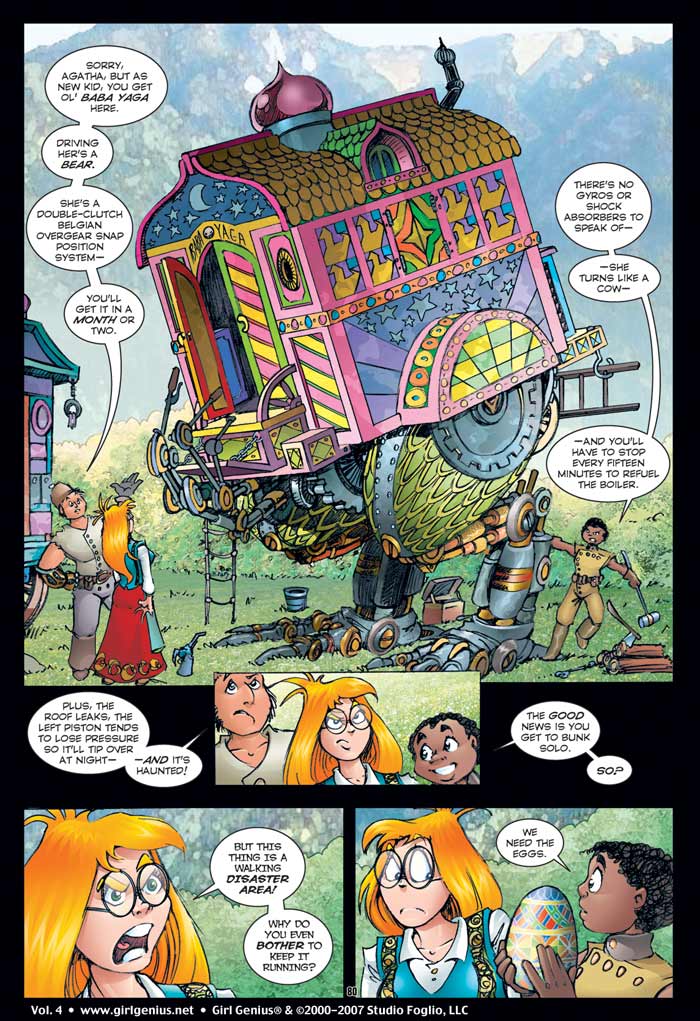 I'm looking at just a stupid fold-over deal that would slide over the rear wheels and you can leave the front wheels off. Good idea? |
|
|
|
Post by cowboyleland on Apr 18, 2017 4:46:42 GMT -9
I don't know what "a stupid fold-over deal" is, but it is a fun and wacky vehicle. You could re-skin it into Baba Yaga's hut.
|
|