|
|
Post by oldschooldm on Jun 22, 2015 7:05:29 GMT -9
YAY! After 4 months of development it's officially released! Thanks to everyone who offered advice, criticisms and suggestions! Now to finish the instructions and get that added as an update! View AttachmentTinkering Tom Wooden Piers setCongratulations on a much needed release to the market place (this kit was one of the first I was looking for when I started making paper terrain...) If I may share one more piece of advice: Your price is significantly more what some folks might be expecting - I think I know why, but your ad copy doesn't tell us why. 54 pages you said? That should be the lead item (since your per-page price is probably better than most other kits.) Also, to get traction, consider a short-term (24 hour) discount code, as modeled here by many designers... Congratulations again! |
|
|
|
Post by oldschooldm on Jun 21, 2015 14:19:55 GMT -9
I've now printed and cut a sheet of these, and completed the build of one of them to confirm the cutfile works - so I'm uploading it now (complete with the image embedded, so just choose your cutmarks, print, and cut all from Studio.... Rideable Motorcycle Prototype 3.studio3 (2.11 MB) If you don't like the options I chose, remove the bitmap and merge something generated from Tom's originals. Pics when I'm done with the other 3... |
|
|
|
Post by oldschooldm on Jun 21, 2015 10:19:28 GMT -9
|
|
|
|
Post by oldschooldm on Jun 20, 2015 15:33:16 GMT -9
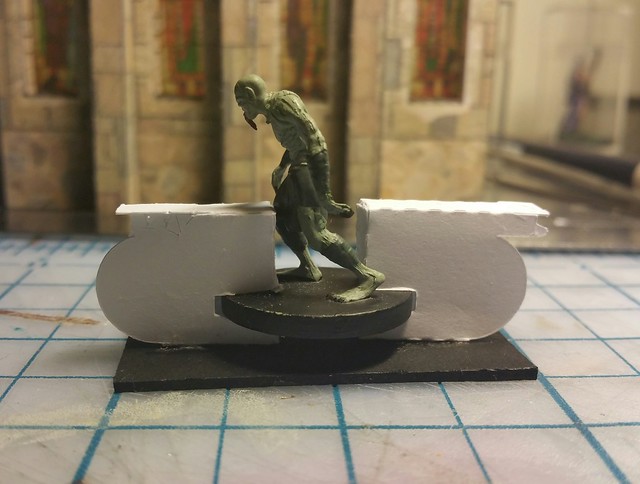
Glad most of these have already been fixed! :-) The exhaust pipe is too flimsy without a back-side. Looks like it would be easy to mirror on the page. There is a small section to fold back onto the tailpipe, I'll clear up instructions for that as well. On your build it wasn't folded back, probably because I forgot to have the fold line identified on version 1.Cool! Dab o glue did the trick! I didn't know the target shape, so I missed that. Lastly, like my first prototype, it's too big for my miniature scale - it makes the minis look smaller than the bike, the bike look bigger than the cars, and contributes to the "I keep falling off" problem :-) the slot should be just-barely 1" wide, and 1/8" high - that way the mini fits in snug enough to not fall out. Good news on this front is that I think I can solve all these problems by just scaling the mini down to 80% of your original (and maybe a tweek or two...) I'll fix the slot issue as well, how does the size of the cutout work? It might work better scaled down to 80%.... it has been sort of challenging not having any actual mini's anymore to work with. I might also include an additional piece that's a bit wider to glue in the bottom of the slot.80% looks right for overall size, but the slot (cut out) needs more adjusting to the dimensions suggested. |
|
|
|
Post by oldschooldm on Jun 20, 2015 15:05:21 GMT -9
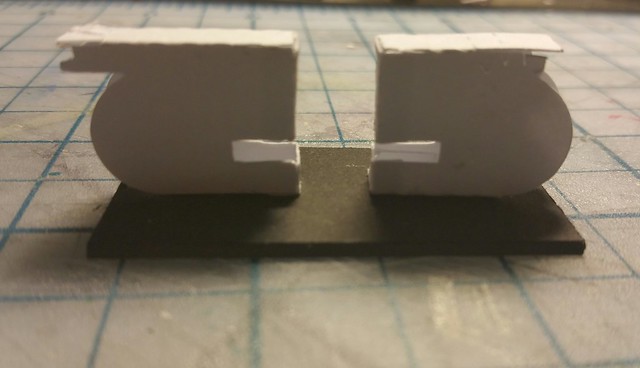
Awesome work Tom! @bearneart76 you've definately improved the idea with a one-piece construction. I really like that a lot. You've moved this design up a notch, but it isn't finished yet! Here's my build of Prototype #3 (Tom's one-peice model) with feeback and a cutfile! 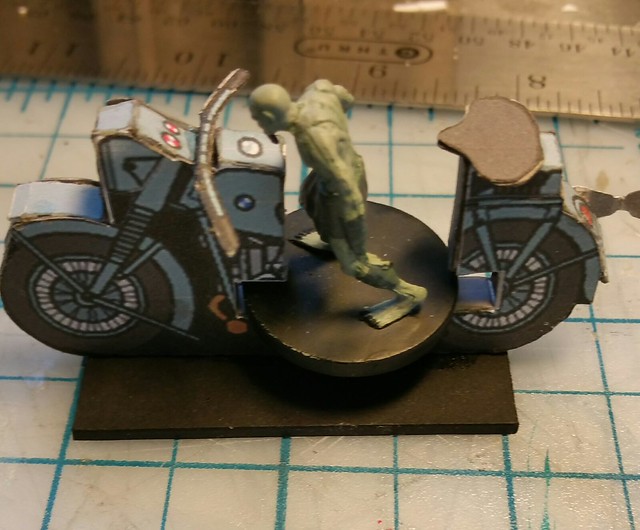 Prototype motorcycle #3 Prototype motorcycle #3 by Oracle Omega, on Flickr 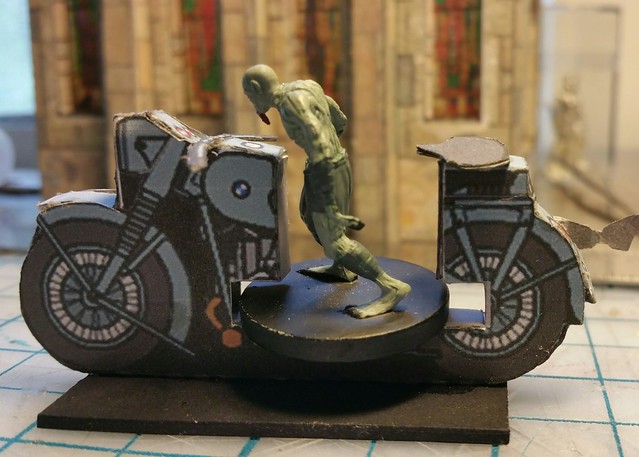 Prototype motorcycle #3 Prototype motorcycle #3 by Oracle Omega, on Flickr  Prototype motorcycle #3 Prototype motorcycle #3 by Oracle Omega, on Flickr Comments: Turns out it doesn't work as-is with a mini because the mini keeps falling off! The mount is too deep/wide so the mini has to rest on a very small platform with nothing else to hold on to. See my "size" comment below for one possible solution. Also, the tabs need to be changed to glue easily around a rounded surface. Should be traniangles/trapizoids, not rectangles. Otherwise layers overlap awkwardly. See my cutfile for a trace you can use. The exhaust pipe is too flimsy without a back-side. Looks like it would be easy to mirror on the page. The grey tabs are on the wrong PSD layer (should be part of the cycle, not the tracings), so they disappeared when I wanted to print without tracelines. BTW - did you try black? That might look better, but I'm not sure. There is a tab missing on the edge of the piece that sits under the seat. I put one in the cutfile after I built the photos here. Here's a link to the screenshot of my cutfile so you can see the detail: www.dropbox.com/s/zuo5dqe36qedjyl/Screenshot%202015-06-20%2016.56.12.png?dl=0Lastly, like my first prototype, it's too big for my miniature scale - it makes the minis look smaller than the bike, the bike look bigger than the cars, and contributes to the "I keep falling off" problem :-) the slot should be just-barely 1" wide, and 1/8" high - that way the mini fits in snug enough to not fall out. Good news on this front is that I think I can solve all these problems by just scaling the mini down to 80% of your original (and maybe a tweek or two...) Here is the cutfile for my first cut of Prototype #3: Rideable Motorcycle Prototype 3.studio3 (102.97 KB) Thank you so much for jumping in on this - I love how strong this model is! We're almost there! |
|
|
|
Post by oldschooldm on Jun 20, 2015 5:23:34 GMT -9
Yes! Grabbed all 3! Thanks! |
|
|
|
Post by oldschooldm on Jun 19, 2015 22:49:13 GMT -9
|
|
|
|
Post by oldschooldm on Jun 19, 2015 21:29:22 GMT -9
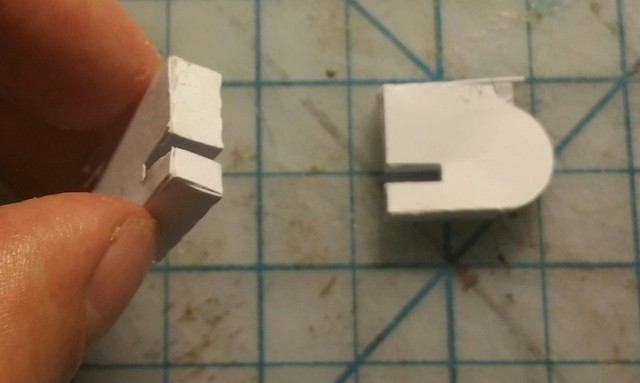
So - that plastic in the Litko models is providing a lot of strength- something paper doesn't have all by itself (without folds and glue...) So I'm looking for a "boxy" and easy-to-mod motorcycle model. After an hour or so searching (mostly via Google at Papermau) I found this one: papermau.blogspot.com/2013/11/japanese-classic-police-motorcycle.html The correct scale for my minis has the model on the map at 2" long by less than 1" wide. So I decide the first thing to try is make a solid mount out of paperboard. I will glue the model to this for stability and proper positioning on the play mat. Initially I scale the model down by 55% (probably still a bit to large, given the photos below) but the tires will fit on the tile. Tracing just the tire and the body at this point, I can make quick paper (no ink) prototypes. Prototype number 1 is dead simple - cut the model in half, and glue each half to the tile:  Protype motorcycle #1 Protype motorcycle #1 by Oracle Omega, on Flickr The bobby pins are holding the two halves in place (there is not any glue under them) so that the bike doesn't droop (all the glue is under the tires.) Wait for a while, insert mini, and shoot photos... 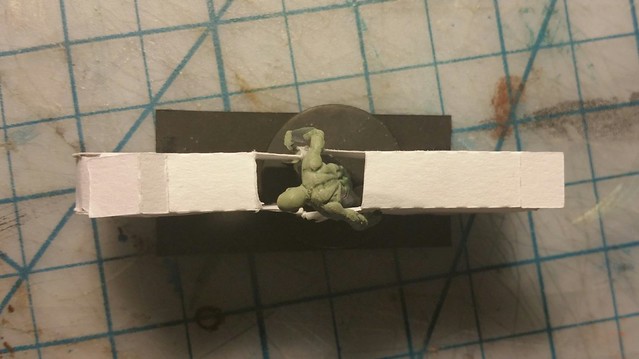 Prototype motorcycle #1 Prototype motorcycle #1 by Oracle Omega, on Flickr 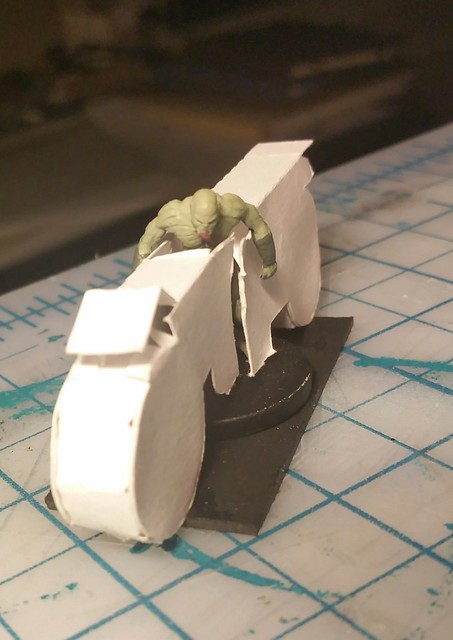 Protype motorcycle #1 Protype motorcycle #1 by Oracle Omega, on Flickr 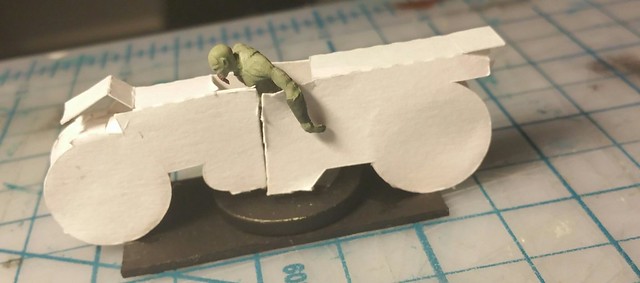 Protype motorcycle #1 Protype motorcycle #1 by Oracle Omega, on Flickr My observations: - Having only one mount point for each half of the bike is awkward and leads to alignment errors.
- Having the sides overlap the mini is an interesting idea, but makes it fiddly to load/unload, not good for game time. Considering just an open gap.
- Where the rider "sits" is just a 'U' shape of paper, should really be a solid box, perhaps even closed.
- The model is too big. Next time I'll make it all fit in 2"
- The rider is setting too low - after reducing scale and testing, consider raising rider from tile height.
- Consider a pure-box model (actually, 2-half models, each a box, with a base slit...)
What are your thoughts? |
|
|
|
Post by oldschooldm on Jun 19, 2015 21:13:42 GMT -9
Y'all know I like to put minis in my models - buildings and vehicles especially. There is something like this from Litko for horses (bears, boars, etc.): www.litko.net/products/Horse%2C-Character-Mount-Marker-kit.html#.VYUDxDxdVRE I couldn't find this adaptation yet in any motorcycle minis. As you know, that never stopped me. This thread will document my attempts to create a miniature paper figure for a motorcycle that can hold a standard 1" based figure in it's center as a "driver". I welcome all comments and suggestions along the way. So far, I have one rough prototype to share... |
|
|
|
Post by oldschooldm on Jun 18, 2015 22:37:42 GMT -9
|
|
|
|
Post by oldschooldm on Jun 18, 2015 22:33:27 GMT -9
|
|
|
|
Post by oldschooldm on Jun 18, 2015 22:30:40 GMT -9
|
|
|
|
Post by oldschooldm on Jun 18, 2015 22:29:18 GMT -9
|
|
|
|
Post by oldschooldm on Jun 18, 2015 22:26:46 GMT -9
Product: TCrazy Eye Van a free model by mautherMods:Cutout Windows and only offered at scale for 28-32mm minis. Cutfile: Eyeball Van.studio3 (70.56 KB) NOTE: These cutfiles require some additional care when using with the source material -
----> They don't fit properly within the cut area, you may have to invert, rotate or even move portions off the printable area. There are white rectangles provided to cover items that fall out side of the cutting area. You may have to hand-cut one of the Sphinx feet.
----> The original models don't have clean clear or black edges. If you "move to bottom" the textures, the outlines will print in black over the objects to make for clean lines.
You will need to download a copy of that product to use these correctly. The artwork is not included to protect the rights of the copyright holders. The product does not contain the required registration marks to work with the cutter. In order to get the registration marks in the correct place relative to the cutting lines in these files, you will need to print from within the Studio program itself after merging the artwork. Helpful tip: Once you've merged in the artwork, you can use the eraser tool to clear out extraneous graphics before printing. Step one: Get each PDF page into individual PNG files, so Studio can read them. There are several ways to do this. If you have Adobe Acrobat Pro, split and reformat the pages one at a time by choosing: Save As > Image > PNG. If you want to customize the layers (There are various texture options), you can print-to-PDF after selecting the layers. Then you still have to convert each PDF into a PNG. If you don't have Acrobat Pro, another means to move PDF -> PNG is using the GIMP editor. When you open a PDF with GIMP, you can specify which pages to import. Be sure to set the resolution to 300 DPI on the import dialog! Once it is open, save the page with a .PNG file (by typing in that suffix), no compression. Now you need to merge the PNG files with their cutfiles to get the registration marks right when you print... (The remaining instructions are specific for Studio 3.3.451ss) Step two: Now you have PNG files for each page, start Studio and then open one of them (you won't see the PNG files by default in the open dialog, click the file-type pop-down and chose PNG to see them). Once you see the image on simulated carrier sheet, you may see it rotated 90-degrees (not fitting on the sheet), just click Portrait on the Page control to rotate the carrier sheet to match. Next choose Merge from the file menu and select the matching cutfile page. You should see red-lines overlaying the image, they probably won't align properly at first. Step three: Align the image to the cutlines. Zoom in 3-4 times by clicking on the +-magnifier at the top of the screen. The lines are in the correct place, it is the image that needs to move to match. Click on the image (including white area) somewhere, and use the arrow keys to shift the image until it matches the cut lines. I'd save the cutfile at this point. Step four: Print the file and cut! Choose the printing option from within Studio - either from the File menu or as the first option after clicking on the Cut icon at the top of Studio - it will include the registration marks from the cutfiles. Then you know the drill, mount to carrier sheet and cut then edge and assemble! These cutfiles were created with Silhouette Studio version 3.3.451ss by oldschooldm and this post format is by mproteau (Paper Realms) @ the Cardboard Warriors forums: cardboard-warriors.proboards.com
|
|
|
|
Post by oldschooldm on Jun 18, 2015 22:17:09 GMT -9
Product: The Ghost Truck a free model by RavensBlight Mods:Cutout Windows and offered in 100% and 80% (for 28-32mm mini compatibility.) Cutfiles (zip): Ghost Truck Cutfiles.zip (214.65 KB) NOTE: These cutfiles require some additional care when using with the source material -
----> They don't fit properly within the cut area, you may have to invert, rotate or even move portions off the printable area. There are white rectangles provided to cover items that fall out side of the cutting area. You may have to hand-cut one of the Sphinx feet.
----> The original models don't have clean clear or black edges. If you "move to bottom" the textures, the outlines will print in black over the objects to make for clean lines.
You will need to download a copy of that product to use these correctly. The artwork is not included to protect the rights of the copyright holders. The product does not contain the required registration marks to work with the cutter. In order to get the registration marks in the correct place relative to the cutting lines in these files, you will need to print from within the Studio program itself after merging the artwork. Helpful tip: Once you've merged in the artwork, you can use the eraser tool to clear out extraneous graphics before printing. Step one: Get each PDF page into individual PNG files, so Studio can read them. There are several ways to do this. If you have Adobe Acrobat Pro, split and reformat the pages one at a time by choosing: Save As > Image > PNG. If you want to customize the layers (There are various texture options), you can print-to-PDF after selecting the layers. Then you still have to convert each PDF into a PNG. If you don't have Acrobat Pro, another means to move PDF -> PNG is using the GIMP editor. When you open a PDF with GIMP, you can specify which pages to import. Be sure to set the resolution to 300 DPI on the import dialog! Once it is open, save the page with a .PNG file (by typing in that suffix), no compression. Now you need to merge the PNG files with their cutfiles to get the registration marks right when you print... (The remaining instructions are specific for Studio 3.3.451ss) Step two: Now you have PNG files for each page, start Studio and then open one of them (you won't see the PNG files by default in the open dialog, click the file-type pop-down and chose PNG to see them). Once you see the image on simulated carrier sheet, you may see it rotated 90-degrees (not fitting on the sheet), just click Portrait on the Page control to rotate the carrier sheet to match. Next choose Merge from the file menu and select the matching cutfile page. You should see red-lines overlaying the image, they probably won't align properly at first. Step three: Align the image to the cutlines. Zoom in 3-4 times by clicking on the +-magnifier at the top of the screen. The lines are in the correct place, it is the image that needs to move to match. Click on the image (including white area) somewhere, and use the arrow keys to shift the image until it matches the cut lines. I'd save the cutfile at this point. Step four: Print the file and cut! Choose the printing option from within Studio - either from the File menu or as the first option after clicking on the Cut icon at the top of Studio - it will include the registration marks from the cutfiles. Then you know the drill, mount to carrier sheet and cut then edge and assemble! These cutfiles were created with Silhouette Studio version 3.3.451ss by oldschooldm and this post format is by mproteau (Paper Realms) @ the Cardboard Warriors forums: cardboard-warriors.proboards.com
|
|
|
|
Post by oldschooldm on Jun 18, 2015 22:02:53 GMT -9
Product: White Hatchback Compact Car a free model by @gredelsmother64 Mods:Cutout Windows and only offered at 120% scale up for 28-32mm minis option. Hand aged using spray tack and dirt/red terrain dust... Cutfile: White Hatchback.studio3 (119.6 KB) NOTE: These cutfiles require some additional care when using with the source material -
----> They don't fit properly within the cut area, you may have to invert, rotate or even move portions off the printable area. There are white rectangles provided to cover items that fall out side of the cutting area. You may have to hand-cut one of the Sphinx feet.
----> The original models don't have clean clear or black edges. If you "move to bottom" the textures, the outlines will print in black over the objects to make for clean lines.
You will need to download a copy of that product to use these correctly. The artwork is not included to protect the rights of the copyright holders. The product does not contain the required registration marks to work with the cutter. In order to get the registration marks in the correct place relative to the cutting lines in these files, you will need to print from within the Studio program itself after merging the artwork. Helpful tip: Once you've merged in the artwork, you can use the eraser tool to clear out extraneous graphics before printing. Step one: Get each PDF page into individual PNG files, so Studio can read them. There are several ways to do this. If you have Adobe Acrobat Pro, split and reformat the pages one at a time by choosing: Save As > Image > PNG. If you want to customize the layers (There are various texture options), you can print-to-PDF after selecting the layers. Then you still have to convert each PDF into a PNG. If you don't have Acrobat Pro, another means to move PDF -> PNG is using the GIMP editor. When you open a PDF with GIMP, you can specify which pages to import. Be sure to set the resolution to 300 DPI on the import dialog! Once it is open, save the page with a .PNG file (by typing in that suffix), no compression. Now you need to merge the PNG files with their cutfiles to get the registration marks right when you print... (The remaining instructions are specific for Studio 3.3.451ss) Step two: Now you have PNG files for each page, start Studio and then open one of them (you won't see the PNG files by default in the open dialog, click the file-type pop-down and chose PNG to see them). Once you see the image on simulated carrier sheet, you may see it rotated 90-degrees (not fitting on the sheet), just click Portrait on the Page control to rotate the carrier sheet to match. Next choose Merge from the file menu and select the matching cutfile page. You should see red-lines overlaying the image, they probably won't align properly at first. Step three: Align the image to the cutlines. Zoom in 3-4 times by clicking on the +-magnifier at the top of the screen. The lines are in the correct place, it is the image that needs to move to match. Click on the image (including white area) somewhere, and use the arrow keys to shift the image until it matches the cut lines. I'd save the cutfile at this point. Step four: Print the file and cut! Choose the printing option from within Studio - either from the File menu or as the first option after clicking on the Cut icon at the top of Studio - it will include the registration marks from the cutfiles. Then you know the drill, mount to carrier sheet and cut then edge and assemble! These cutfiles were created with Silhouette Studio version 3.3.451ss by oldschooldm and this post format is by mproteau (Paper Realms) @ the Cardboard Warriors forums: cardboard-warriors.proboards.com
|
|
|
|
Post by oldschooldm on Jun 18, 2015 21:48:11 GMT -9
Product: Easybuild Humvee a free model by Dave's Card Creations Mods: Windows cutout and a 60% scaled version of the cutfile is offered to work with for 28-32mm scale minis. Cutfiles:easybild-camo-humvee.studio3 (90.87 KB) easybild-camo-humvee 60.studio3 (92.41 KB) NOTE: These cutfiles require some additional care when using with the source material -
----> They don't fit properly within the cut area, you may have to invert, rotate or even move portions off the printable area. There are white rectangles provided to cover items that fall out side of the cutting area. You may have to hand-cut one of the Sphinx feet.
----> The original models don't have clean clear or black edges. If you "move to bottom" the textures, the outlines will print in black over the objects to make for clean lines.
You will need to download a copy of that product to use these correctly. The artwork is not included to protect the rights of the copyright holders. The product does not contain the required registration marks to work with the cutter. In order to get the registration marks in the correct place relative to the cutting lines in these files, you will need to print from within the Studio program itself after merging the artwork. Helpful tip: Once you've merged in the artwork, you can use the eraser tool to clear out extraneous graphics before printing. Step one: Get each PDF page into individual PNG files, so Studio can read them. There are several ways to do this. If you have Adobe Acrobat Pro, split and reformat the pages one at a time by choosing: Save As > Image > PNG. If you want to customize the layers (There are various texture options), you can print-to-PDF after selecting the layers. Then you still have to convert each PDF into a PNG. If you don't have Acrobat Pro, another means to move PDF -> PNG is using the GIMP editor. When you open a PDF with GIMP, you can specify which pages to import. Be sure to set the resolution to 300 DPI on the import dialog! Once it is open, save the page with a .PNG file (by typing in that suffix), no compression. Now you need to merge the PNG files with their cutfiles to get the registration marks right when you print... (The remaining instructions are specific for Studio 3.3.451ss) Step two: Now you have PNG files for each page, start Studio and then open one of them (you won't see the PNG files by default in the open dialog, click the file-type pop-down and chose PNG to see them). Once you see the image on simulated carrier sheet, you may see it rotated 90-degrees (not fitting on the sheet), just click Portrait on the Page control to rotate the carrier sheet to match. Next choose Merge from the file menu and select the matching cutfile page. You should see red-lines overlaying the image, they probably won't align properly at first. Step three: Align the image to the cutlines. Zoom in 3-4 times by clicking on the +-magnifier at the top of the screen. The lines are in the correct place, it is the image that needs to move to match. Click on the image (including white area) somewhere, and use the arrow keys to shift the image until it matches the cut lines. I'd save the cutfile at this point. Step four: Print the file and cut! Choose the printing option from within Studio - either from the File menu or as the first option after clicking on the Cut icon at the top of Studio - it will include the registration marks from the cutfiles. Then you know the drill, mount to carrier sheet and cut then edge and assemble! These cutfiles were created with Silhouette Studio version 3.3.451ss by oldschooldm and this post format is by mproteau (Paper Realms) @ the Cardboard Warriors forums: cardboard-warriors.proboards.com
|
|
|
|
Post by oldschooldm on Jun 18, 2015 15:27:03 GMT -9
⊙▂⊙
Whoa. A warning to all budding designers out there - this level of work is NOT required for making a successful paper terrain kit.
That said - my wallet is out and ready! I'm sure this is going to be a great value.
|
|
|
|
Post by oldschooldm on Jun 18, 2015 14:45:22 GMT -9
I was on BensRPGPile, but the site shut down and I'm having problems finding his link in the archive. Here's a fuzzy photo though:  |
|
|
|
Post by oldschooldm on Jun 18, 2015 14:33:39 GMT -9
Those are pretty cool, even if I don't know what they are. For the moment, I'm now looking for motorcycles I can build and mod to take figures as riders. (I saw a mini somewhere for a horse that could take most any mini as a "mount" in the center, but can't find it now.) |
|
|
|
Post by oldschooldm on Jun 17, 2015 13:43:33 GMT -9
Did you build Dave Winfield's Humvee's at normal scale? No. I printed the Dave's Humvees at 60, scaled down Mauther's eyeball van by some unknown value, scaled up the Trabby (from the previous one I built here), and the ghost truck at 80%. |
|
|
|
Post by oldschooldm on Jun 17, 2015 10:37:47 GMT -9
Excellemt!!! I'm guessing most of the characters are One Monk figs - where did the three in the last pic come from though? Correct. The three others are custom jobs. I'm letting my players prep their artwork. Sent from my SAMSUNG-SM-N910A using proboards |
|
|
|
Post by oldschooldm on Jun 16, 2015 22:51:09 GMT -9
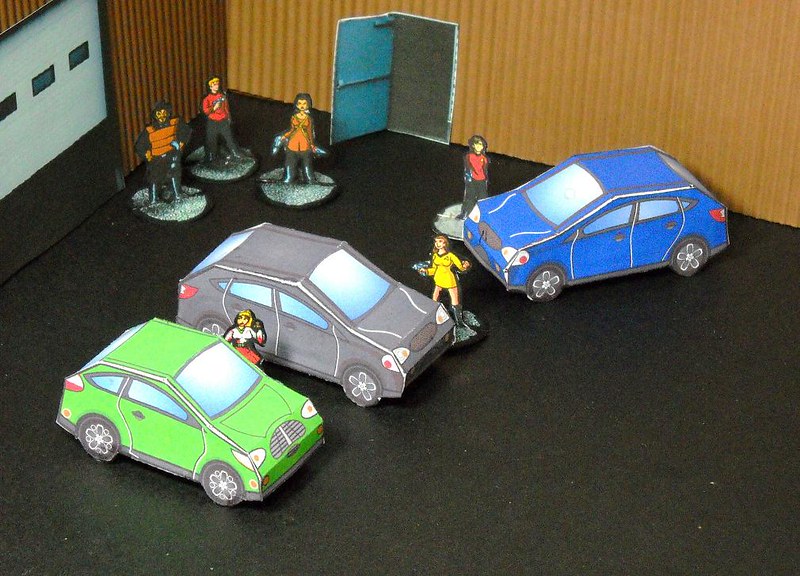
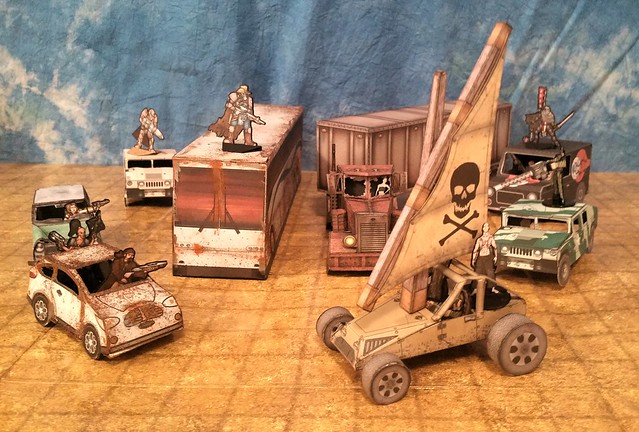
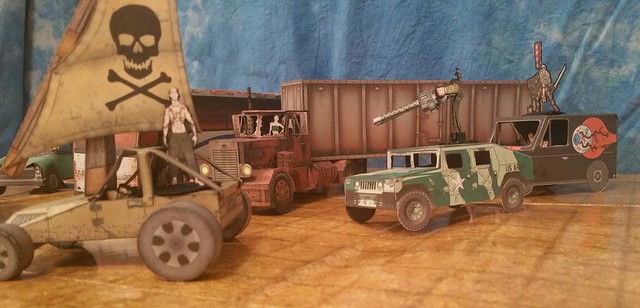
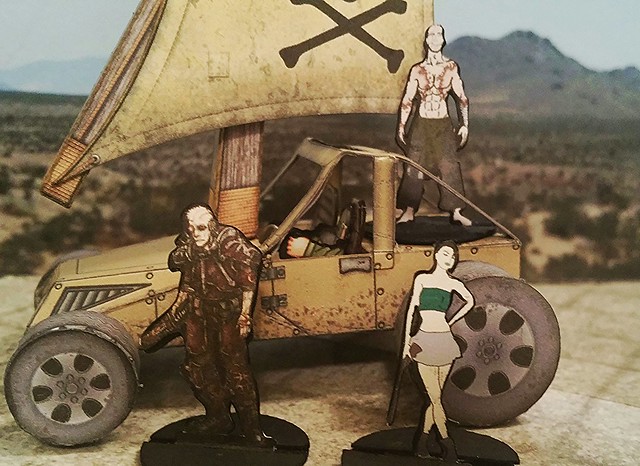
Game is in 18 hours, and I've got sleep, furniture moving and work to do before that. So here's how far I got in 1 week: The cars aren't all distressed yet, but I need to do other stuff... |
|
|
|
Post by oldschooldm on Jun 16, 2015 11:17:29 GMT -9
I did this and found lots of amazing stuff. Photos soon. Sent from my SAMSUNG-SM-N910A using proboards |
|
|
|
Post by oldschooldm on Jun 15, 2015 6:40:08 GMT -9
Oh yeah!
|
|
|
|
Post by oldschooldm on Jun 14, 2015 16:26:38 GMT -9
I'm lazy. I'll do just about anything to avoid learning about grunge brushes in photoshop. so here's my grunging solution: This: 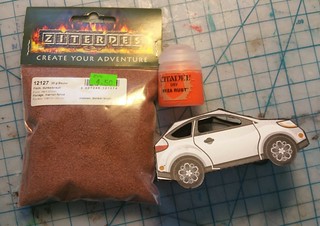 plus this: 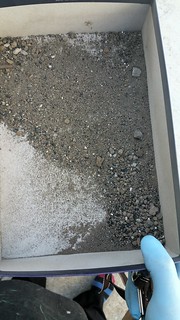 plus some silver paint, spray on adhesive, and a clear-cote equals: 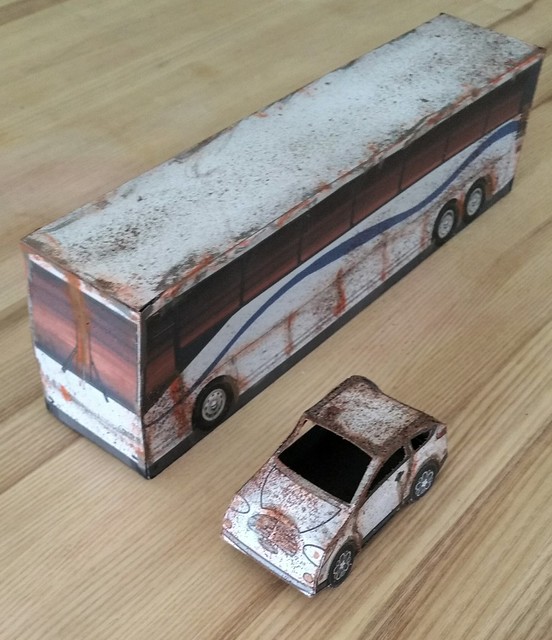 Atomic Highway GoB Atomic Highway GoB by Oracle Omega, on Flickr More details in a separate thread (I'm falling behind the threads I owe...) |
|
|
|
Post by oldschooldm on Jun 14, 2015 15:11:42 GMT -9
Looks like things are shaping up. I'm not actually 100% sure. Kinda building optimistically. After all, we *are* playing Atomic Highway which has longer rules for vehicle building than character building. (Note: may not actually be true, but sure seems like it.) |
|
|
|
Post by oldschooldm on Jun 14, 2015 15:05:59 GMT -9
I don't see the Man Semi on Papermau Vermin King - could you post a pointer for me (and posterity)? Thanks! I found the Winnebago somewhere... Thanks for all the pointers everyone! |
|
|
|
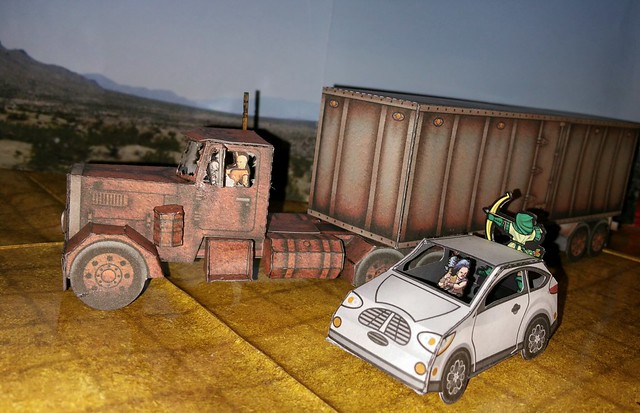
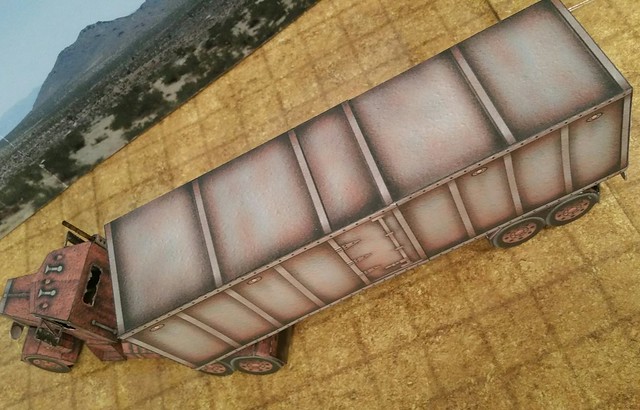
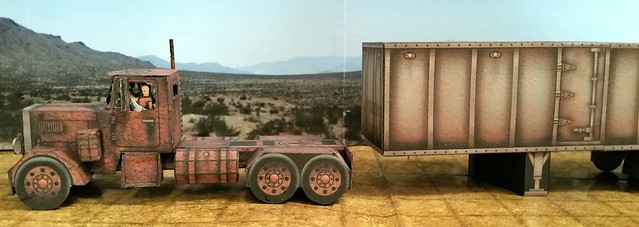
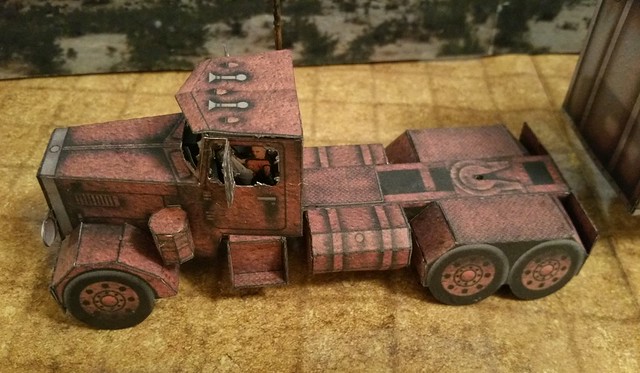
Post by oldschooldm on Jun 13, 2015 22:52:14 GMT -9
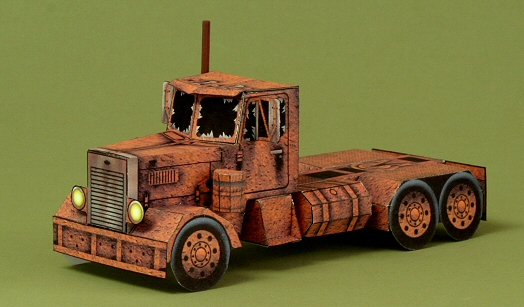
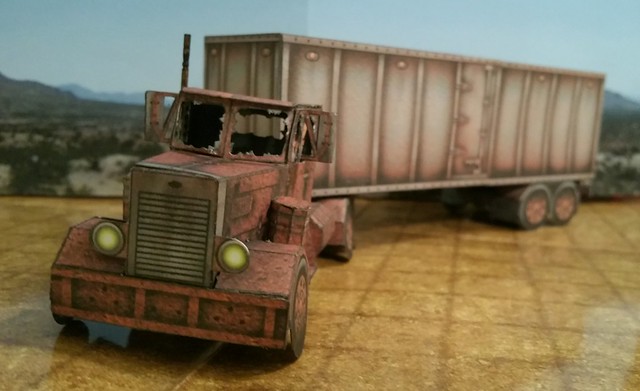
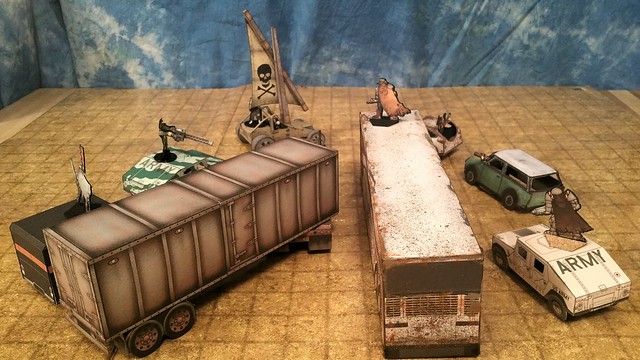
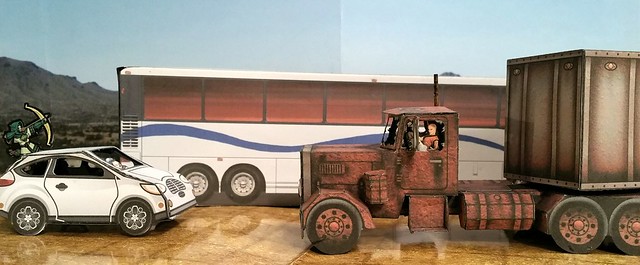
So - I built the Ghost Truck at 80%, rebuilt the White subcomact at 120% (down 80% from the last build), and the tour bus at 100% (larger model). Here they are together... Expect cutfiles for the Ghost truck and compact tomorrow evening... |
|
|
|
Post by oldschooldm on Jun 12, 2015 18:18:01 GMT -9
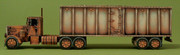
Just looked up the size of a shipping container, it is only 8 feet wide, so I may scale down 20% after all.
Sent from my SAMSUNG-SM-N910A using proboards
|
|