|
|
Post by oldschooldm on Jul 8, 2015 7:36:22 GMT -9
|
|
|
|
Post by oldschooldm on Jul 7, 2015 22:58:09 GMT -9
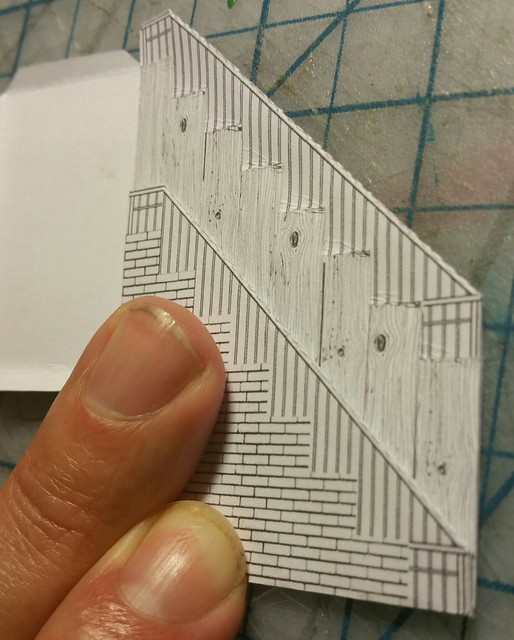
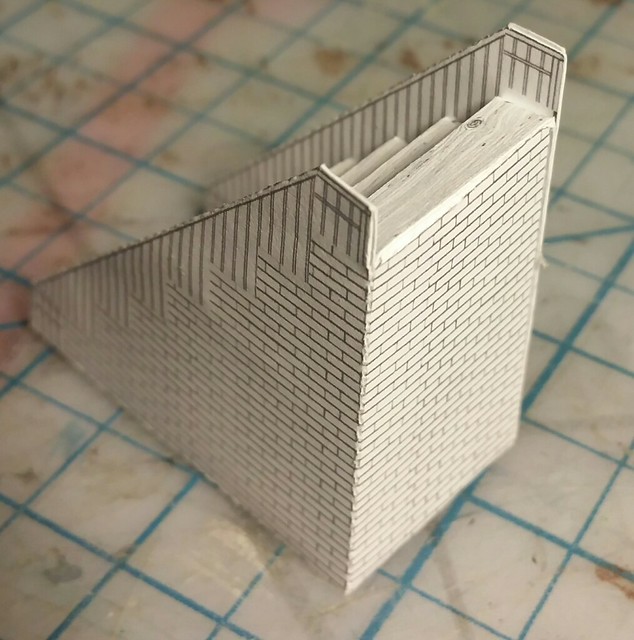
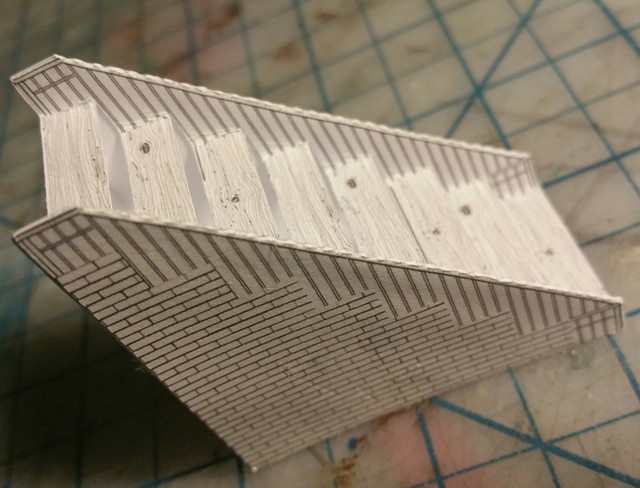
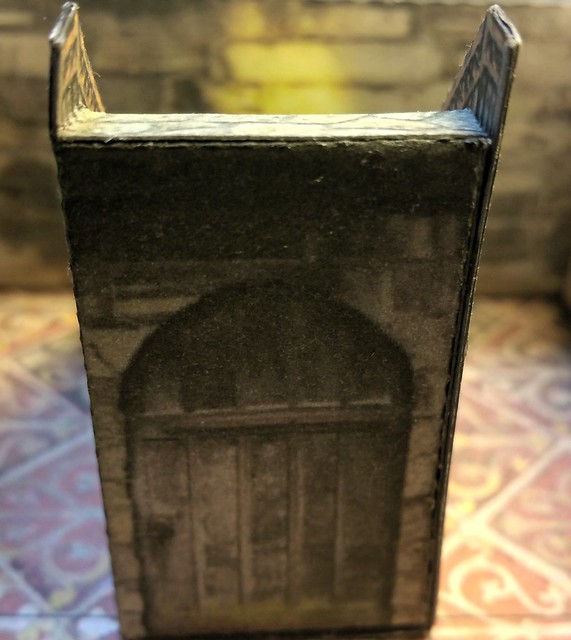
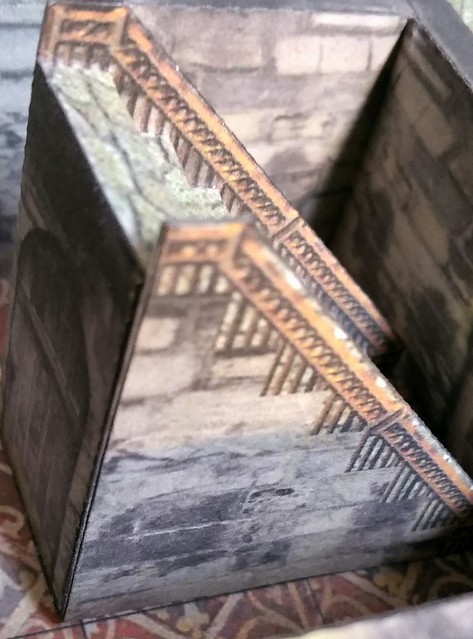
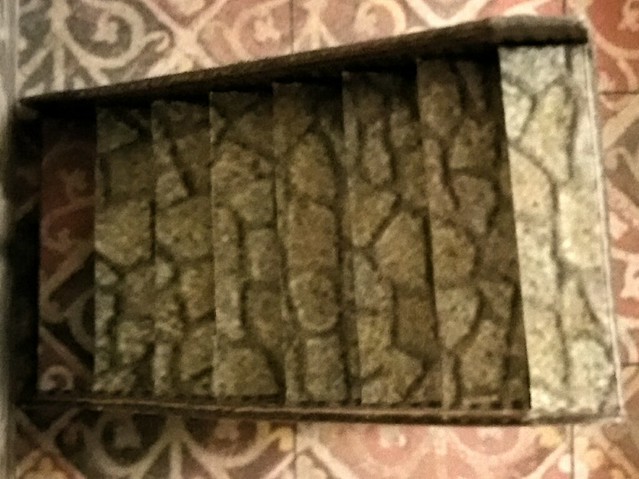
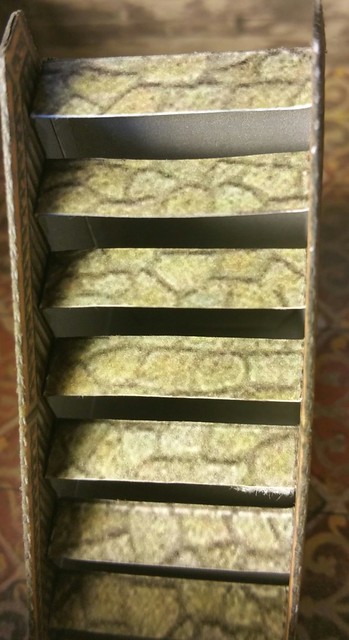
Someone on Facebook was having a problem wrapping their head around the construction. Given how I tad to twist my head into a pretzel to design this, I'm not at all surprised. Here's a new version of the PNG with a simple texture that shows how everything is oriented and some construction pictures to show how everything folds (and this is a fold-flat version of the build.)  |
|
|
|
Post by oldschooldm on Jul 7, 2015 11:49:53 GMT -9
|
|
|
|
Post by oldschooldm on Jul 7, 2015 11:31:24 GMT -9
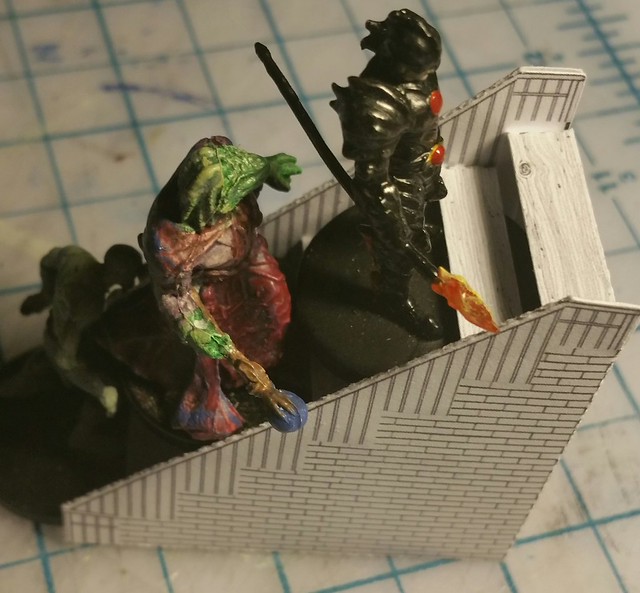
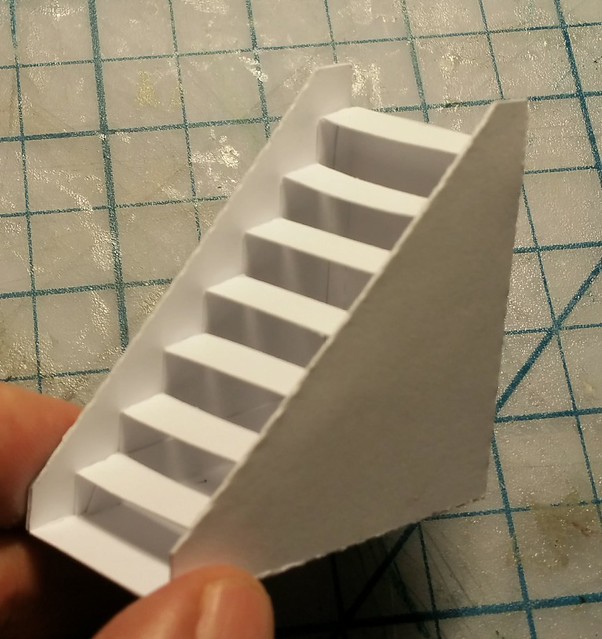
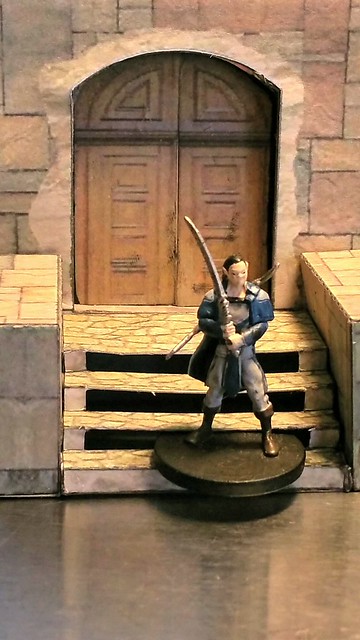
As you all know, I'm a bit obsessed with paper staircases lately. Till now, one thing has eluded me: a fully stand-alone popop staircase, that you could use in the middle of a room, for example. Well, I had just such a need for a custom sized and shaped staircase for my 2015 Papercuts contest entry in progress. I wanted to start with the perfect pop-up tread model I'd been working with - so many staircase designs have the crafter glue tons of tiny tabs, often 2-4 for each tread. Add that I always like to make the staircase mini-climbable and the construction is 4x more complicated and fraught with gluing errors. So - as I layed out my popup treads, I realized that I could probably reduce the wall to just being the size of a hand-rail or smaller - then that meant I could put the "outside" texture on a fold-down piece that went along that rail. Ooh! then I could put on the wall that closes the "backside" of the structure! Oh! And the bottom piece folds under... and... and... Before you knew it I had a single-piece fold-flat mini-walkable staircase that had only a half-dozen glue points! Here's the design: No glue tabs for the treads! Yay! Here's some pictures, followed by the attachments/links: Dropbox links: Popup Staircase - One Piece Stand Alone [PNG] [STUDIO3] [PDF]Attachments (alternate source): Popup Staircase - One Piece Stand Alone.pdf (35.05 KB) Popup Staircase - One Piece Stand Alone.studio3 (88.5 KB)  This is my gift to the community - you may do whatever you want with this design - no one may own it it because I'm hereby putting it in the public domain! [This will also appear in the Designer Showcase Sampler as an option for anyone who wants to create one.] TIP: Leave the back panel (the one shown with the doorway printed on it) unglued if you want this to store flat. If you want it stronger, glue the back panel in place. |
|
|
|
Post by oldschooldm on Jul 7, 2015 6:04:55 GMT -9
Thanks! That looks pretty cool. I look forward to trying it out.
BTW: The design I posted really only had one benefit: It will work on any existing wall 'boxy' wall design without modification. If you are doing "exterior" walls, copy-rotate-paste is the only mod needed to make the end look nice.
Your design looks much stronger, but looks like more work for the designer - adding yet-another-layer. I'm up for it if you are!
|
|
|
|
Post by oldschooldm on Jul 6, 2015 9:52:07 GMT -9
Dave - as one of your #1 kitbashers: here's the one thing I got from the PSD's that I normally can't get from the PDF (but you could add and I would be happy): a layer to disable the "white glue" areas - For interior walls, I'm always having to photoshop some texture where the exterior glue-spots (dormers, chimney's, etc.) are - but the PSD had them as a layer.
If you could do that, we interior-kitbashers would be grateful.
|
|
|
|
Post by oldschooldm on Jul 3, 2015 7:22:51 GMT -9
|
|
|
|
Post by oldschooldm on Jul 3, 2015 7:19:04 GMT -9
|
|
|
|
Post by oldschooldm on Jul 3, 2015 6:39:51 GMT -9
I post there as @ oldschooldm - mostly papercraft related.
|
|
|
|
Post by oldschooldm on Jul 2, 2015 21:15:39 GMT -9
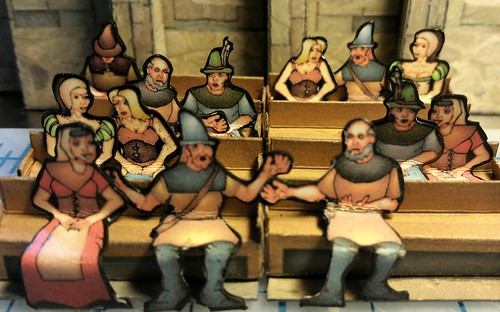
It depends on the quantity modded; a few can just be posted with no worries, a whole page, or thereabouts, I like to add into the OBS files so things stay together. Modded only 3 male and 3 female seated Tavern people. They are all in the photo (please ignore the sleepy guy, he is un-modded and not in included as part of the kitbash.) That's 6, with a mirrored copy on the page. I'm sending a PM with links (page and cutfile) for your inspection as to quality (they don't look so awesome close up, but work well when printed at scale.) Let me know if I should post as kitbash or let you take it from here. :-) Thanks for the awesome models! |
|
|
|
Post by oldschooldm on Jul 2, 2015 13:53:10 GMT -9
It is only through your inspiration that I've started planning interiors for my buildings... The County Brewery is my first, and I've really enjoyed it (I've been meaning to post pics for a week or so).... OMG! Post pics! I'd love to see that with an interior! Don't worry about the windows, it's a bit of a pain and I only do it for special models anyway. :-) |
|
|
|
Post by oldschooldm on Jul 2, 2015 11:24:15 GMT -9
Don't get out much, do you Randy?  I was sick for two weeks, so I had a big burst of extra hours available. :-) Thinking of it today: I don't play video games (even though I like them very much) - You can think of it as "Papercraft is my Minecraft." Thanks! Now I'm going to use that as my .sig! |
|
|
|
Post by oldschooldm on Jul 2, 2015 10:08:13 GMT -9
|
|
|
|
Post by oldschooldm on Jul 1, 2015 12:34:21 GMT -9
You might need to do some Gimp-work to get parishoners Underway. |
|
|
|
Post by oldschooldm on Jul 1, 2015 7:13:00 GMT -9
<...> only seated figures I know of <...>
 This I freely admit.  |
|
|
|
Post by oldschooldm on Jun 30, 2015 22:23:53 GMT -9
|
|
|
|
Post by oldschooldm on Jun 30, 2015 22:02:57 GMT -9
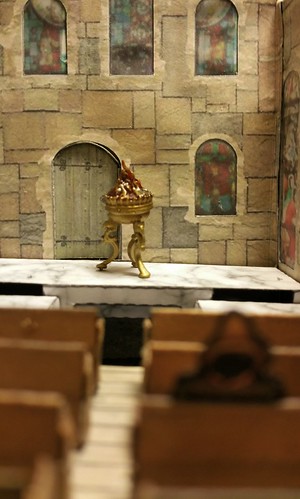
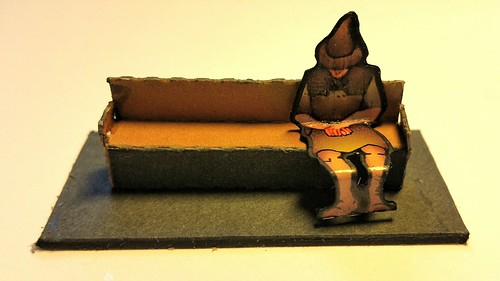
One monk has the only seated figures I know of:  and  But those are (almost) all drinking. Drinking is not the only reason to sit. :-) 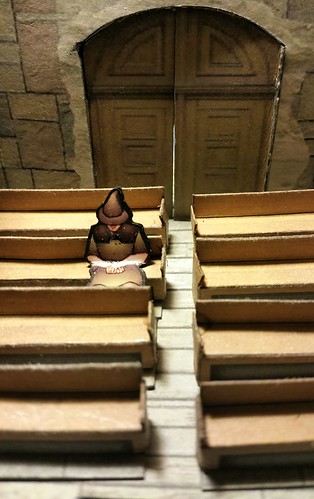 Does anyone know of other sets of sitting figures that might be appropriate for non-drinking settings? If not, I'll adapt other figures (and probably remove the cups from some of the One Monk ones, as I like the style...) |
|
|
|
Post by oldschooldm on Jun 27, 2015 22:55:30 GMT -9
Final textures look good... A little public domain Oak tabletop and some photoshop... |
|
|
|
Post by oldschooldm on Jun 27, 2015 13:13:32 GMT -9
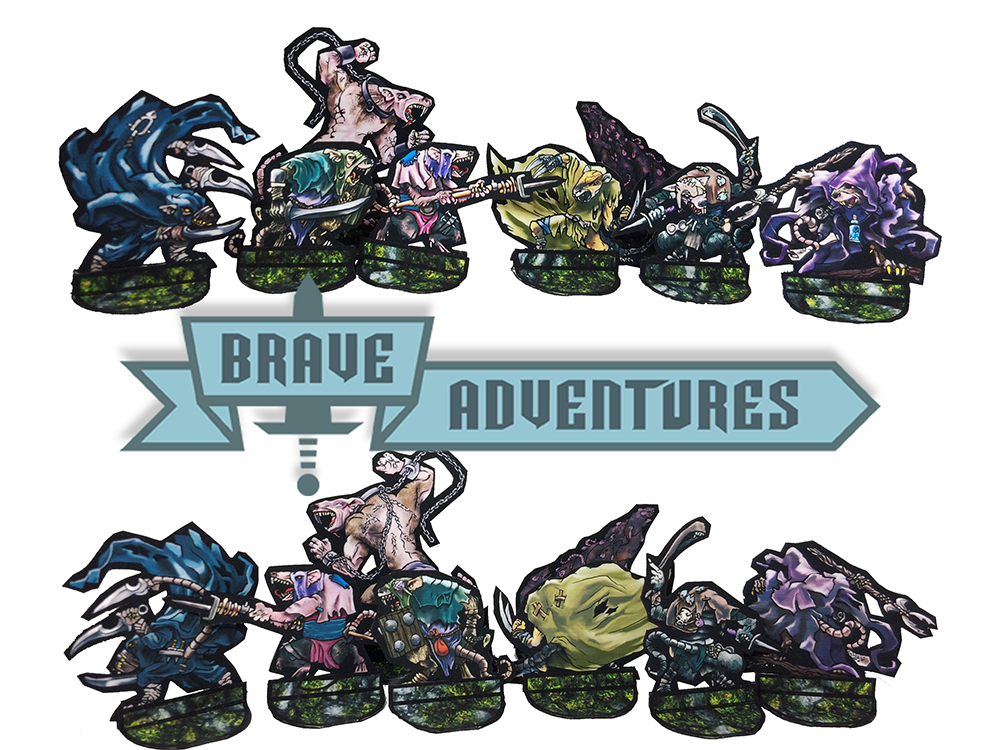
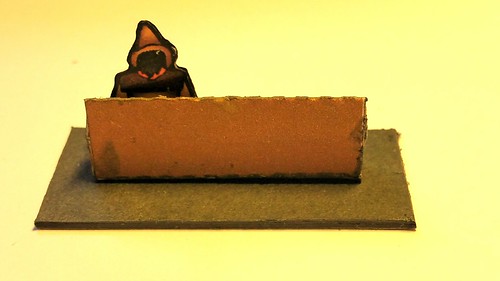
For the interior, I need pews - and I need them to be small (but work with seated cardboard figures...) Here's my .25" deep prototype. I like it, so I'll texture it up using public domain textures and share it here... |
|
|
|
Post by oldschooldm on Jun 26, 2015 14:56:10 GMT -9
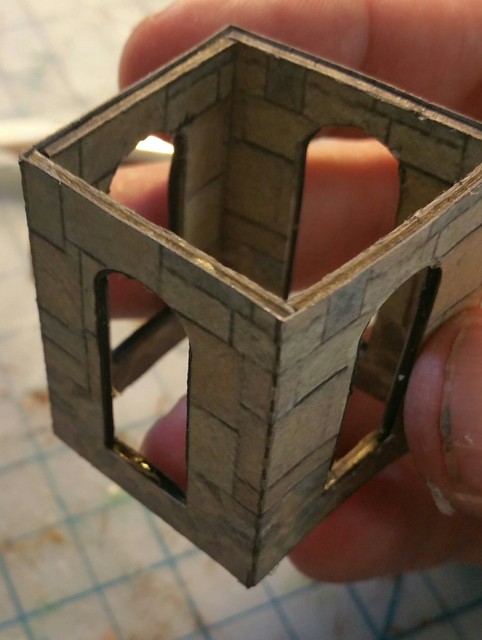
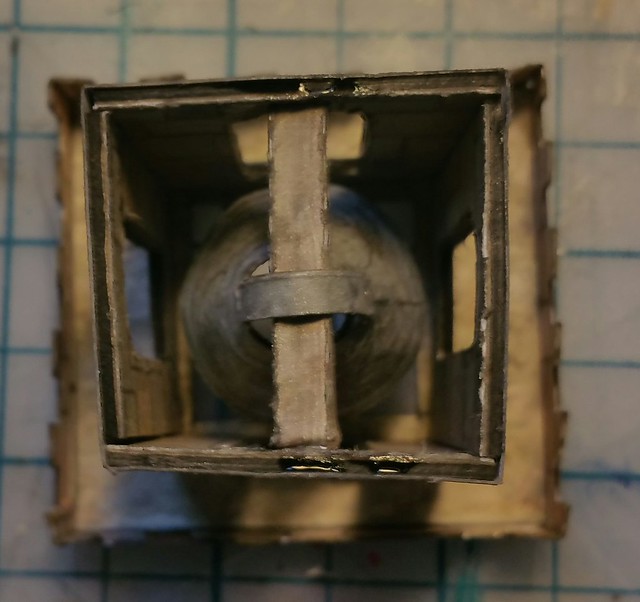
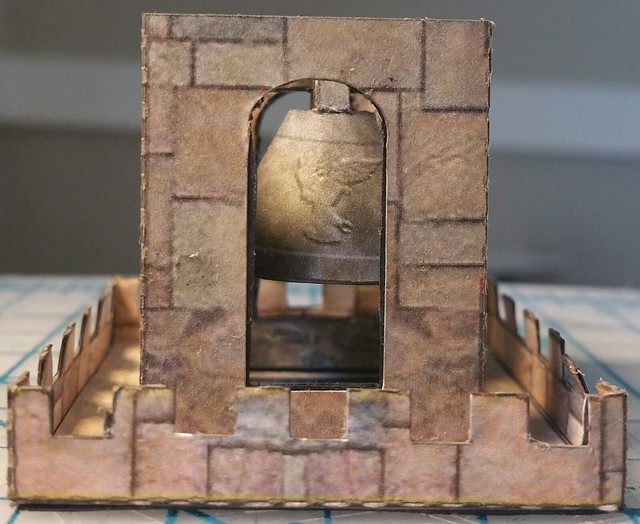
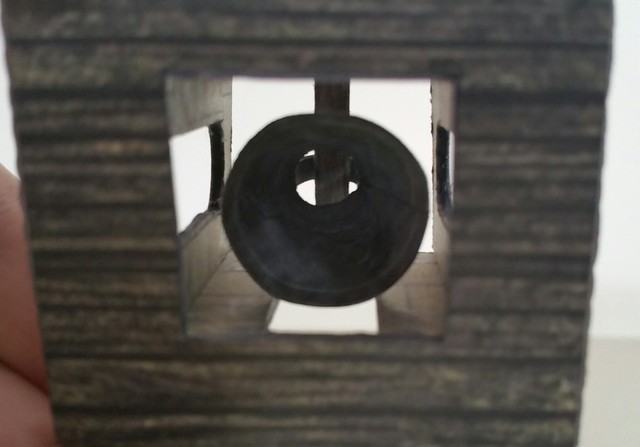
I haven't forgotten - here's another mod - opening the upper tower for a church bell (the Bell is from fatdragongames) And, of course, the staircases have been modded to hold figures... ... lots more to do ... |
|
|
|
Post by oldschooldm on Jun 25, 2015 8:19:30 GMT -9
"CIS" is the keyword you want to use when doing searches for information about Continuous Ink Systems (the ultimate destination for saving money on ink.) There are threads here and over at FatDragonGames.proboards.com(I haven't made the plunge yet...) |
|
|
|
Post by oldschooldm on Jun 23, 2015 21:20:36 GMT -9
Taking my own advice - here's my #1 Tip for making your build photos more awesome: Tool: This tip can be done with the built in photo editor on any smartphone, smart camera, or in sites like Flickr quickly and easily. OLDSCHOOL's #1 TIP: If you can't frame the image yourself (as it is with my players taking pictures of my games) the NUMBER 1 TOOL is CROP (and sometimes free rotate, if the image is tilted.)
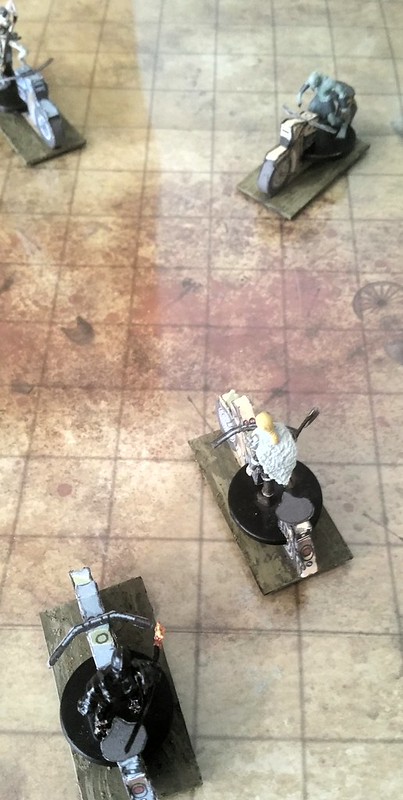
You'll get 80% of the awesome you are looking for by finding the photo inside the photo that was taken.
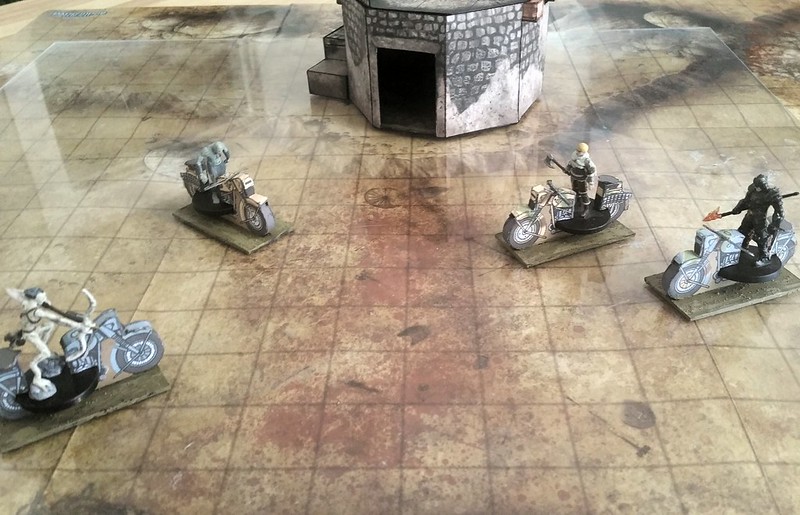
Keep in mind that the field of view to get the minis/terrain in the shot may end up including lots of other stuff, such as furniture, game gear, soda bottles, and even player body parts (usually waistlines.) All of that stuff distracts from the minis and terrain. It is AMAZING what happens when only your build is in the shot. Here's a simple example: Before:  After:  One shows a portly DM with his trusty laptop, lording it over his terrain model on a sunny day. The other shows some the ominous far off dungeon. ALWAYS CROP. None of us takes perfect pictures without a tripod. It takes <30 seconds and is worth it! |
|
|
|
Post by oldschooldm on Jun 23, 2015 21:10:53 GMT -9
There is so much talent here, and such great work - and much of it is hiding behind terrible photography.  Some of our most prolific contributors are taking bad pictures, for example: over a dozen minis in rows on in a single shot, on a washed out background, with the minis themselves barely visible. Before you get all sad or think I'm calling you out - Au contraire mon amis! This is a call to arms to raise the bar for us all! I am one of you! I think I'm pretty crappy at photography, but with some examples from my peers here and other places, I was able to learn a few quick tips that started making my shots much better. I'm now much less crappy at it - and it's all self taught - no fancy study or anything. No expensive camera, no fancy equipment (though those all help the pros with packaging and promotion quite a bit.) Some of the contributors here, take amazing photographs and I'm asking them to contribute tips and pointers to the rest of us. Stuff we can do without spending a lot of cash. Pointers to videos, blog posts, or other threads that helped you archived here would be a great boon to us all. I'm looking at you dcbradshaw, bravesirkevin, Sirrob01, madarchitect, Nemo (to name a few...) We need help with framing our shots, balancing our compositions, getting the right focus/detail, well - stuff make our snaps look awesome... Will you share? |
|
|
|
Post by oldschooldm on Jun 23, 2015 15:58:44 GMT -9
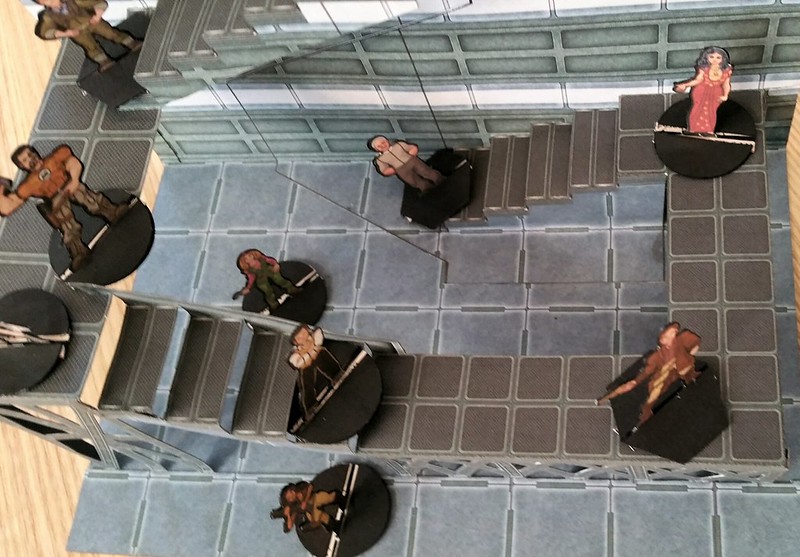
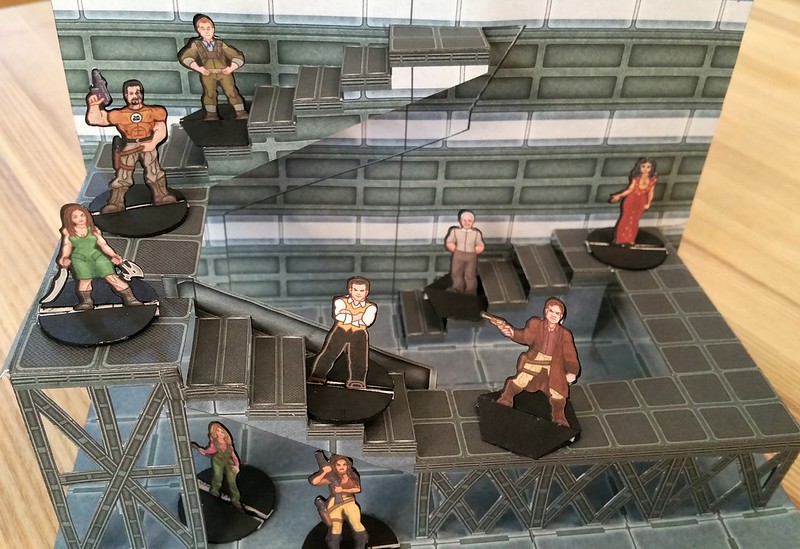
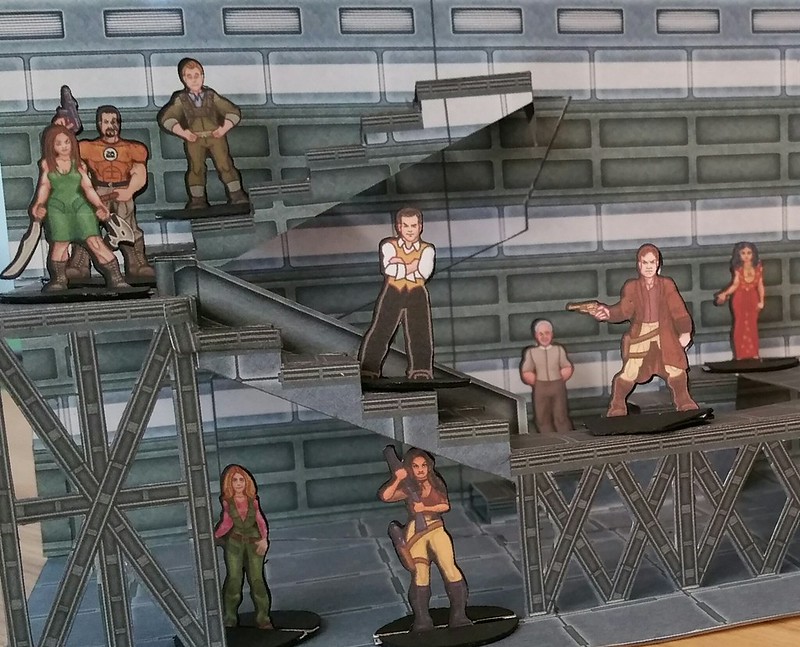
Sorry no pictures for a while, I've been a little distracted with work (YAY!) and being sick (BOO!)... Way back when I started this little project, I got permission to kitbash some of Christopher Roe's techie textures onto the spiral staircase - but quickly got stuck with things being too dark and me having near 0 skill with Photoshop/Gimp/Etc. Anyway - for other reasons I needed to make some Serenity Crew figures and I *always* like to have a nice background for my build shots. Solved two problems at the same time my resuming work on the staircase (for now, just jacking up the brightness and contrast) so I'd have an appropriate backdrop (and another encouragement for anyone planning on making a 'case.) Enuff chatter - The Photos! |
|
|
|
Post by oldschooldm on Jun 23, 2015 15:49:34 GMT -9
|
|
|
|
Post by oldschooldm on Jun 23, 2015 15:47:06 GMT -9
Product: Serenety Crew a free model by grendelsmother64Cutfile: Grendelsmother64-Serenity_Figures.studio3 (365.48 KB) Cutfile: Grendelsmother64-Serenity_Figures.studio3 (365.48 KB) NOTE: These cutfiles require some additional care when using with the source material -
----> They don't fit properly within the cut area, you may have to invert, rotate or even move portions off the printable area. There are white rectangles provided to cover items that fall out side of the cutting area. You may have to hand-cut one of the Sphinx feet.
----> The original models don't have clean clear or black edges. If you "move to bottom" the textures, the outlines will print in black over the objects to make for clean lines.
You will need to download a copy of that product to use these correctly. The artwork is not included to protect the rights of the copyright holders. The product does not contain the required registration marks to work with the cutter. In order to get the registration marks in the correct place relative to the cutting lines in these files, you will need to print from within the Studio program itself after merging the artwork. Helpful tip: Once you've merged in the artwork, you can use the eraser tool to clear out extraneous graphics before printing. Step one: Get each PDF page into individual PNG files, so Studio can read them. There are several ways to do this. If you have Adobe Acrobat Pro, split and reformat the pages one at a time by choosing: Save As > Image > PNG. If you want to customize the layers (There are various texture options), you can print-to-PDF after selecting the layers. Then you still have to convert each PDF into a PNG. If you don't have Acrobat Pro, another means to move PDF -> PNG is using the GIMP editor. When you open a PDF with GIMP, you can specify which pages to import. Be sure to set the resolution to 300 DPI on the import dialog! Once it is open, save the page with a .PNG file (by typing in that suffix), no compression. Now you need to merge the PNG files with their cutfiles to get the registration marks right when you print... (The remaining instructions are specific for Studio 3.3.451ss) Step two: Now you have PNG files for each page, start Studio and then open one of them (you won't see the PNG files by default in the open dialog, click the file-type pop-down and chose PNG to see them). Once you see the image on simulated carrier sheet, you may see it rotated 90-degrees (not fitting on the sheet), just click Portrait on the Page control to rotate the carrier sheet to match. Next choose Merge from the file menu and select the matching cutfile page. You should see red-lines overlaying the image, they probably won't align properly at first. Step three: Align the image to the cutlines. Zoom in 3-4 times by clicking on the +-magnifier at the top of the screen. The lines are in the correct place, it is the image that needs to move to match. Click on the image (including white area) somewhere, and use the arrow keys to shift the image until it matches the cut lines. I'd save the cutfile at this point. Step four: Print the file and cut! Choose the printing option from within Studio - either from the File menu or as the first option after clicking on the Cut icon at the top of Studio - it will include the registration marks from the cutfiles. Then you know the drill, mount to carrier sheet and cut then edge and assemble! These cutfiles were created with Silhouette Studio version 3.3.451ss by oldschooldm and this post format is by mproteau (Paper Realms) @ the Cardboard Warriors forums: cardboard-warriors.proboards.com
|
|
|
|
Post by oldschooldm on Jun 23, 2015 15:35:26 GMT -9
I think you may be better off with a modified 2d horse. Modified by using a layer of notepad backing sandwiched between the two halves of the horse. Not much different than the Litko horses. I'm not a very visual person, so I don't get this description. Could you make a sketch or a rough prototype? |
|
|
|
Post by oldschooldm on Jun 22, 2015 20:29:07 GMT -9
@eddnick's models are pretty amazing, but are very fragile. If you are staring with that, you'll be adding a lot of structure.
Best of luck!
|
|
|
|
Post by oldschooldm on Jun 22, 2015 13:31:30 GMT -9
Oh my gosh those look so amazing. I agree completely, and want to thank berneart76 again for jumping in and taking this project to the goal line! Great detailed work! Sent from my SAMSUNG-SM-N910A using proboards |
|
|
|
Post by oldschooldm on Jun 22, 2015 12:28:18 GMT -9
|
|


 Some of our most prolific contributors are taking bad pictures, for example: over a dozen minis in rows on in a single shot, on a washed out background, with the minis themselves barely visible.