|
|
Post by oldschooldm on Jun 12, 2015 12:52:08 GMT -9
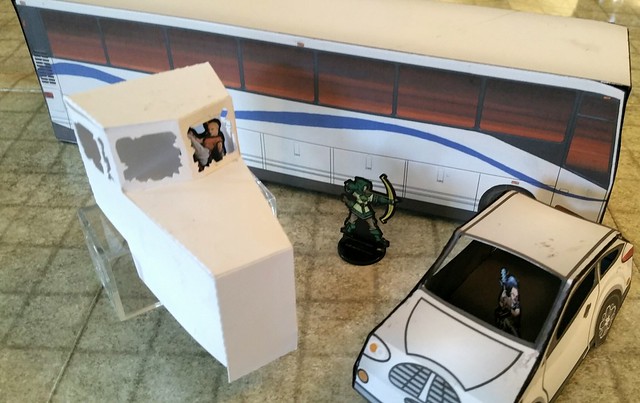
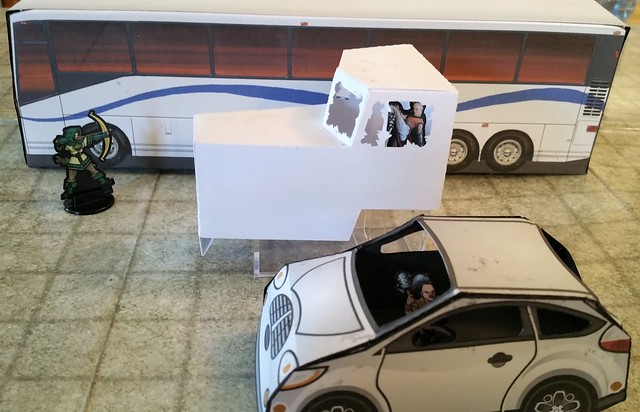
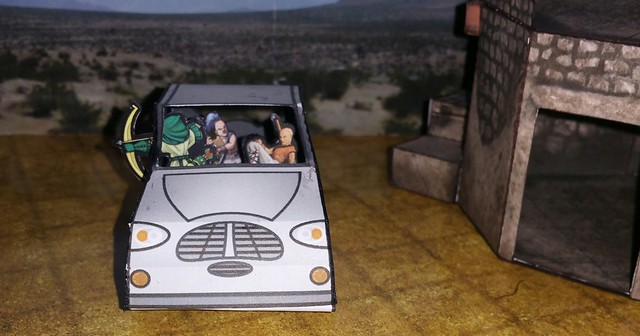
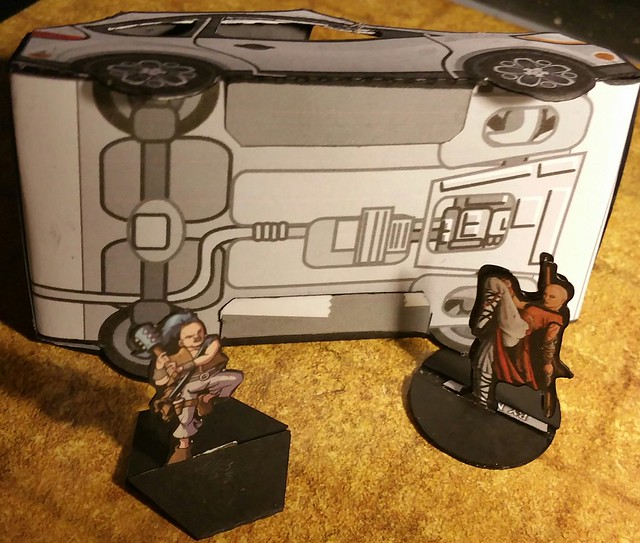
Judge for yourselves: The cab will get wider when the wheels (and wheel wells) are on - so total will be about 3" wide, but I'm more concerned with the cab and cargo container size myself. So *my* verdict is for 28-32mm paper minis: Print at full size. We'll see what the final looks like in a couple days. |
|
|
|
Post by oldschooldm on Jun 12, 2015 11:35:52 GMT -9
Haven't built it, but when I was thinking of printing it out, I thought printing at 2 pages per page looked too large still (but acceptable) and four pages per page looked a bit small. Did not do the project (got sidetracked building Joan of Arc), but I thought that the door looked about right printing at three pages per page That sounds pretty small. What target scale are you looking for? I'm using the width of the container to judge the scale size, in D&D 1" = 5ft, so 2" wide seems pretty good (if not a little small) and for me that is 1:1 scale on 8.5x11" paper. I think I'll build the cab, check, then the container and recheck. |
|
|
|
Post by oldschooldm on Jun 12, 2015 11:26:31 GMT -9
I wonder how impossible Mauther's Bedford would be to get close to scale. 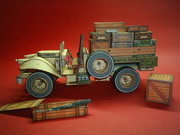 I've been grabbing stuff of Papermau left and right, but hadn't seen that beauty! Thanks! |
|
|
|
Post by oldschooldm on Jun 12, 2015 6:12:40 GMT -9
What percentage would you guys recommend printing ravensblight's ghost truck at to make it work for 28 mm? I'm working on cutfiles for this one now - as it is looks pretty good to me (I'm going for vehicles being 2" wide as scaling.) - will let you know. (Unless someone out there has already built it...) |
|
|
|
Post by oldschooldm on Jun 11, 2015 9:43:30 GMT -9
Thank you from us all! :-)
|
|
|
|
Post by oldschooldm on Jun 11, 2015 7:07:44 GMT -9
I knew you'd all come through with great stuff instantly! :-) Thanks Rhannon (again) and squirmydad! |
|
|
|
Post by oldschooldm on Jun 10, 2015 23:38:54 GMT -9
1 - First paper minis that come to mind are those by Dave Graffam. Official paper minis for Atomic Highway. They very reminiscent of Fallout series, imho. Found them - they are gone from OBS, but still on Paizo. They look like mercenaries only. I think I want stuff that's more punky. Checking out the rest of your recommendations. |
|
|
|
Post by oldschooldm on Jun 10, 2015 23:30:10 GMT -9
|
|
|
|
Post by oldschooldm on Jun 10, 2015 20:22:23 GMT -9
So my FLGS D&D 5e game is going on hiatus for 12 weeks, but one of our group has gone completely nuts for the new Mad Max is inspired to run Atomic Highway during the break. I've never played or run a post-apocalypse game, but am exited to bring my papercrafting skills to the table as a propmaster. I'm planning on making: - "Fortune" tokens (cards): These are like Bennies/Action Points/Fate Points from other games - a resource to change the luck of a roll.
- Paper miniatures (and flat mini stands): I'll probably find my first cut at these on this very forum! Recommendations requested!
- Vehicles!: I need a semi truck, various post-apocalyptic raiding vehicles, a dune buggy, a bus - all with weathering (or additionally some textures to lay over usual models to make them look beat up. BTW, I'm planning on making the vehicles to be able to hold minis, and fold flat!
If I create/mod/cut-trace anything, I'll share it on this thread. And, of course, any construction and play photos! So - help me with links, and I'll help us all with mods/cutfiles! Deal? Thanks in advance! OldSchoolDM! .. and so begins the searching ... |
|
|
|
Post by oldschooldm on Jun 6, 2015 13:43:56 GMT -9
Not that matches that set, sorry No need to match that set. My idea is that one of your designs/textures from any set could be contributed to the pop-up staircase sampler and promote an existing set and your company... Sent from my SAMSUNG-SM-N910A using proboards |
|
|
|
Post by oldschooldm on Jun 5, 2015 13:38:17 GMT -9
|
|
|
|
Post by oldschooldm on Jun 3, 2015 21:00:36 GMT -9
In theory the links have been replaced by "sharable" links. Sorry bout that, I generally avoid using google docs/drive/etc/anything. Can someone confirm if they are working, please? Also updated to add build instructions. Confirmed. Looks great. |
|
|
|
Post by oldschooldm on Jun 3, 2015 11:25:52 GMT -9
|
|
|
|
Post by oldschooldm on Jun 3, 2015 8:15:52 GMT -9
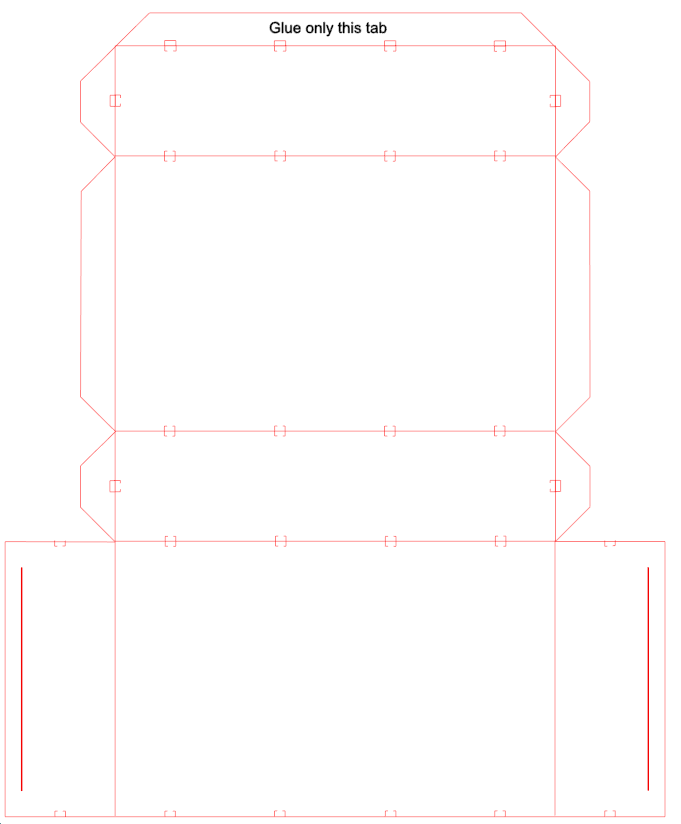
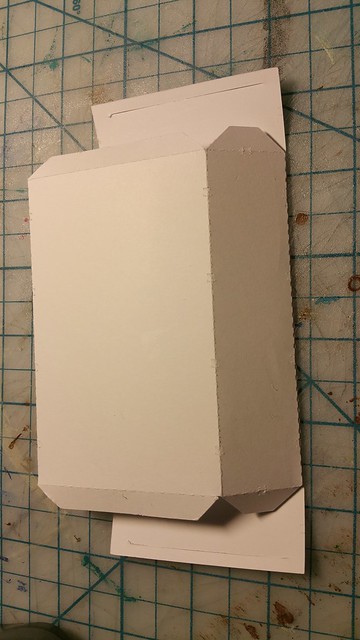
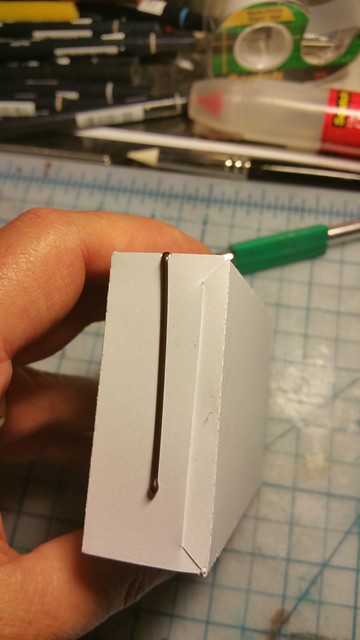
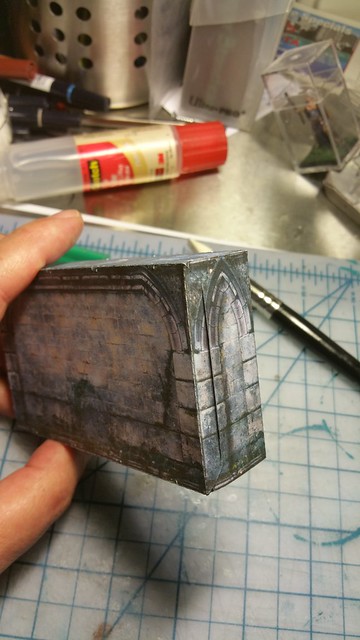
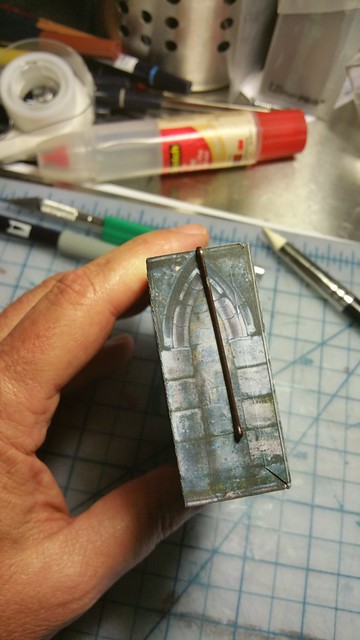
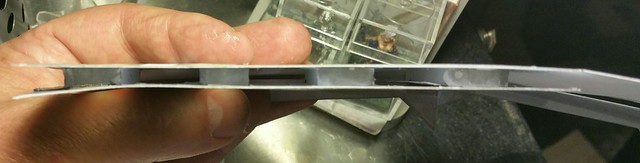
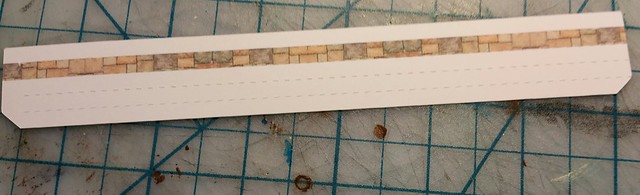
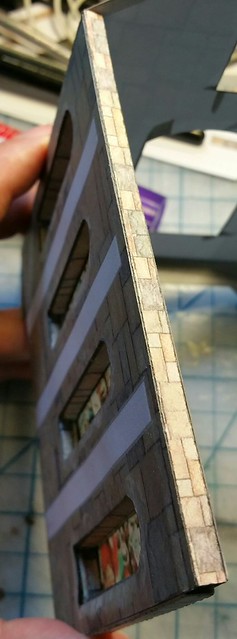
I've got a new fold-flat scheme I'd love to share with you all. It's the easiest fold-flat mod I've ever done... Background: BSGTony (lordzsezse)'s Kickstarter Elven Wall Set is now available. I am planning on making a LOT of this (hopefully in the Dark texture, if it comes out on time) but I don't have the space to store lots of boxy wall segments. At least the blank walls MUST be fold-flat. So, I started experimenting with various ideas to make that happen. I'm happy to report that I really like my section option, something I call "EZSlot Fold Flat". It only adds 2 cuts and doesn't change any other cuts/folds. The darker red lines are the new cuts. The side tabs are fold-in. Only the bottom tab is glued. Here's my prototype photos: Here's the rub - if (and only if) you want the ends to look nice: The side former-glue-tabs are now outside the model, and so need to be textured. The texture is the inverse (rotate 180degrees) of the edges of the side panels. I did two quick select-copy-rotate-paste in photoshop (any PDF loading editor will work) before printing, and here's the results when cut and assembled: It's stronger than you think (at least using 80# card stock) - but not as strong as glued. This technique makes no sense for walls with holes in them (such as gates.) If you use these for only interior wall segments, you don't even have to retexture the fold-over-side-tabs, as the will be hidden when you bobbypin the whole thing together. For me this won't save 100% of the wall-storage problem, but I'm sure it'll make 80%-90% of the pieces take virtually NO space. That's a huge win for me. Here's the cutfile: Walls_4in_Fold_Flat_EZSlot.studio3 (101.92 KB) |
|
|
|
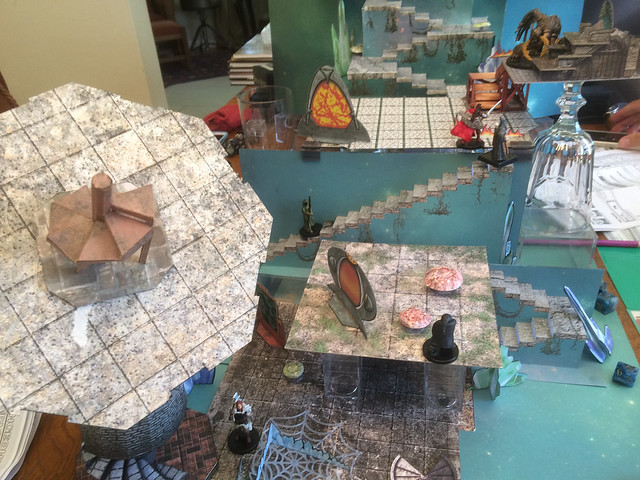
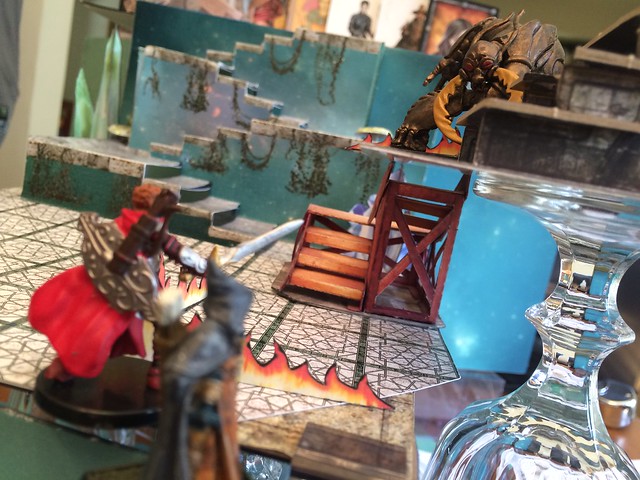
Post by oldschooldm on Jun 3, 2015 7:52:49 GMT -9
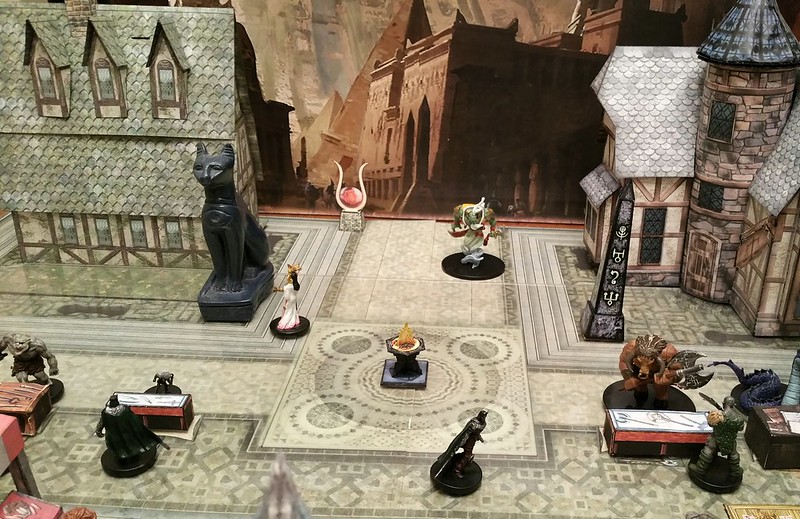
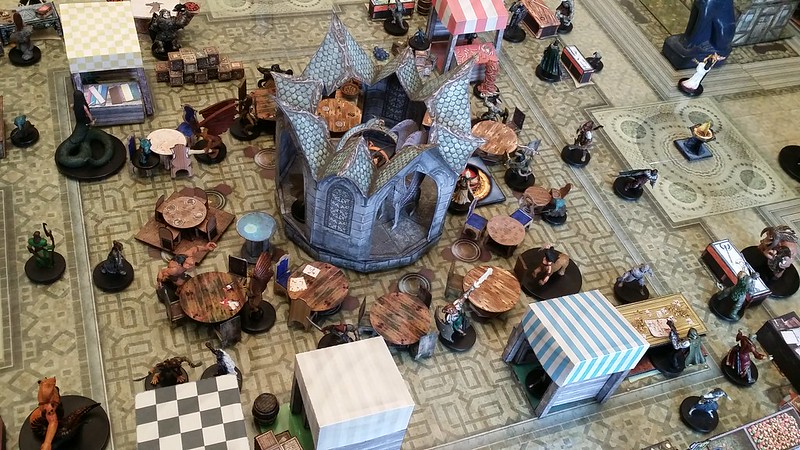
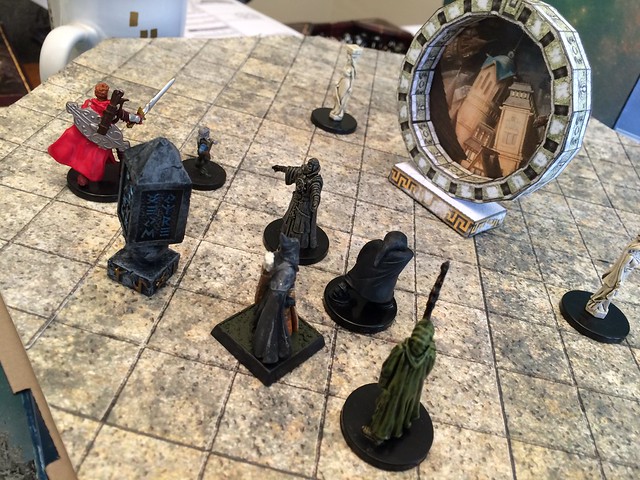
It has! 8 13x19 sheets printed on UltraPremium Presentation Matte - I placed matching 3D items over each element (Though I went for buildings in the corners instead of trees - it being Sigil and all...)
I've been itching for an excuse to make one of the DramaScape maps for a very long time. Hope I did it justice.
The map is getting a bunch of attention on FB as well. Hope you see a little bump in sales! :-)
|
|
|
|
Post by oldschooldm on Jun 2, 2015 17:02:13 GMT -9
:: Ping! :: It's been awhile since there's been a submission. berneart76 has weighed in that he's still working on his wharves (for which I can not wait to be first in line to purchase, I must say...) But I'm still hoping to get a little love from several others here that mentioned a desire to participate... squirmydad - You had an idea for something with the Hollow Spiral mproteau (Paper Realms) - I have a draft from you. What can I do to help it get done? I'm happy to hack in photoshop mesper - You started a couple of really cool ideas, but we got stuck at the walls? bravesirkevin - You have such great staircases already, just borrowing those textures would be awesome Tooncraft3D - I can't wait to see what you'd make! okumarts - At least one of these templates has to work with your Kickstarter stuff, and I'm not opposed to adding more versions - check out Billiam's stuff! aaron - You were one of the first to get started, but we stalled for some reason. Probably my fault - can we bring that cool cyberpunk staircase home? darkhorseproductions - I love your elvish furniture, but your love of all things Trek suggests other options... Sirrob01 - You're the one who introduced me to the joy of interior kitbashing, so something from you would be special. What is making this project so amazing is the range of styles going into it. Honestly, I know it has stretched my horizons working with your designs and related kits for this project. BTW, since I started this, some new designers have come on board - you are eagerly desired to participate in this project as well! (see the cross linked post at the top of this thread for details.) EVERYONE is welcome, not just people who I @-mention here. That means you madmanmike pavaro cariboucowboy Mike H "Chugosh" BSGTony (lordzsezse) (any easy elvish textures handy?) kingzhu migibb distrigillator darkmook Vermin King TheRooster tonsha omega40k Rhannon cowboycentaur ... OK - stopping there before this looks like spam... More Staircases! They Are Awesome! |
|
|
|
Post by oldschooldm on Jun 1, 2015 14:15:48 GMT -9
|
|
|
|
Post by oldschooldm on May 27, 2015 21:20:19 GMT -9
Beware this one if you've never built ships-for-play before, it is not a "water line" model, meaning that you can't just set the ship (hull) on the table. Waterline models put a big flat area flat on the table and build up the remainder of the hold from there. |
|
|
|
Post by oldschooldm on May 26, 2015 23:43:43 GMT -9
Product: Stone Tower by Dave Graffam Models Cutfiles:Stone-Tower 1.studio3 (62.46 KB) Stone-Tower 2.studio3 (90.42 KB) NOTE: These cutfiles require some additional care when using with the source material -
----> They don't fit properly within the cut area, you may have to invert, rotate or even move portions off the printable area. There are white rectangles provided to cover items that fall out side of the cutting area. You may have to hand-cut one of the Sphinx feet.
----> The original models don't have clean clear or black edges. If you "move to bottom" the textures, the outlines will print in black over the objects to make for clean lines.
You will need to download a copy of that product to use these correctly. The artwork is not included to protect the rights of the copyright holders. The product does not contain the required registration marks to work with the cutter. In order to get the registration marks in the correct place relative to the cutting lines in these files, you will need to print from within the Studio program itself after merging the artwork. Helpful tip: Once you've merged in the artwork, you can use the eraser tool to clear out extraneous graphics before printing. Step one: Get each PDF page into individual PNG files, so Studio can read them. There are several ways to do this. If you have Adobe Acrobat Pro, split and reformat the pages one at a time by choosing: Save As > Image > PNG. If you want to customize the layers (There are various texture options), you can print-to-PDF after selecting the layers. Then you still have to convert each PDF into a PNG. If you don't have Acrobat Pro, another means to move PDF -> PNG is using the GIMP editor. When you open a PDF with GIMP, you can specify which pages to import. Be sure to set the resolution to 300 DPI on the import dialog! Once it is open, save the page with a .PNG file (by typing in that suffix), no compression. Now you need to merge the PNG files with their cutfiles to get the registration marks right when you print... (The remaining instructions are specific for Studio 3.3.451ss) Step two: Now you have PNG files for each page, start Studio and then open one of them (you won't see the PNG files by default in the open dialog, click the file-type pop-down and chose PNG to see them). Once you see the image on simulated carrier sheet, you may see it rotated 90-degrees (not fitting on the sheet), just click Portrait on the Page control to rotate the carrier sheet to match. Next choose Merge from the file menu and select the matching cutfile page. You should see red-lines overlaying the image, they probably won't align properly at first. Step three: Align the image to the cutlines. Zoom in 3-4 times by clicking on the +-magnifier at the top of the screen. The lines are in the correct place, it is the image that needs to move to match. Click on the image (including white area) somewhere, and use the arrow keys to shift the image until it matches the cut lines. I'd save the cutfile at this point. Step four: Print the file and cut! Choose the printing option from within Studio - either from the File menu or as the first option after clicking on the Cut icon at the top of Studio - it will include the registration marks from the cutfiles. Then you know the drill, mount to carrier sheet and cut then edge and assemble! These cutfiles were created with Silhouette Studio version 3.3.451ss by oldschooldm and this post format is by mproteau (Paper Realms) @ the Cardboard Warriors forums: cardboard-warriors.proboards.com
|
|
|
|
Post by oldschooldm on May 26, 2015 23:39:54 GMT -9
Product: Harbormaster Tower, part of Maritime Buildings Bundle by Dave Graffam Models Cutfiles:Harbormasters-Tower 1.studio3 (69.31 KB) Harbormasters-Tower 2.studio3 (108.54 KB) NOTE: These cutfiles require some additional care when using with the source material -
----> They don't fit properly within the cut area, you may have to invert, rotate or even move portions off the printable area. There are white rectangles provided to cover items that fall out side of the cutting area. You may have to hand-cut one of the Sphinx feet.
----> The original models don't have clean clear or black edges. If you "move to bottom" the textures, the outlines will print in black over the objects to make for clean lines.
You will need to download a copy of that product to use these correctly. The artwork is not included to protect the rights of the copyright holders. The product does not contain the required registration marks to work with the cutter. In order to get the registration marks in the correct place relative to the cutting lines in these files, you will need to print from within the Studio program itself after merging the artwork. Helpful tip: Once you've merged in the artwork, you can use the eraser tool to clear out extraneous graphics before printing. Step one: Get each PDF page into individual PNG files, so Studio can read them. There are several ways to do this. If you have Adobe Acrobat Pro, split and reformat the pages one at a time by choosing: Save As > Image > PNG. If you want to customize the layers (There are various texture options), you can print-to-PDF after selecting the layers. Then you still have to convert each PDF into a PNG. If you don't have Acrobat Pro, another means to move PDF -> PNG is using the GIMP editor. When you open a PDF with GIMP, you can specify which pages to import. Be sure to set the resolution to 300 DPI on the import dialog! Once it is open, save the page with a .PNG file (by typing in that suffix), no compression. Now you need to merge the PNG files with their cutfiles to get the registration marks right when you print... (The remaining instructions are specific for Studio 3.3.451ss) Step two: Now you have PNG files for each page, start Studio and then open one of them (you won't see the PNG files by default in the open dialog, click the file-type pop-down and chose PNG to see them). Once you see the image on simulated carrier sheet, you may see it rotated 90-degrees (not fitting on the sheet), just click Portrait on the Page control to rotate the carrier sheet to match. Next choose Merge from the file menu and select the matching cutfile page. You should see red-lines overlaying the image, they probably won't align properly at first. Step three: Align the image to the cutlines. Zoom in 3-4 times by clicking on the +-magnifier at the top of the screen. The lines are in the correct place, it is the image that needs to move to match. Click on the image (including white area) somewhere, and use the arrow keys to shift the image until it matches the cut lines. I'd save the cutfile at this point. Step four: Print the file and cut! Choose the printing option from within Studio - either from the File menu or as the first option after clicking on the Cut icon at the top of Studio - it will include the registration marks from the cutfiles. Then you know the drill, mount to carrier sheet and cut then edge and assemble! These cutfiles were created with Silhouette Studio version 3.3.451ss by oldschooldm and this post format is by mproteau (Paper Realms) @ the Cardboard Warriors forums: cardboard-warriors.proboards.com
|
|
|
|
Post by oldschooldm on May 26, 2015 14:45:48 GMT -9
These are SWEET. If I ever start playing Star Wars again (perhaps if the grand daughters become attached to the new movies as they grow up) I'm so using these!
|
|
|
|
Post by oldschooldm on May 26, 2015 11:55:11 GMT -9
White or black dashes are fine (as long as the can be switched off...) :-)
BTW, I like the hand drawn grid-dots. :-)
Randy
|
|
|
|
Post by oldschooldm on May 26, 2015 8:09:04 GMT -9
Black exterior cut lines. Option to hide score lines (which should be dashed, black, and thin.)
IMO. :-)
Sent from my SAMSUNG-SM-N910A using proboards
|
|
|
|
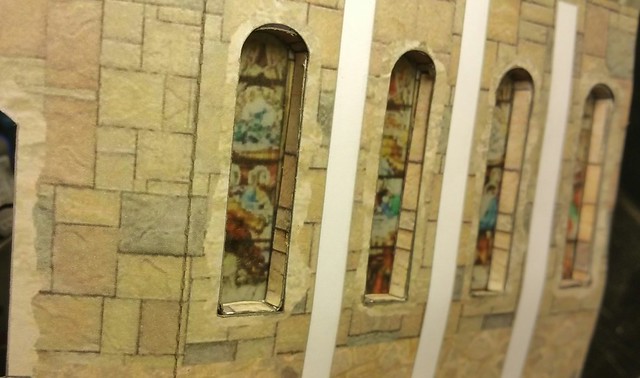
Post by oldschooldm on May 25, 2015 10:20:39 GMT -9
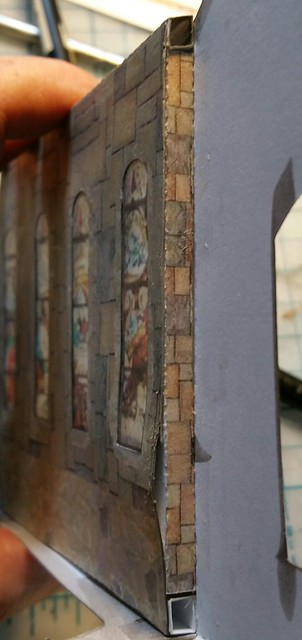
I wasn't happy with the "floppy walls" effect from only having the window frames to connect the inner and outer walls... I iterated on several ideas for fixing it, then went with my simple standby: Open-end boxes... In effect a way to add perfect fitting tabs to two things that join at 90/180/270 degrees but don't already have tabs. Trim to fit, and bam! OK. I think I'll set this aside for a bit, since my group are coming to Sigil on Saturday and I don't have a thing planned.... |
|
|
|
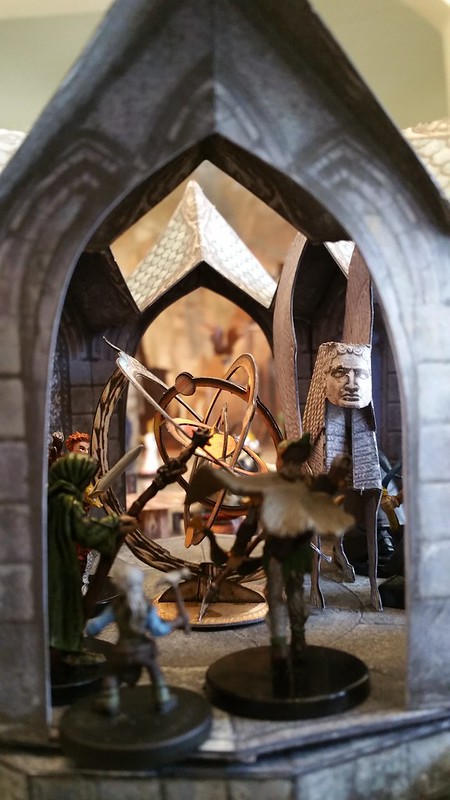
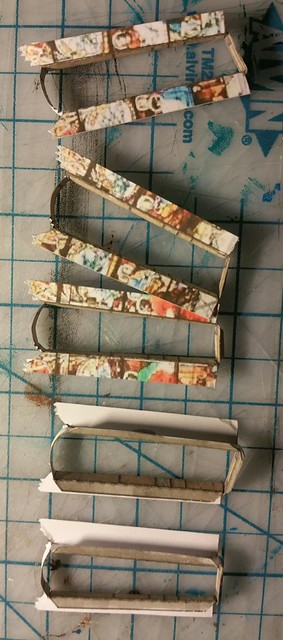
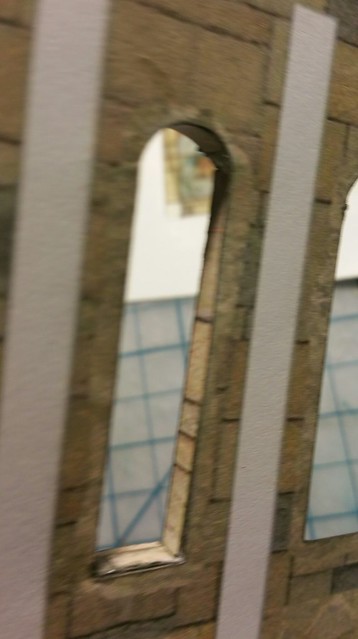
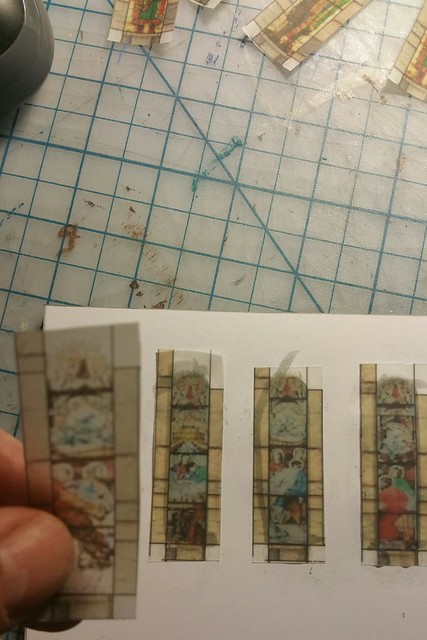
Post by oldschooldm on May 24, 2015 23:08:55 GMT -9
One of the reasons I really wanted to kitbash this model was the inset windows. Here's my build pix as I try to figure out exactly how to make them work with vellum... |
|
|
|
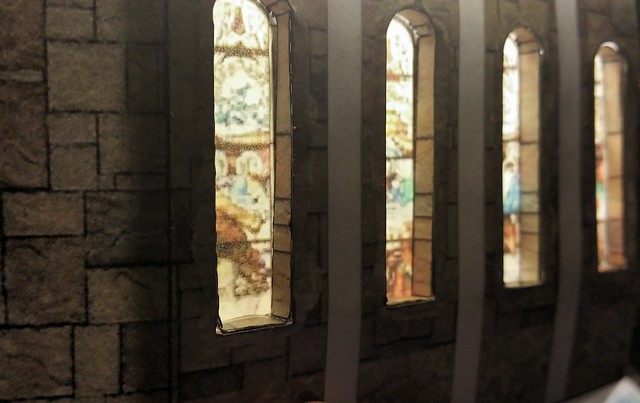
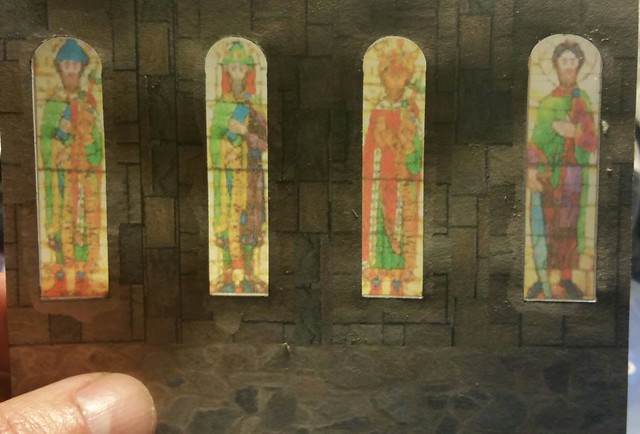
Post by oldschooldm on May 23, 2015 23:35:12 GMT -9
This year I'm inspired to build a special kitbash based on mauther's FREE Igreja Medieval. papermau.blogspot.com/2011/06/igreja-com-cruzeiro.html. Honestly, you all know what to expect... an interior and see-through stained glass... But, I've got something special in mind to make this kit work well with roll-playing. A whole new level of kitbash! :-) Anyway, if there is a Papercuts 2015 this year, I'll probably enter this (not sure about multimedia or all-paper, we'll see as I go along.) Last year, working on my entry gave me something to feel good about at a time I wasn't feeling very good about myself. I'm happy to report that I get the same positive feeling from kitbashing this model, even though I'm in a much better place this year. I wonder if we are having our annual contest this year? Randy |
|
|
|
Post by oldschooldm on May 18, 2015 15:08:35 GMT -9
|
|
|
|
Post by oldschooldm on May 18, 2015 8:59:28 GMT -9
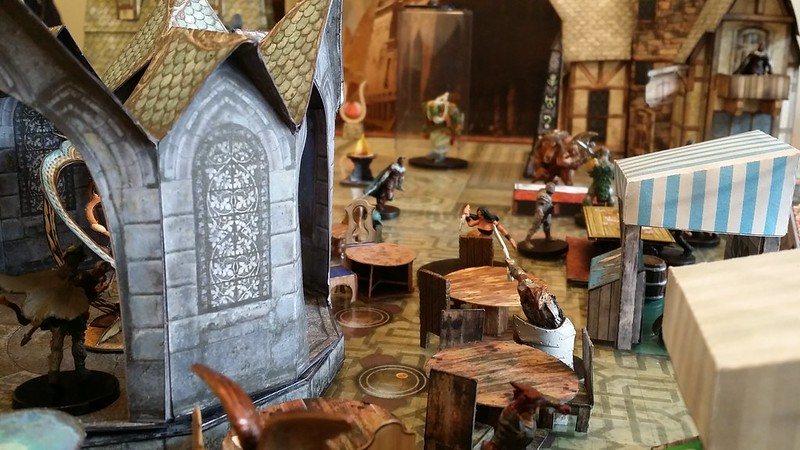
This is awesomesauce! I can't wait to see the live-play photos. Something about players interacting with scenery like this brings the place to life!
|
|
|
|
Post by oldschooldm on May 18, 2015 6:49:31 GMT -9
Thanks for the mats, Mike! |
|
|
|
Post by oldschooldm on May 16, 2015 16:48:27 GMT -9
Product: "A few more furniture for your dungeon" by eddnicCutfiles: dl.dropboxusercontent.com/u/3838990/More%20Dungeon%20Furnishings%20by%20Eddnic%20Cutfiles.zipNOTE: These cutfiles require some additional care when using with the source material -
----> They don't fit properly within the cut area, you may have to invert, rotate or even move portions off the printable area. There are white rectangles provided to cover items that fall out side of the cutting area. You may have to hand-cut one of the Sphinx feet.
----> The original models don't have clean clear or black edges. If you "move to bottom" the textures, the outlines will print in black over the objects to make for clean lines.
You will need to download a copy of that product to use these correctly. The artwork is not included to protect the rights of the copyright holders. The product does not contain the required registration marks to work with the cutter. In order to get the registration marks in the correct place relative to the cutting lines in these files, you will need to print from within the Studio program itself after merging the artwork. Helpful tip: Once you've merged in the artwork, you can use the eraser tool to clear out extraneous graphics before printing. Step one: Get each PDF page into individual PNG files, so Studio can read them. There are several ways to do this. If you have Adobe Acrobat Pro, split and reformat the pages one at a time by choosing: Save As > Image > PNG. If you want to customize the layers (There are various texture options), you can print-to-PDF after selecting the layers. Then you still have to convert each PDF into a PNG. If you don't have Acrobat Pro, another means to move PDF -> PNG is using the GIMP editor. When you open a PDF with GIMP, you can specify which pages to import. Be sure to set the resolution to 300 DPI on the import dialog! Once it is open, save the page with a .PNG file (by typing in that suffix), no compression. Now you need to merge the PNG files with their cutfiles to get the registration marks right when you print... (The remaining instructions are specific for Studio 3.3.451ss) Step two: Now you have PNG files for each page, start Studio and then open one of them (you won't see the PNG files by default in the open dialog, click the file-type pop-down and chose PNG to see them). Once you see the image on simulated carrier sheet, you may see it rotated 90-degrees (not fitting on the sheet), just click Portrait on the Page control to rotate the carrier sheet to match. Next choose Merge from the file menu and select the matching cutfile page. You should see red-lines overlaying the image, they probably won't align properly at first. Step three: Align the image to the cutlines. Zoom in 3-4 times by clicking on the +-magnifier at the top of the screen. The lines are in the correct place, it is the image that needs to move to match. Click on the image (including white area) somewhere, and use the arrow keys to shift the image until it matches the cut lines. I'd save the cutfile at this point. Step four: Print the file and cut! Choose the printing option from within Studio - either from the File menu or as the first option after clicking on the Cut icon at the top of Studio - it will include the registration marks from the cutfiles. Then you know the drill, mount to carrier sheet and cut then edge and assemble! These cutfiles were created with Silhouette Studio version 3.3.451ss by oldschooldm and this post format is by mproteau (Paper Realms) @ the Cardboard Warriors forums: cardboard-warriors.proboards.comMore photos!
|
|