|
|
Post by sunraven01 on May 27, 2017 9:18:41 GMT -9
  Another secret door will lead the players into Area 9, a hallway with several more secret doors. The secret door design is straight up cribbed from jeffgeorge, in the Dungeons of Olde set. I had never used the skew and perspective actions in Photoshop before, but I'm super stoked how this came out. |
|
|
|
Post by sunraven01 on May 27, 2017 9:15:53 GMT -9
 If the players can discover the hidden door near the north end of Area 3, they find a short hallway that leads into Area 8, which has a large open space and a warren of smaller chambers. |
|
|
|
Post by sunraven01 on May 26, 2017 10:33:14 GMT -9
 And this is the completed sliding block trap at the north end of Area 2. I used the wall texture for the block because it's supposed to not be discernible without careful inspection; the entire trap won't be placed on the table to the players' view until after they trigger the trap. |
|
|
|
Post by sunraven01 on May 26, 2017 10:21:17 GMT -9
 Finally worked out something to use for the mist filled archway at the southern end of Area 3. So, this is the entire end of the hall, with the giant face, magical archway, and put trap. It's pretty nifty. The archway is a prop from the World Works Games Pharaoh's Descent set. |
|
|
|
Post by sunraven01 on May 22, 2017 10:52:21 GMT -9
 Okay, last room until my magnet order arrives. This is Area 2 on the map, another false entrance to the tomb. The side alcove will not be visible to the players until After they discover that there is a stone block trap there, set to close off half the hall while they are investigating the fake doors. |
|
|
|
Post by sunraven01 on May 21, 2017 2:26:36 GMT -9
 Whoooops. Ran out of magnets last night. I have another batch ordered, but in the mean time, I won't be able to make tiles. So, I made a storage box for the tiles I've made so far. This is an IKEA TJENA box with a custom foam core tray inside. (Living 20 minutes from IKEA has its benefits.). This one box probably definitely won't be enough for every tile I'll need for the dungeon, but it does get the stacks of tiles off the edge of my desk so I can have some room back. I have 40 tiles assembled, enough blanks left to make 9 more tiles, and enough magnets ordered to make another 75 more after that. Since I'm not building out the whole dungeon at once, I will be able to reuse tiles from room to room, but Area 25 is really big: 121 tiles in area if I stuck to a 2x2 format. I am planning on reducing that number significantly by creating some 6x6 field tiles for the center of the room, which leaves me at needing a mere 40 tiles to create the outer perimeter, 33 of which will be single wall tiles. In the meantime until my magnets arrive, I'm working on printing and cutting the wrappers still, and making tile blanks, so when the new magnets get here, I'll have a big pile of bits ready for assembly. |
|
|
|
Post by sunraven01 on May 20, 2017 8:52:08 GMT -9
This is Area 1 on the map, which is a false entrance. Two of my Frostgrave mouslings have volunteered to pose for photos. I think this marble works fine, although the cracks between the tiles is pretty dark. I experimented with lightening it, but ultimately decided to just leave it as is. I haven't made a double door yet, so this uses two single doors.   |
|
|
|
Post by sunraven01 on May 20, 2017 5:11:56 GMT -9
Exactly. I only have to make things for me, and I'm an experienced paper crafter (I did scrapbooking before starting to make terrain for my D&D games), so I not only have a huge range of paper crafting tools and adhesives, but I don't need to write instructions for what I'm making. I know how my files work.
|
|
|
|
Post by sunraven01 on May 19, 2017 18:26:22 GMT -9
Because you did the hard work of developing the geometry, and you're creating your own artwork.  I'm re-using textures mostly from World Works Games. This marble is from their Atlantis set. I just open the PDF in Photoshop, select the area I want to use, then paste it into my tile templates. Export to PNG, open the PNG in Silhouette Studio, merge my cutfile, then send to the Cameo. While one page is cutting, I'm printing the next one, and gluing together tiles. My biggest time consumer is making the tile blanks. Cutting the foam board, cutting the hardware cloth, piercing the tile sides with nailed and gluing in disk magnets really takes a while. I make 10 blanks at a time, then go back to printing, cutting, and gluing. Also, I have a deadline for this: the brother arrives in 3 weeks. |
|
|
|
Post by sunraven01 on May 19, 2017 17:17:36 GMT -9
Adding a new tile style for the parts of the Tomb that are not covered in frescoes. This introduces my single doors as well.  Moving to a more generic tile texture also will speed up construction, because I don't have to 'shop tiles for the inlaid floor; I can just print, cut, and glue. |
|
|
|
Post by sunraven01 on May 19, 2017 10:42:50 GMT -9
 The whole hallway, with pit traps revealed. I could t fit the whole thing in frame without also exposing my desk, ha! The meandering inlaid floor is wider than described in the module, but that's ultimately irrelevant to game play, since the path's purpose doesn't have anything to do with its representation on the table. |
|
|
|
Post by sunraven01 on May 19, 2017 9:08:26 GMT -9
  Still plugging away at making the tiles for the first hallway, which is going more slowly than I anticipated thanks to real life. One more tile to go before I finish, but I took a small break today to make some pit traps. These are made from three layers of card to give them some thickness, and they have some magnets on the bottom to stop them from sliding around on the tiles. |
|
|
|
Post by sunraven01 on May 18, 2017 12:19:00 GMT -9
Hey Sunraven! Here is a mouse with a much fancier staff! I hope it's a good choice for your character!  This is the most amazing thing I've seen today. Lady Irisaadi Spellroyal is forever indebted to you! |
|
|
|
Post by sunraven01 on May 18, 2017 10:12:25 GMT -9
Yes, if you want maximum safe cutting, that's best practice. Someone else might be able to tell you where you can squeeze in those guidelines, but that's what Silhouette America recommends.
|
|
|
|
Post by sunraven01 on May 18, 2017 9:57:50 GMT -9
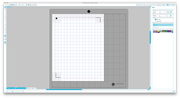 Red lines are safe printing zone; grey hashmarks are the area that can't be cut automatically, and you should keep images outside to minimize the chance of confusing the camera on the cutter. |
|
|
|
Post by sunraven01 on May 18, 2017 4:58:00 GMT -9
To keep with Dave's set as an example -- because it's a layered PDF that lets you change the color of some of the model clothing in I think four different options -- I don't need to see all 21 models in all five variations. (In other words, I don't need you to show me 105 models in a preview). But it would be nice to see all 21 models before I buy. I to know if I'm looking for a female mouse model using a bow, that this specific set has a female mouse model with a bow. And from the example I linked, I can't tell if this set has that. I don't even know if it has male bow-weilding mice. I can't tell if any of the mice in this set have bows at all. There's no information in the listing, and the cover graphic is limited.
Surely you can understand why expecting a customer to google to find an artist's Tumblr/Patreon/Twitter/Facebook/LiveJournal/other social media account, just to find out what's included in the set that they're buying, is not a good idea.
|
|
|
|
Post by sunraven01 on May 18, 2017 2:54:13 GMT -9
If it includes all the minis, sure. But I want to see everything I'm buying. Here's an example: I wanted to make a mousling war band for Frostgrave. The best option for me in paper minis was Okumarts Mice and Rats sets. You can't see every mini in the sets, which is why I didn't find out until After I had bought them that there's no female spell casting mouse with fancy staves like the male mice. There is a female with a staff, but she's very plain. As it happens, my Frostgrave wizard is female. www.wargamevault.com/product/153741/Darkfast-Dungeons-Mice--RatsThis shows five of the twenty-one models in the set. If I could have previewed the whole set, I would have known this ahead of time. Finding out after I had already paid for the set just whized me off. Like, really whized me off. |
|
|
|
Post by sunraven01 on May 18, 2017 1:23:48 GMT -9
As a customer, I find it extremely frustrating when mini packs are sold that don't have a preview of all the minis. I might be shopping for one specific model for an encounter, and you might be selling it, but because I can't see what it looks like, I'll never buy the pack it's in.
|
|
|
|
Post by sunraven01 on May 16, 2017 5:59:55 GMT -9
 The first clip-on feature. It was really important to me to get this right, because this particular dungeon feature is for most people (myself included) THE iconic image associated with the Tomb of Horrors. The original illustration from the 70s was a horned demon's face, but I couldn't find an appropriately high res image to 'shop down, so I searched for Green Man images instead. This particular one I think came from a light switch cover. Ha! |
|
|
|
Post by sunraven01 on May 16, 2017 3:11:36 GMT -9
My brother is coming to visit mid-June and loves D&D, so I've promised to run a game for him. I haven't told him he'll be doing Tomb of Horrors (in a stripped down, less lethal grinder version because it will only be two players and over two nights). At the same time, I've been looking at converting some of my old terrain to modular dungeon tiles and it's pretty obvious by now I love jeffgeorge's take on the modular tile system, so this seemed like a perfect opportunity to chronicle my build and really give the modular tile system a workout. 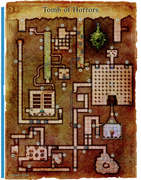 Except for the small area of caverns at the bottom right of the map, everything in the dungeon is rectilinear, so it should play nicely with the dungeon tiles, and the map is conveniently in a 1 square = 10 feet scale. Perfect, no half-tiles needed. 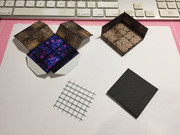 I have made some quality of life adjustments to my tiles over the stock build: the first one is to make the surface magnetically receptive. This is accomplished with a piece of 23-guage quarter-inch hardware cloth (available at any hardware store). The tile surface isn't strongly receptive due to the relatively low metal surface area, but it's just enough to keep a paper mini in place even if you hold the tile vertically, so it will provide a little resistance to being bumped on the table, which is all I need. This also, conveniently, brings the height of the tile up to one-quarter-inch, so the tile wrappers line up perfectly around the tile. 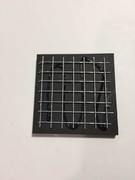 Next, I've also added rare-earth magnets and one-inch ring shank panel board nails to the sides of the tiles, making them snap together on the table, to make it faster to build. I'm not going to try and fit the whole dungeon on the table at once, just the encounter area the players are currently in, so being able to slap down tiles quickly is needed to keep the momentum going. I threw together a quick little card stock jig to make my placement consistent at a half-inch in from each edge, and as long as I'm careful and consistent to follow this pattern, magnet polarity is irrelevant, because the magnets are always meeting with a metal receptor. 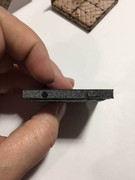 And, finally, there's gonna be a whole lot of Photoshopping to go along with the build. The dungeon is full of traps, and things like floor and wall appearances are important clues to the players. So, that said, here's the first 20 feet into the Tomb of Horrors, where a mosaic path begins to wend down the hallway. The stock image of the floor is that the path is red, but I have changed it to purple. The walls and brick floor are from World Works Games, the tiles themselves are Dungeons of Olde, the purple mosaic is from Glen McClune's Serpent Caverns, and the skeleton mini is from Printable Heroes. 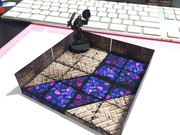 |
|
|
|
Post by sunraven01 on May 15, 2017 10:20:02 GMT -9
 That's my sheet metal play surface with 2" tiles marked in red. It's a 24" x 36" piece of cheap sheet metal from Lower, and the dark gray band around the outside is where I've wrapped duct tape around the edges to keep me from cutting my hands on it.  And that's the 2.5" tiles. You can see it's a pretty marked difference in area for gaming. |
|
|
|
Post by sunraven01 on May 15, 2017 5:35:19 GMT -9
So, I did some major brain noodling this weekend in anticipation for the release of this set (I'm dying for your expansion curved and diagonal walls, btw ... have you thought about how to do irregularly shaped walls for caverns yet? Please say yes ...). Most importantly, what I was looking at was going 1" grid vs 1.25" grid, and after mocking up my play surface in PS and mapping out how many 2x2 tiles would fit, I ended up deciding to use 1" grid. The primary reasons were thus:
I got more squares with a 1" grid, which allows greater flexibility for game area layout. Your cardstock walls are effectively zero thickness, which alleviates the problem Wyloch was solving with his .25" thickness walls, so there's no need for the larger grid size, other than the slightly larger squares makes more room for fingers and minis. And, finally, staying at a 1" grid allowed backwards compatibility with the items I've already built in my pretty expansive collection of terrain. Using a 1" grid also meant I could fit more tile wrappers on a single sheet of letter-sized paper (four field tiles, two corner tiles, three single-wall tiles), with plenty of room to stay inside the safe cutting zone with default Cameo registration marks.
Last night I made my first six DoO tiles, on photo paper instead of my cardstock test pieces, and created the cutting files for them as well. So far I've only made files for the field tile, corner tile, and single wall tile (I ran out of time and needed to get to bed). Because I magnetize my terrain, I added a piece of hardware cloth under the wrapper to act as a magnetically receptive surface, and I put small disk magnets into the sides of the tiles to make them snap together. I'll get photos up for you today, but I cannot give you enough praise on how clever I think this system is, and how excited I am about using it. Truly, this is a great system.
Now, release the set (and the expansion). My first big project is going to be building out Tomb of Horrors -- my brother is coming to visit in mid-June and I'm going to run it for him. I started last night with the initial hallway and the mosaic floor. It looks fantastic, it's going to store beautifully, it's very playable with the 3/4" walls, and it goes down on the table like a dream.
|
|
|
|
Post by sunraven01 on May 3, 2017 8:15:19 GMT -9
No need to abandon the old sets, just erase the old reg marks in the Cameo software and let the Studio software print new ones when it prints the page.
|
|
|
|
Post by sunraven01 on May 3, 2017 3:32:21 GMT -9
The thing that tripped me up in the beginning was not paying attention to the settings. Make sure your cutting mat is set to Cameo and not Portrait, make sure the page in the preview window is set up the same way you put the page on the mat, make sure you always put the arrow on the mat in first, etc.
Once I got used to double checking those things, I haven't had a single problem. When possible, convert PDFs to PNG, and then import the PNGs into the Cameo software, erase the old reg marks, and have the Cameo software print the page and new, Cameo reg marks. That clears up nearly every issue.
|
|
|
|
Post by sunraven01 on Apr 20, 2017 10:38:34 GMT -9
Clever bridge design!
|
|
|
|
Post by sunraven01 on Apr 19, 2017 9:03:05 GMT -9
I'm pretty sure the Cameo will be the only reason I can get WWG's The Maiden built for my annual October Halloween game. Even better if I can turn her into a ghost ship.
|
|
|
|
Post by sunraven01 on Apr 19, 2017 1:36:40 GMT -9
I also recently picked up a Cameo 3, and it has spoiled me, quite frankly. I had a stack of old minis and terrain printed out but not assembled that I used as busy work for those nights when I wanted to sit at the computer but have something to keep my hands busy, and now that's all in the trash. I have whipped up basic shapes in Photoshop (like, circles and rectangles), looked at them, and thought, "Am I really going to be so basic as to use the Cameo for this? Yes. Yes I am."
|
|
|
|
Post by sunraven01 on Apr 10, 2017 11:07:12 GMT -9
I just downloaded both the Mice and Rats sets today to make a mousling Frostgrave war band. Thanks for these cut files!
|
|
|
|
Post by sunraven01 on Apr 6, 2017 12:05:13 GMT -9
Thanks!
|
|
|
|
Post by sunraven01 on Apr 4, 2017 18:18:59 GMT -9
The 3/4" walls look great!
|
|


 I'm re-using textures mostly from World Works Games.
