|
|
Post by Floyd on Jun 1, 2009 11:46:24 GMT -9
ok. F The last four of the the Special Weapon soldiers to go then I am done.. The Stakers & basic weapons are all finished. I'll have them off my desk tomorrow. Here is a sample of the Special Weapons crew. 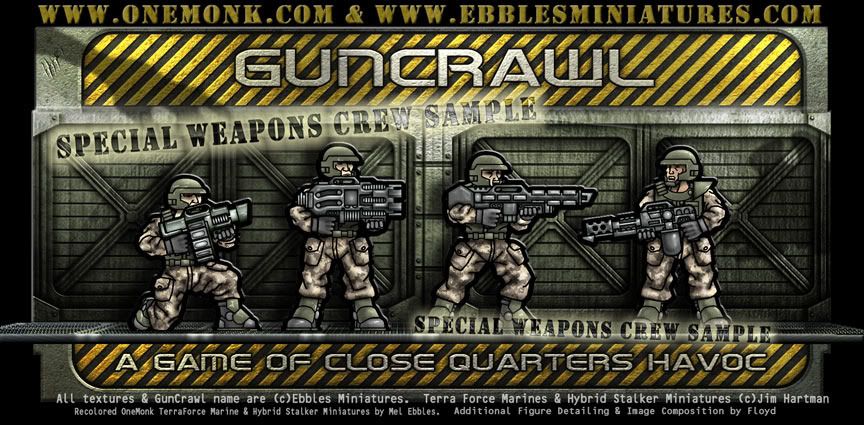 Phew busy weekend. ~F |
|
|
|
Post by Floyd on May 31, 2009 19:09:05 GMT -9
Looking good man. I like the camo pattern.
How does it look like 1:1 scale? (ie. to size)
~F
|
|
|
|
Post by Floyd on May 31, 2009 18:05:58 GMT -9
:Thumbs up: Can we get a couple more wall & debris parts, please? How about adding some more grit and dirt to that wall and roughen and tatter that poster!  Seriously, good start to some MDRG terrain. I've been thinking about what would make for some interesting themes that haven't been done yet, or done adequately in paper terrain for the post-apocalyptic setting. Truthfully, there isn't much 28mm stuff(in paper). Yes there is the Platform Command series from WWG and the Helworks 2:Cathedrea Noctis. Or the closer fit but harder to find small set for the Rezolution skirmish game. The only one that comes to mind as even close to something along these lines is Microtactix:Industrial Station Wreckage (and it is free). So really, this niche sub-genre of NearFuture scifi is wide open. You know, stuff like this would be great: Beneath the Planet of the apes and this one has some cool building ideas that no ones done. And it could be done with either WWG:Mayhem sets or Microtactix:Twilight City sets. Or this lovely and evocative piece... which could be made by some creative kitbashing of WWG:Mayhem Downtown and Hinterlands sets. Here is a page full of inspiration. ~F
|
|
|
|
Post by Floyd on May 31, 2009 17:31:09 GMT -9
I've got that LibertySquare 1/2 built and started the preliminary for the Santiarium Facade. What's cool about that site is that he shows the work involved in designing the projects. Very cool stuff. Thanks for sharing that with everyone. I'll add one to go along with the same theme: ravensblight.com/papertoys.html - The animated Bat sculpture is cool! The paper miniatures, battlehearse & diarama are great! Note the Angus Scrim model. :-) ~F
|
|
|
|
Post by Floyd on May 30, 2009 8:36:05 GMT -9
Bare with me this is my first tutorial. These are a set of basics ideas and tools for giving the impression of volume and detail to an otherwise flat shape. This example is using One Monk's TerraForce Soldier figure. They were re-colored by Mel Ebbles and released as a tie in to his GunCrawl miniatures skirmish game, the recolored set for GunCrawl can be found here at RPgNow. The idea here was to give the fatigues the impression of folds and shape. As well as adding a level of depth to the weapon and make it stand out and away from the figure (as if being held in front of him).  The work was done in Photoshop on 5 layers. 1. Background - containing the source image 2. Shadow Layer - containing all the extra dark, shadowy details. I blocked in the major areas to be shadowed using the brush tool Note how I made the light source to the upper right of the figure. So the majority of the visible shadows would be on the left bottom. Then Gaussian Blurred(3.8pix) the layer. I then added extra shadowing detailing with the Brush tool set on Multiply and pressure at 40%. Note the finger details and extra stuff like under the belt and cuffs of the fatigues and the face where it is recessed into the helmet. The layer was then set to Multiply and I dropped the opacity to 74%. 3. Highlight Layer - contains the lightest areas of the fatigues, where the main light may be hitting the fatigues and other areas almost directly. I blocked in the major highlights with a white color. (I went with a neutral look but feel free to mix it up a bit here. Try a soft yellow or even orange for a different look. Change the layer style from Overlay to soft light, or pin light. Experiment!). The Highlight blocks were then Gaussian Blurred as above But the layer was set to Overlay & the opacity set to 68. The idea here is to give the impression of detail your eye will fill in the rest for you. I know this sounds a bit abstract, but less is more. Looks at some of the amazing tricks impressionists pulled of with light in their paintings. • Notice how the highlight interacts with the shadow giving the folds a rounded, organic look, volume and shape. 4. Detail & Scuffs - Extra bits of detail to add visual interest. I added some chipped paint and some random highlights (to taste) on the helmet, shoulder pads(of some of the soldiers), backs, boots, etc. It was done much like the highlights above. But little to no blur. And the opacity was only dropped to around 70%. Go crazy here if you like. Adding battle damage and wear to the outfit and equipment. Muddy boots, etc.4. Gun Layer - Where the hard edges are define giving the material a subtle but different look and feel. I made the beveling effect(using Layer Styles) and a very shallow but sharp edge. And added a drop shadow & a grey-green gradient overlay. That's it. The entire process is a pretty simple approach that everyone should be able to accomplish in some form. And with a little practice and experimentation will be adding a suitable amount depth and detail to all their paper miniatures. Don't get bogged down in the details... too much and you risk loosing the effect when the figure is on the table and all your precious work is lost at a distance or buried in the microscopic detail. Try the layered approach. Start by adding the most obvious places shadows would be. Then work up slowly from there...little by little. And in time you'll intuit the right amount of detail and shadow vs. visual interest. Imply and suggest ... that is really the key. You'd be amazed at how much your eyes actually fill in for you. Hope this helps anyone interested in paper figure modeling. I am always glad to hear comments, suggestions, and most importantly examples of applied practice. ~F
|
|
|
|
Post by Floyd on May 30, 2009 6:44:46 GMT -9
I can send the completed files to you Mel. Though I don't see any reason to make extra work for you guys with the added shadowing and detail. I have your set already printed as well. And they look good on the GC tiles as is. That said, if you so choose to release them that is fine with me. I do not wish to receive any of the profits from this set. But if you wanna put my name in somewhere cool! I need to add the beveling and texture effects to the 2 other Stalker models then I'll send the files to you. In the meant time here is that animated GIF demonstrating the steps I took to create the marine detail. BTW Quit teasing us with cool play mats and storage compartments!  ~F The work was done in Photoshop on 5 layers. 1. Background, containing the source image 2. Shadow Layer. I blocked out the areas to be shadowed. Using the brush tool. Then Gaussian Blurred(3.8pix). Then I added extra shadowing detailing with the Brush tool set on Multiply and pressure at 40%. The layer was then set to Multiply and I dropped the opacity to 74%. 3. Highlight Layer. I blocked in the major highlights with White. Blurred as above. Then set the layer to Overlay and dropped the opacity to taste. I think it was 68% for this one. 4. Detail & Scuffs. I added some chipped paint and some random highlights (to taste) on the helmet, shoulder pads(of some of the marines), backs, boots, etc. Just for some visual interest. It was done much light the highlights above. But little to no blur. And the opacity was only dropped to around 70. 4. Gun. Here is where I made the beveling effect(using Layer Styles) and a very shallow but sharp edge. And added a drop shadow & a grey/green gradient overlay. That's it.
|
|
|
|
Post by Floyd on May 30, 2009 6:24:06 GMT -9
The only thing that really bothers me on the bottom image is that you used
a flash. It sort of flattens everything out and adds harsh shadows.
Otherwise both images are fine.
Looked like a fun game.
~F
|
|
|
|
Post by Floyd on May 29, 2009 19:48:43 GMT -9
Cool! Very useful thanks!
~F
|
|
|
|
Post by Floyd on May 29, 2009 12:03:49 GMT -9
Here is the Stalker(parts are 1:1 but assembled in Photoshop for thid image). I have built this version and thought t looked fairly good. If anyone has seen or played Doom 3 on the PC or xbox or even seen screenshots you will note how it had this cool hyper-real, almost surreal lighting and bump map effects shader. This is totally what the end result of the stalker shown here reminds me of....for better or worse. lol. I also included the unshaded version for a comparison. 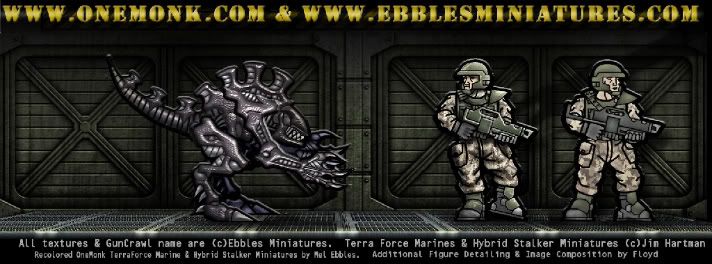 Here are the parts. 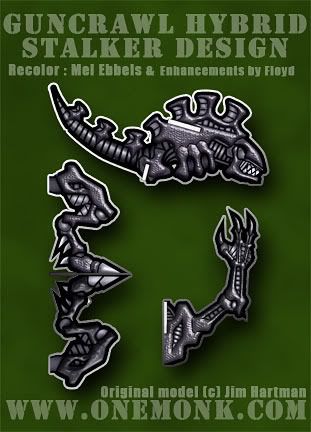 I will post a step by step GIF animation of what I did for the Marine shading. I think all of you could simply recreat it yourself. I am writing this on my phone so apologies for any overt typos'etc. Hopefully the hand typed URL's worked. At 6pt size this font is hella hard to read. ~F |
|
|
|
Post by Floyd on May 28, 2009 14:55:46 GMT -9
I like photos like this. Where the focus is pulling your attention to what's in store for the Marines & kobold? Focusing on the interesting parts, be it the action of something unsaid is important.
I think I'd back the camera away and focus on a point in between the front models & the ones in the background. This way more of your arrangement will be in focus.
~F
|
|
|
|
Post by Floyd on May 28, 2009 14:50:19 GMT -9
 I was digesting what MelEbbles said in another thread and decided to desaturate the base figure and paint over the parts with different layers set to different blend modes. That's a fun and easy technique.  Yes that is a great way to do things...and easy to test and undo ideas. I use a lot of layer work, layer styles and the paintbrush(using various blend modes & brushes) and of course the ubiquitous Burn/Dodge tool. The vector tool and magnetic lasso see lots of use and I often use them much the same way an airbrush artist uses frisket for masks. Another useful tool is the Eraser(but switch it to the brush) and change the modes. Very useful for blending different parts, subdoing details, etc). ~F |
|
|
|
Post by Floyd on May 28, 2009 14:01:12 GMT -9
Ok here is a sample of the 1st row of the Mel colored TerraForce Soldiers. Yes, went a little crazy with the presentation. The models are not altered and are 1:1(other than what I did with your re-colors). Other than add a bevel to the outline to appear as the models would be cut out. Its probably subjective...but I think the minor bit of shading and gun adds to it though maybe I should have put an untouched one next to it for comparison. 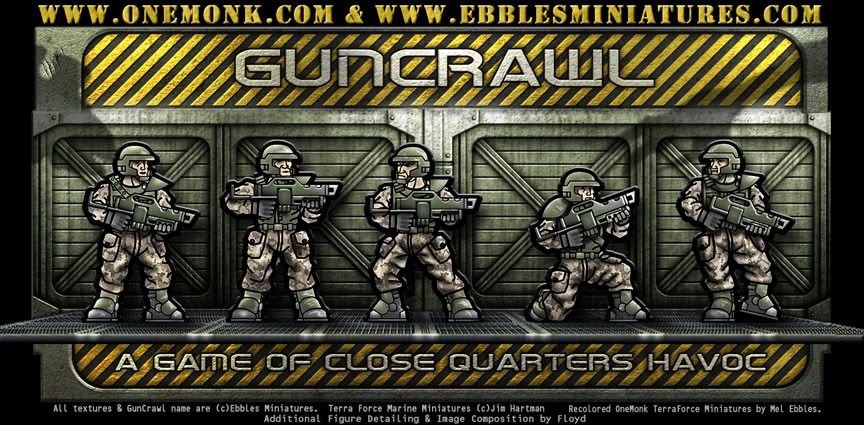 I hope you don't mind me borrowing a texture from your Objective set & the GunCrawl corridor tile and elements of the Game Manual.( I'll remove them if you wish, since I didn't ask your permission). It really did start with just a simple complimentary colored background, but I thought it'd be fun to put them in an environment to see how they'd look. And well...needless to say my lunch break went fast at work today. no lunch...but a lot of crunching in Photoshop. I'll post the example of the Hybrids as soon as I get them done. The TF looks just like above printed on both Laser and Inkjet on 110lb cardstock. ~F
|
|
|
|
Post by Floyd on May 27, 2009 18:31:01 GMT -9
The extra variety of figures and poses are a welcome addition. I was going to put a red cross on the shoulder pad of one of the TerraForce Marines in the other set to denote the Medic(or a white shoulderpad). But these work even better. Nice job! ~F ps. Got the other set printed and cut. And in a fit of OCD I added a small amount of highlight/shadow to give the soldiers fatigues a bit more of a folded clothy look. And some shadowing under the gun/torso to show a little more seperation. The Stalkers I used some beveling and dodging to give them a bit more of a shiny /slippery look. (but not like the OneMonk originals). None of it seems to have taken away from your muted more natural look, nor Jim's over-all style...just a bit of experimentation really... I'll post some images just for examples.
|
|
|
|
Post by Floyd on May 27, 2009 15:22:20 GMT -9
I like your texture example...but (at least for me) I feel it takes away from the miniature itself. They are too busy. But they might be fun to use on something like WWG:Shadowcore Prime or the old Advanced Space Crusade boards.  ~F
|
|
|
|
Post by Floyd on May 23, 2009 5:03:13 GMT -9
I second that motion. It's far better to teach people how to do it themselves, so they can apply it to whatever they want. I already put in so much time on the figures already it would make it no longer worth my while to put out several optional files with each figure set. After seeing that the thing can in fact do complicated cuts for figures it's very tempting to get one, but cutting the figures out is by far the easiest and quickest part of the work. Now if you can point me to an auto designing machine, then were talk'n! JIM Jim, if you got one of these. You could sell your sets precut...like you've been wanting to do at some point down the road. I don't know the durability or wear on one of these so mass production runs might not be economically feesible. But small runs..or better yet as a fast cutting/prototyping machine for you to have your figures finished and ready for photography quicker might be super ideal. Seeing how well this machine performs given what it can do from reading Mel's article and seeing the exceptional results (espeically paper minis) has only made me want one more. I guess I'd need to justify it(to myself and my pocketbook) by designing something the someone would want to buy... ~F |
|
|
|
Post by Floyd on May 23, 2009 4:57:51 GMT -9
ww.litkoaero.com/basemaker Just scroll down to the bottom to see all the colors we offer there. I like bronze better than translucent grey, which is really dark. If any of you want a quote for paper bases, the design will have a 1mm thick slot, 5mm smaller than the base, with a slight curve to it. This curve in the slot, keeps the figure in place so you don't need to glue. Like I mentioned, in time I'll add a whole selection of custom order acrylic bases and such from the One Monk website. JIM Do you have any pictures with some of your minatures based in these? I think I am gonna order a set of hexagonal bronze. I'd like to see what these look like (if possible). I may order more in a variety of colors if these work out well. I want to go with a non-permanent base system...but I don't like the tabs floating above the base that is currently employed for basing your miniatures. I flat base all of mine, but that means gluing them to the base. Thus I can't store as easily, or change the texture bases depending on the genre or environment I am playing in. (I might print textures and glue them to the bases... the pre-slotted acrylic bases seem ideal) and the added weight will be nice....but I am getting a bit ahead of myself. Thanks. ~F |
|
|
|
Post by Floyd on May 22, 2009 13:23:05 GMT -9
I love the tight cuts that conform to the figures shape ALOT! I try and do that with
my figures using and Xacto but you wouldn't believe how many blades I go through because
the very tip of the blades snap so easily... (I am talking the 1st mm or 2)... sight...
I'd get a Craft-Robo if you were to make templates for all the figure sets.... LOL
~F
p
|
|
|
|
Post by Floyd on May 22, 2009 13:18:40 GMT -9
 Sent to Jim! What do buddhist monks say when they meditate? Love the colors on the dress!!! nice one! ~F |
|
|
|
Post by Floyd on May 21, 2009 17:52:09 GMT -9
GunCrawl, SpaceHulk, Song of Blades and Heroes and a variety of RPGs.
~F
|
|
|
|
Elf
May 21, 2009 17:42:21 GMT -9
Post by Floyd on May 21, 2009 17:42:21 GMT -9
Great work on the figures man!
You are really gonna make me drag it out of the games closet now aren't you...
being able to play the Barbarian quest with the actual figures now... Sigh!
So we gonna see the Female Barbarian?
~F
|
|
|
|
Post by Floyd on May 20, 2009 15:06:52 GMT -9
Oh yeah man!
Your monster models are great!
~F
|
|
|
|
Tiling
May 20, 2009 14:39:42 GMT -9
Post by Floyd on May 20, 2009 14:39:42 GMT -9
The broken stones are excellent. I like the way you have them scattered all over the place. Very nice. I'd like to get the set of them
when you are done.
I think the grass texture tile needs something more though... maybe some barren rocky areas. Some worn paths, maybe some footprints? an old camp fire site? Some more distinct mounds or a variety of grass textures.
~F
|
|
|
|
Post by Floyd on May 19, 2009 13:00:50 GMT -9
I missed the collaberation part, sorry guys.  Good job all around so far. Look forward to seeing the game. ~f |
|
|
|
Post by Floyd on May 18, 2009 15:23:09 GMT -9
Very, very impressive looking set there man.
Put these together with your flyers and sell
them on RPGnow. They are easily better than
those other 2d walker sets for Dp9's alternate
WW2 game.
Really excellent stuff man.
~F
|
|
|
|
Post by Floyd on May 12, 2009 10:31:15 GMT -9
implemented a colored ball shaker as a randomizer for the order of play (Reminiscent of DarkWorld). It all works out quite well. One of these days, though I want to incorporate the WHQ tile system and random encounters. That would probably take all the Role play out of it entirely and make it too much of a hack-n-slash, but the original quests were geared more toward that anyway. I have 2 copies of DarkWorld LOL. That game plays like a video game with the respawns and the competitive game-play... It was an ok game. I loved the board and the hidden treasure boxes. I wish I could have gotten copies of the 2 expansions when they were available. There was a random game (Random Quest) available online a while back for HQ that incorporated elements of WHQ. ~F |
|
|
|
Post by Floyd on May 12, 2009 9:09:33 GMT -9
:raises hand: Big fan and avid collector of Hq/AdvHQ/WHQ! Those new manuals are AWESOME Jabbro. Thanks for sharing! I gave up on trying to get "official printed copies" of the Barbarian, Elf & Wizard expansions when I saw the absorbidant prices on E-Bay. In some cases each more expensive than the entire WHQ Boxed set alone. Luckily I was able to find entire scanned packages of the missing expansions. And I bought the old GW Plastic Wizards collection for the Wizards of Morcar expansion and WHQ expansion characters. And can use my minis & paper figures from GW & OneMonk...and of course now your excellent Frozen Hordes figures. I've built my own HQ board slightly enlarged to allow wiggly room. And enlarged and cleaned the expansion set tiles for play on it. And I also have all the various and sundry collections both old and new for HQ tiles & quests. Though I never purchased any of the Home-Brew expansions sold on e-bay. A few years back, when I really got heavy into Paper models, I printed entire sets of props(WWG mostly) for use with the game. And played all but a few quests from the original book & 1st two expansions...before getting a little burnt out on the over-simple mechanics. But it makes a great intro game for would be RPG'ers and Boardgamers a like. I tend to prefer playing WHQ now a days.(or Descent) That said, the expanded rules in the posted manuals will most likely have me pulling the game back out and playing the Barbarian Expansion with the new Jabbro paper minis. Besides I owe you some photos of them in play...! Thanks for rekindling my interest. Or curse you for yet another added distraction. ~F
|
|
|
|
Post by Floyd on May 11, 2009 16:52:07 GMT -9
Thank you sir!
I've been needing these!
~F
|
|
|
|
Mage
May 11, 2009 16:47:18 GMT -9
Post by Floyd on May 11, 2009 16:47:18 GMT -9
Very nice man!
I am digging the muted earthy colors. And the pose is interesting.
Looking forward to seeing this mounted and on the table.
~F
|
|
|
|
Post by Floyd on May 8, 2009 6:04:41 GMT -9
Thanks. My Girldfriend said that she was really impressed with how "3d" the models looked. She said they don't look like flat paper at all. So kudos Jim!
Also, you are welcome to use this if you like. I can send you one much larger and the wording removed.
Just for future reference, would you want the entire set of figures in the photo, or just moments of in-game action, like this one?
~F
|
|
|
|
Post by Floyd on May 8, 2009 5:51:35 GMT -9
That's a cool idea. There are tons of Sprites ripped from nearly every game imaginable these days.
Might be fun to do a retro-styled set of figures.
I like the trace Inkscape performed on that piece. Very much a loose painterly look.
~F
ps. Off to find some Metal Slug, Wolfenstein and Ghouls and Ghosts sprites.
|
|


