|
|
Post by bravesirkevin on Jun 20, 2013 6:51:05 GMT -9
I'm consistently impressed (and even a little jealous) of your imaginative approach to fantasy architecture!  This one looks like it's going to be every bit as awesome as your Magic shop, and possibly even a little better! |
|
|
|
Post by bravesirkevin on Jun 20, 2013 6:31:14 GMT -9
The last few printers I have had have been inkjets that friends were getting rid of for some reason or other. I really want the next one to be a laser printer. Has anyone ever tried some kind of fixative on a laser printed page to make it OK to fold? It's not really something a fixative would fix. Laser toner consists of incredibly fine ground plastic dust. The dust is attached to the paper with static electricity and baked in place with heat forming a thin plastic veneer on the page surface. There are some models that use a fuser oil to help the plastic veneer survive the baking process better, but nothing will change the fact that it's still a plastic film on the surface of the page and not a liquid ink that's penetrated into the page surface. Because of the nature of the beast, any sharp creases are going to cause that film to crack, and any friction is going to cause it to flake off, an added varnish on top of that plastic film surface will just be a layer on top of the film surface (because it can't reach the paper) and will merely flake off along with the toner. I once took advantage of this fact to create a library of grunge textures by printing solid black pages and then crunching them up, reflattening them and scanning the damaged toner surface. Another way I've taken advantage of this is to print out "blue lines" of my rough drawings to do my clean pencil work over: The toner erases away as easy as pencil so if one area's a complete mess I can knock it back to white and redraw it from scratch. Just to illustrate, I printed the Humble Hovel model that I used for product photography with a laser printer: 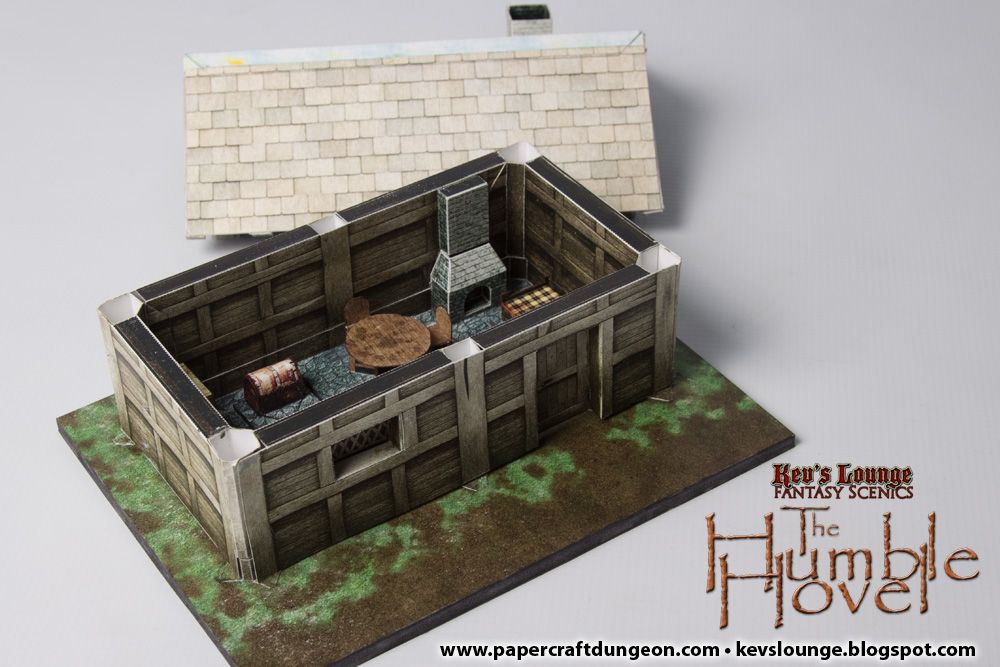 The detail is incredibly crisp and every nuance of the shading is captured perfectly. The exterior model consists mostly of clean flat planes, so it's not taken much of a knock, but if you look at the pic quite closely you can see a few patches that have flaked off a little during building. Now take a look at the roof beams on the interior: 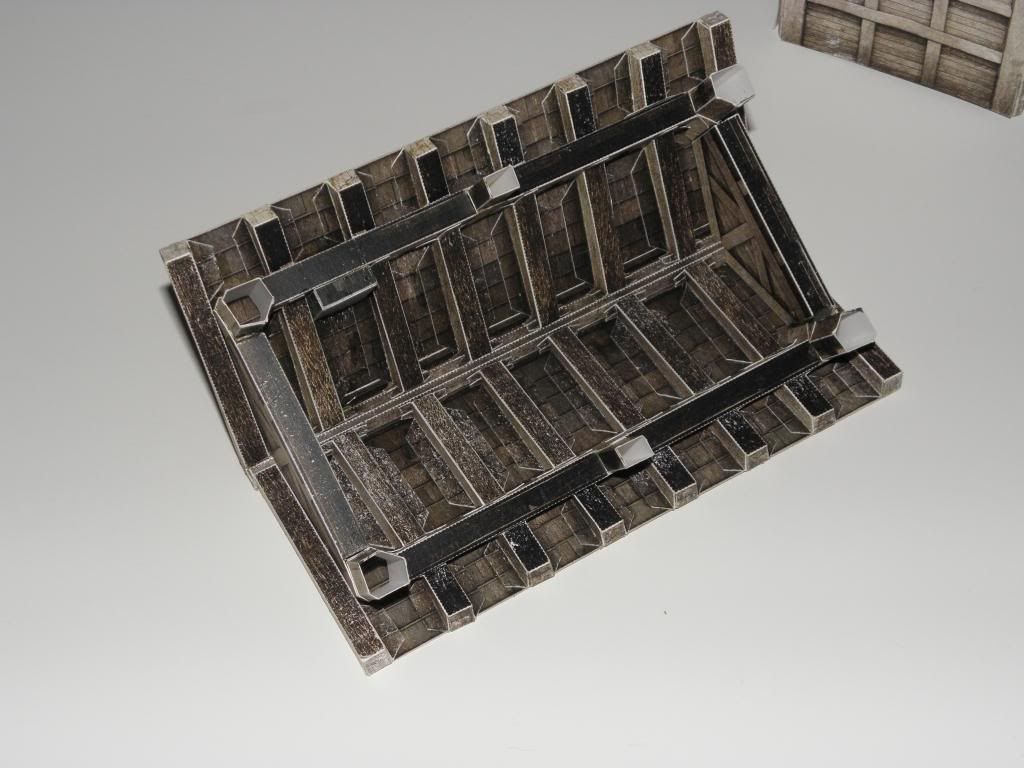 You see how it's worn down from all the folding? The quality of the print is fantastic, but as soon as you start dealing with the folding, you're going to run into a lot of issues that you'd never even have to consider with an ink jet. I'd just like to add one more thing. Looking above, you'll notice that the model's not edged. This is because the ink in the markers I had available at the time had a solvent that didn't play nice with toner so I instead resolved to photoshop in the edging afterwards. Many solvent based glues have the same problem, so it's likely that any spray varnish or fixative would eat the surface as well. |
|
|
|
Post by bravesirkevin on Jun 18, 2013 17:30:21 GMT -9
This is great! Thanks OldSchoolDM Hope this comes in handy for a lot of you. Love the photos too... They really capture the spirit of this set and how I envisioned it being used |
|
|
|
Post by bravesirkevin on Jun 18, 2013 15:06:20 GMT -9
Laser print quality is fantastic and the colours are really vibrant! And it's true... the cartridges do last forever. I've had one for over a year and a half and I've printed easily over 1000 densely coloured pages and I'm still on the starter cartridges. I've just bought a new black because the blacks are starting to look a little faded now, but other than that, it's still going strong.
That said, colour laser prints are not good for anything that needs a lot of folding and definitely not great for anything that's extremely fiddly because the toner rubs off very easily, so while I do use it for paper minis and dungeon tiles and maps, I tend to stick to my ink jet for any papercraft models.
|
|
|
|
Post by bravesirkevin on Jun 14, 2013 11:12:19 GMT -9
So, I've finished that elusive last component! 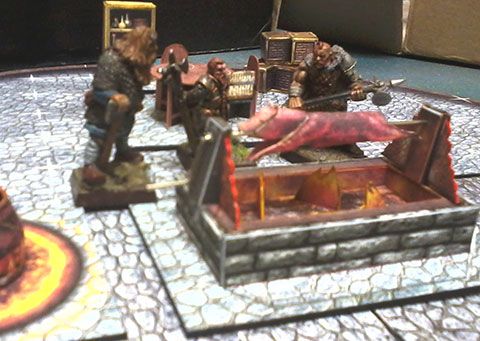 Yes! The pig is 3d and yes, the spit rotates. This is obviously the "expert" version of the model but there will be an option to use a 2d paper-mini-style pig instead and an option to build the model in the simplest, least fiddly way possible. Got the studio photoshoot tomorrow afternoon so there should be some nice high quality images in this thread soon! Apart from that, I'm just cleaning up the PDFs and sorting out the instructions, but this set might even be out on sunday. |
|
|
|
Post by bravesirkevin on Jun 13, 2013 5:25:40 GMT -9
Looking good! Do the bookshelves have MORE layer options than are already available in the "Council Chamber" set? Not sure I can cope, if so! Also, interested to see the bed photos all have textured covers. I noticed when making mine up from the Humble Hovel set that the checked cover worked better than the plain when disguising the fold-up pillow's "bed cover" tab. Any chance of an open chest with contents options, or is that asking too much too late? This shelf is relatively simple I'm afraid. It got short-changed by my layers budget which all got spent on the tables and the crates on that particular page, so this one's only got the jugs and plates. I do have some really fun plans for customisable shelves in the next Luxurious Lair set however. The beds have lots of options for the blankets, but you can still do a blanketless one just by turning all the blankets off. If you look closely at OldschoolDM's photos you can see that he's got a completely different blanket combination and he's also opted to skip out on the 3d pillows. I've toyed with the idea of an open chest, but it'd have to be quite a bit bigger than that one or it will be way too tricky for anyone to build, so the short answer is you probably won't see it in this set, but one is likely to show up soon... The Luxurious Lair: Treasury is just begging to be made at some point!  |
|
|
|
Post by bravesirkevin on Jun 12, 2013 14:05:27 GMT -9
I've been putting together a small generic dungeon furniture pack which will soon be going online for a nice low price. The idea sprang about when someone commented that they liked the free bonus furniture pack in the Humble Hovel set, but didn't have much use for the house and they weren't particularly keen on paying $6 just for the furniture, so I started out by grabbing all the furniture pieces in that set and giving them a major texture upgrade and lots of added optional layer detail and then added a few pieces on top to round out the set nicely. I'm still busy fiddling with one of the pieces to try and make it as awesome as possible and yet still very easy to build, but here's a small preview of some of the components that are already complete (pardon the low quality, the pics were taken with a handheld cellphone camera and it's winter down here and very cold so I could only do so much to control the shivering  ... Getting some nice pro photos done later this week) 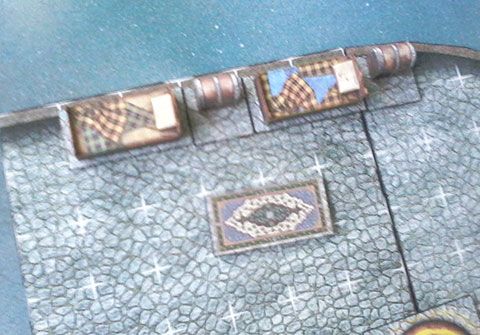 The "Dormitory" page includes a couple beds, sleeping pallets, carpets and chests. The floors are customisable, as is the bedding. There's also an option to turn off the 3d pillows to make the build a little simpler. 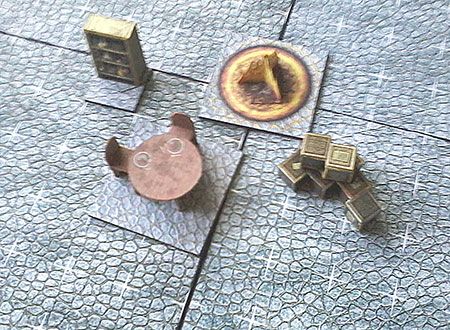 The "Mess Hall" page includes a shelf, a brand new crate stack (which will go great with those in the Ominous Storeroom set and includes all the same layer options) and a dining table vignette. The dining table is very customisable, allowing you to choose how many chairs you want and where they are, and has options for dinner plates, and/or beer mugs. You also have two different options for the chairs, though only one is pictured here at the moment. 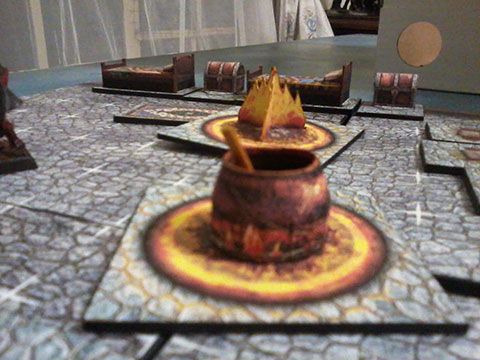 The final page includes a nice big camp fire, an awesome little cauldron full of yummy stew and some other stuff not pictured here just yet (including the piece I'm still busy tweaking.) More details, and better quality images to follow as soon as I can get them done. |
|
|
|
Post by bravesirkevin on Jun 11, 2013 23:43:42 GMT -9
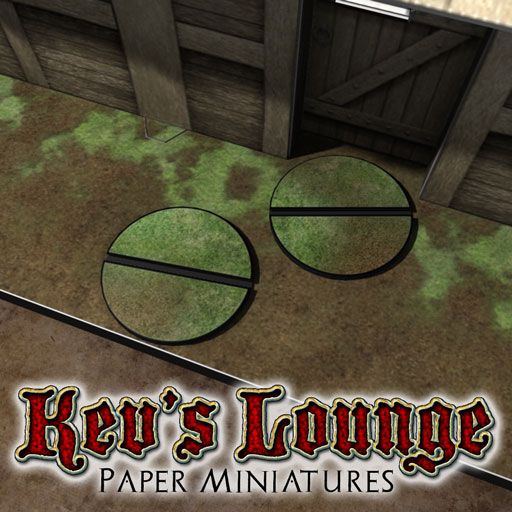
Cutting out circles isn't particularly difficult with a sharp pair of scissors, which is why I put a bit of white space between the bases. It makes it a little easier to get a nice clean edge while trimming around it. Even if you don't manage a perfectly smooth cut, it'll look perfectly neat once you've edged it with a marker. I'm going to add some square bases in all the current flavours after I release the Skeleton Skirmishers so that people can rank them up easily. I may add some hex and octagonal bases too, because some people favour those. |
|
|
|
Post by bravesirkevin on Jun 11, 2013 23:36:18 GMT -9
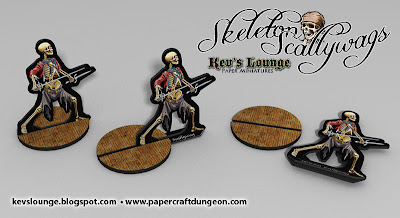
Nearly finished making-up some of Jabbro Jones' "Just Deserts" Egyptian fantasy minis at present, so these promised Egyptian skeletons will go nicely with those for me. The guys for whom mummification didn't take, or was too expensive an option, perhaps. Maybe one half unwrapped to reinforce the former idea? Regardless, I like the concept of skeletons carrying their own treasure this way. Whole new meaning to "kill the monsters and open the chest"! In my head it was more of a (possibly completely inaccurate) notion that while the nobles and kings would get themselves mummified, the average peasant, soldier and slave would just get buried. The rich and powerful would return as mummies, but the rank-and-file troops would return as bones... In terms of game mechanics, it would mean that while crawling around a mummy's tomb you'd have tough mummies as elites and bosses, and weak skeletons as minions. Consequently, I didn't even think to add the traditional bandages though it's not a bad idea... Might go back and do that later, though for right now I'm busy concentrating on getting the last other bits done so I can get it out before the end of the month! As far as treasure goes, I've always found it a little odd that 4000 year old undead creatures would carry legal tender on them. Like in Skyrim when you raid a tomb and find a few hundred gold coins in the purses of all those Draugr that are as good as if they'd been minted yesterday. It makes much more sense for the treasure to be in the form of ancient jewelry that can be sold, worn or melted down and turned into something else. |
|
|
|
Post by bravesirkevin on Jun 11, 2013 23:20:57 GMT -9
This looks great! It's nice to see you making the move to pro. Best of luck... |
|
|
|
Post by bravesirkevin on Jun 10, 2013 5:20:34 GMT -9
More progress here... Egyptian themed skeletons!  |
|
|
|
Post by bravesirkevin on Jun 10, 2013 0:55:16 GMT -9
Excellent! I know it's a little cross-topic, but when I checked your new bases after seeing your posting about those, the Ominous Storeroom crate bases made me think there'll need to be some burnt-out crate stacks (and wooden floors) next, once the Blazin' Bone crew pay a visit! Next to the "Humble Hovel - Smoulderin' Remains" kitbash, perhaps? Haha! A burning warehouse inferno with hundreds of flaming crate stacks sounds like it might make for an interesting dungeon... Might have to add that one to my to-do list. I've already got some burnt/ruined wooden floors that I meant to use in my "dingy den" sets. Perhaps the Warehouse Inferno will fit right in to that line. Speaking of crate stacks, the good old non-fiery crate stacks are about to make a small return in my very-soon-to-be-released* dungeon furniture set. I'll probably post about that one a little later today once I've finished the test builds and can take some pics. Burnt down hovel is actually one of the 15 I mentioned above... Started it almost immediately after I finished the original because in our games group we play a lot of Mordheim and all the other guys at the table wanted a ruined version that they could use in the game. It landed up going into perpetual limbo because I could never get it to look the way I wanted it to. Being a perfectionist is seldom a good thing * Literally very soon. The set's done apart from minor tweaks, instruction manual layout and promo photography, which should be sorted out by the end of the week. |
|
|
|
Post by bravesirkevin on Jun 9, 2013 23:34:49 GMT -9
Also I know this one is a long shot but where can I find nice free art/pictures/clip art (whatever the name is, lol) to use on cards. Something like what would be found on nice trading cards. Its more for a personal project than anything. As long as you're going to keep it for personal use, you should find literally thousands of great images in DeviantArt groups like this one: fantasy-npc.deviantart.com/gallery/Reddit serves up these: www.reddit.com/r/ImaginaryCharacters/, www.reddit.com/r/ImaginaryLandscapes/ and www.reddit.com/r/ImaginaryMonsters/ and between those three you should have no trouble finding anything you want at all Another tip is to go to Pinterest and do a search for whatever you're interested in looking for. It's like searching through google images, but you'll find only really high-def awe-inspiring pictures because people don't pin ugly pics too often. For weapons, armour and photos of the more majestic parts of the real world, I've found this to be invaluable. |
|
|
|
Post by bravesirkevin on Jun 9, 2013 0:05:26 GMT -9
When making up some of the stone floor "Council Chamber" tiles, it occurred to me these would do very well for an outdoor arena, or even a paved garden area, so the walls would then represent low stonework, or even just edging, only. Might be interesting for a future layer option to include raised (i.e. on a 3D box) or surface level (2D counters) plant beds - not just flowers, as comes with the "Council Chamber", but herbs and vegetables - suitable for a healer's garden, or one attached to a monastic establishment, perhaps. Another handy option might be to add a circular central (fish-?)pond. Or even to convert the entire interior to water, like the flooding of the Ancient Roman arenas to stage "sea"-fights! Thanks as always for your support Wyvern! A garden is definitely one of the things I've been thinking about, and I even have a few pieces already built for it including a neat looking fountain for the centre piece. I've actually got brand new textures for the floors there, including some really beautiful terracotta tiles, but you're quite right about the stonework being a good fit, so I'll likely use that. Confession: My mind's always been all over the place and I have this way of starting things only to finish them years later. Some times it's because I get a cool idea in my head and can't concentrate on anything else until I've done something with the idea and some times it's because I hit a wall with whatever I'm working on and I'm not sure what I need to do next to keep the set moving forward, and I decide to carry on with something else in the mean time so that I don't lose productivity... the result is that I actually have no fewer than 15 different sets in development right now, some of which have been going since 2008. When I watch Da Vinci's Demons and see everyone giving ol' Leo flak, I'm like "Dude... I know what that feels like!"I'll probably release the garden later this year when my head's in the right space to focus on it. I'll put that one in it's own product line, to reflect the differences between the standard features of that set and the products in the Luxurious Lair line. |
|
|
|
Post by bravesirkevin on Jun 8, 2013 23:33:01 GMT -9
First up... it took me a while to find the page controls to flip to the next page. I'm used to seeing them at the bottom of the page under the last post so it didn't occur to me that they'd be docked at the top of the page and I didn't see them so for a few days I've been scrolling up to the top just to change to the next page. Is it possible to make that a little more obvious?
Secondly, I don't think donations in the traditional sense are the right way to go about it.
I do have two alternative suggestions that I think might be a little better.
Suggestion, the first: We get all the willing designers together and they contribute an item or two to a special edition set which gets bundled together and sold on RPGnow for a very reasonable price, in the same vein as the free monthly hauls, but not free this time around. All profits from this sale go directly to a Cardboard Warriors treasury, managed by the admins. As a policy, money in the treasury is used to pay for the maintenance and if there is a surplus we can use the money to fund promotional efforts like contests and paying for professional services, if need be. Everyone benefits in that the forum is improved, participation is voluntary and is rewarded directly in the form of a special haul of stuff, and the designers benefit in that they've gotten some exposure that they otherwise might not have. Someone with the right negotiation power might convince the OBS crew to give us a slightly better royalty deal on this particular pack, and future ones like it based on the amount of business that this site has generated for them over the years.
Suggestion, the second: We calculate projected expenses for a given year, including things that would be nice to have but that have so far been beyond our budget. We take that budget, divide it by 12 and charge that amount to willing designers and studios to rent the header image for a month allowing them to showcase any of their relevant products and a very clear stamp to say "this month Cardboard Warriors is brought to you by:____________" Along with a link to their relevant shop.
Just my two cents worth.
|
|
|
|
Post by bravesirkevin on Jun 8, 2013 6:26:47 GMT -9
The reason for that is because I'm trying create a cohesive look to my new sci-fi stuff, which is something I never tried to do with my fantasy stuff and I kind of regret. By creating several models that more-or-less work together, I can create ground tile sets and walls and other features that will work cleanly with each one. Kind of a radical concept for me, since I'm so used to creating one-offs. Oh man, I feel your pain there... Early on I adopted a philosophy of making anything new work well with the old stuff so that the old stuff will still be worthwhile to someone who has just discovered me, and so that anyone who's built the old stuff doesn't find it suddenly useless next to the new stuff. The downside of this policy of perpetual backwards compatibility is that I'm lumped with a lot of stuff that seemed cool at the time, but is not quite as awesome as it would be if I were to try my hand it now with the benefits of experience. One of the tricky parts about sci-fi terrain is... what do you make? I'd say you're on the right track with the stuff you're doing, and the stuff you have planned. My design philosophy has always been to make stuff that I'd use (which is why I myself haven't made any sci-fi scenery yet... Love the genre and play lots of SF board games, but I don't play any SF RPGs and I own less than 10 SF miniatures so I don't play the wargames either)... it's been a pretty good philosophy for me, because none of my models have ever gone to waste... It's never been a matter of building and photographing and then boxing them up and throwing them in a dark corner of the garage. I've even had to rebuild a few models that got worn out through years of use... As to a more direct answer to that rhetorical question... your ideas seem really cool! My temptation would be to do stuff that can easily be multi-genre depending on the textures chosen and the option pieces glued on. For example, a church built today and a church built 300 years from now would only really differ from each other and a church built 300 years ago in the choice of building materials and decorations. As you know, I've been a long time fan of your work and I'm eager to see what you come up with in the future! |
|
|
|
Post by bravesirkevin on Jun 8, 2013 2:24:37 GMT -9
Hey Kev, I like the idea of bases blending in but often figs are moving from terrain to terrain and nobody likes switching bases in the middle of their turn. In theatre, when we need a neutral stage, designers often use a grey floor spattered with shades of grey, brown, black and white. I couldn't get it to work for me, but I'm strictly amateur. Another idea I discussed with Kane on these boards years ago was to have a base that suggested the shadow of the figure. Maybe just darker in the middle and fading towards the edge. Since you are in base mode, maybe you would like to give it a try. Or not, your call. Hi there! Thanks very much for your feedback! The idea is not so much about making the bases hot-swappable, as it is about making them removable so that the miniatures and the bases can be stored flat between games... it just so happens that one of the benefits of this is that the base texture can be swapped to match whichever terrain you're using that games session. That feature comes in handy when one is doing photoshoots and you'll see my bases show up pretty often, particularly in OldSchoolDM's pics, just because they're useful that way. As to your suggestion, I entirely agree. Most of my bases are decidedly neutral, but it sounds like the base with Dave Graffam's Mud texture might be perfect for the "neutral stage" suggestion as it stands. I'm sorta slowly building up the library between other tasks, but there will be new sets added all the time with new textures and new shapes and even some abstract ones, like you're neutral base with a shadow |
|
|
|
Post by bravesirkevin on Jun 7, 2013 9:54:31 GMT -9
What's your ID kev? I've got some pins of papermodling stuff there... PM'ed. Nice to finally have a follower there! |
|
|
|
Post by bravesirkevin on Jun 7, 2013 9:51:59 GMT -9
|
|
|
|
Post by bravesirkevin on Jun 7, 2013 9:22:41 GMT -9
The Luxurious Lair started out as a single kit, but landed up growing in scope and the current intention is to make it a line of products, the first of which, Council Chamber, has already been released on Papercraft Dungeon and RPGnow. There are many more sets in this line planned, including an Armoury, Master Bedroom and the Arcaneum. The unifying theme of these sets will be that they contain oppulent furniture pieces and ornaments to create the abodes characters with a little wealth and taste! I also have thoughts towards a sister line ("the Dingy Den," perhaps?) focusing on accessories and dungeon tiles for creating lower class environments and seedy establishments. 
Features of the Luxurious Lair sets: Dungeon Tiles: • 2.5d modular tiles. Walls are indicated by artwork printed on to the tile, rather than a 3d structure. This is beneficial in that it reduces the amount of storage space needed, but I am considering making an add-on series for those who want to upgrade the walls to 3d. • Floors will have 6 texture options: Flagstone, Damaged Flagstone, Herringbone Paving, Wooden, Stonework Floor and Sandstone Slabs; and will have the option to use a 1 inch grid, or a 1.5 inch grid, represented by either black lines or white stars, or no grid at all. • Tiles are compatible with tiles in other Luxurious Lair sets (and other Kev's Lounge dungeon sets in general) and interlink with the optional Starlinks system. • Floors are relatively featureless, with on-floor details like trapdoors and carpets being handled with 2d marker tokens for greater flexibility. 3d Papercraft Furniture and Ornaments: • Every set will include several highly customisable 3d papercraft scenery pieces, designed along a specific theme. Detail is exquisite, and the furniture designed to look like it cost it's owner a fair bit of gold. • Furniture styles are consistent throughout, so pieces of one set will look good alongside the pieces of another. Customisability: • All Luxurious Lair PDFs will include several layers. Control of the layers is handled by clickable buttons within the PDF itself, making customisation very easy and intuitive. • Options are frequently stackable, meaning a single piece of furniture could have thousands of unique possible combinations • Variable difficulty. Some of the models are designed with complex 3d components that may be a little too fiddly for some folks, and where this is the case, we've incorporated simpler versions of the models. All it takes to turn off the complexity is the click of a single button within the PDF! Instructions: • Every set includes highly-detailed, fully-illustrated instructions. They're optimised for viewing on a screen so that, if you wish, you can refer to them on your laptop easily while you're building instead of printing them out. |
|
|
|
Post by bravesirkevin on Jun 7, 2013 6:46:38 GMT -9
(No, I don't know what "mauve" is, or "lavender". I was told that the male of our species only sees 16 different colors and I believe it) Quick sidetrack: Women do see a greater variety of colours as a result of having twice as many red receptors on their retinas. This is unrelated to the amount of colours we can identify and distinguish between however. Our brain compartmentalises different colours according to their names, rather than what they look like so if we can name a colour, we can tell it apart from other similar colours and recall it as being distinct. In a particularly extreme example, if your language had no word for the colour "orange" and you called it red or yellow depending on which side of the spectrum it was on, and you were asked to remember what colour a traffic cone is and pick that colour from a swatch book, you'd likely pick a red swatch rather than an orange one. Women, who stereotypically take an interest in decorating and in fashion tend to have an extensive list of names for colours so they can tell the difference between subtle shades of purples and blues that men would stereotypically just think of as generic purple or blue. I for one, tend to think of colours primarily as they are named on the old GW paint bottles, and secondarily by the common names used on tubes of artist's paint, and at a stretch by the CMYK combination that would give that particular shade, so I can perceive and recall literally thousands of unique colours. The CW theme is clearly a shade of Warlock Purple!  |
|
|
|
Post by bravesirkevin on Jun 5, 2013 10:45:39 GMT -9
Idem "MEMBER PROJECTS" boards. One board for "current projects" ( with many sub-boards inside ) and one for old projects. I didn't ask to amalgamate, delete anythings or for forum's pruning. I think his argument is more that having an "old" section would be the effective death of those threads since it'd be implied that that's the graveyard where outdated stuff goes to die. I think the main intention with the "member's projects" section was to highlight the amateurs who were interested in giving it a go by putting their boards on the front page and I think that was a great idea when it wasn't a massive mission to get to the buttons you actually needed to get to. Assuming that it's possible to control elements of the layout with some clever CSS editing (and that someone with admin priveleges on this forum is actually interested in putting in the effort) then it seems to me that the solution would just be to put the button everyone wants back at the top. |
|
|
|
Post by bravesirkevin on Jun 4, 2013 20:36:29 GMT -9
Interesting thing I've just spotted... At the top, to the right of the bread crumb trail is a button for "Participated". It keeps track of all the threads you've recently posted in and notifies you if there's something new in one of them. That's gonna come in handy! |
|
|
|
Post by bravesirkevin on Jun 4, 2013 6:38:46 GMT -9
I am getting the red skulls - but what is missing is the 'new' button at the top of the screen which allowed me to see all the new messages without having to scour all the boards. I miss it - as I am terminally lazy!!!!! lol! The button still exists, but it's not a button anymore, and it's now right at the bottom in the statistics. Now labeled "recent threads". Still, it is a pain to scroll all the way down there past all the hundreds of lines. |
|
|
|
Post by bravesirkevin on Jun 2, 2013 20:42:41 GMT -9
Been working my fingers to the bone on some massive projects in my day job, so a lot of the Kev's Lounge stuff has had to take a back seat for a while. I've finally managed to get through that and I'm back on track with many projects including this one. I've also got some papercraft dungeon furniture that's going to be up on Papercraft Dungeon later this week, and a whole bunch of other stuff lined up! Here's a preview of some of the recently completed gladiator themed artwork for the Skeleton Skirmisher's set:  |
|
|
|
Post by bravesirkevin on May 29, 2013 16:27:47 GMT -9
www.pinterest.comYeah, I realise it's known for being mainly used by women, but it's actually quite a nifty way of bookmarking the parts of the internet you find interesting and useful while also sharing that information with others. I've found a few boards on their that are filled to the brim with some really excellent historical reference photos, and I'm also finding it's a good way to find some interesting stuff that I'd never have located in a hundred days worth of googling. Also getting the impression that it's a good way to spread the news about your own stuff (as long as you don't over do the self promotion thing).
|
|
|
|
Post by bravesirkevin on May 28, 2013 21:18:34 GMT -9
I got 4 separate emails about this product. Am I the only one that got this many? I got this many too. Occasionally the OBS sites tend to get stuck while loading and reloading causes it to submit a given form a second time (and a third and fourth too, I guess), and I'm guessing that's what happened here. |
|
|
|
Post by bravesirkevin on May 16, 2013 3:13:19 GMT -9
|
|
|
|
Post by bravesirkevin on May 15, 2013 20:37:37 GMT -9
I use Spray Glue for large surfaces, and "contact adhesive" for virtually everything else. I'm not sure what the local equivalents of contact adhesive would be in your countries, but it's a kind of rubber cement that has a particular affinity for itself. You'd apply it to both surfaces and wait a couple minutes, and then firmly press the two surfaces together. It's tacky, but repositionable, for a minute or two, and once bonded is super-strong and won't decay for at least 15 years. (It's also the active ingredient in spray glue)
The downsides:
Contact adhesive isn't particularly cheap (though, drop for drop, it's dramatically cheaper than superglue), and it's a little tricky to work with and very, very messy. It also looks a little like snot and sniffing it will make you high. The solvents in it will melt laser printer toner on contact, but they play nice with ink-jet inks and paper varnish.
The upsides:
The bond is incredibly strong and stays strong for years. It's repositionable for a few minutes, so it's very easy to get fiddly glue flaps lined up. It doesn't warp paper at all. It sticks to most surfaces, including photo paper with a heavy coat of paper varnish and transparencies, and stays stuck!
|
|
|
|
Post by bravesirkevin on May 15, 2013 7:39:46 GMT -9
Welcome to Cardboard Warriors! Good to have you here Hope you enjoy your stay, and good luck with your kickstarter! |
|


 This one looks like it's going to be every bit as awesome as your Magic shop, and possibly even a little better!


 ... Getting some nice pro photos done later this week)