|
|
Post by Vermin King on Jul 7, 2017 16:46:52 GMT -9
Taking a break to explain something 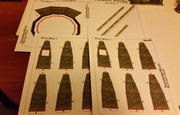 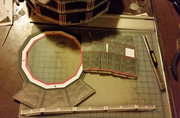 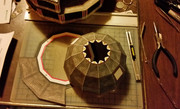 Printed out everything at lunch today for the roof files. Scored, Cut, Edged. I glued the dome together, but wanted to take a break to explain the roof base. There's a big old hole cut out of the middle. That is to give you access to firmly attach the dome tabs to the base. Which is what I plan to do before Wynonna Earp comes on. I like how this roof texture looks. Very satisfied with the Blue/Grey roof tiling. The light blue/grey edging fits in well and the red accent brings it together. I guess we really won't know until the dormers, chimneys and cupola go on, but it is encouraging. I like the lighter edges on this roof, so I am going to add the lighter edging to the cupola roof. I think I'm going to recolor the roof of the cupola, too, darker than this roof, but not as dark as I'd originally drawn it. I should probably give it a bluish tint while I'm at it |
|
|
|
Post by Vermin King on Jul 7, 2017 18:16:32 GMT -9
Roof base not glued to downstairs cap, yet, but this gives an idea of where this is going 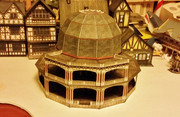 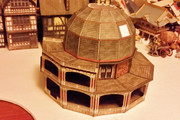 There will be doors at either end of the balcony. Chimneys go over the white spaces. Large dormers on balcony level and smaller round window dormers above those. Capping it off with the cupola |
|
|
|
Post by Vermin King on Jul 8, 2017 5:17:00 GMT -9
Got a little sidetracked 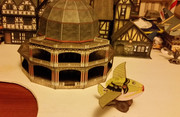 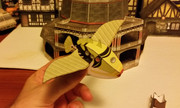 |
|
|
|
Post by marzman on Jul 8, 2017 10:08:54 GMT -9
Where did you get this flying fishy toy from?
|
|
|
|
Post by Vermin King on Jul 8, 2017 10:53:32 GMT -9
It's a combination of several models that I resized and modded. Do an online search for 'filefish papercraft' and you can probably find the fish. 'Steampunk windows' will give you the windows. The wings are from a Fiddlers Green early flyer. The transport cart is from another FG early flyer
After working this out, I'd planned on using the basic method to design a Flying Fishcraft for the Hoard. Got looking at various fish and couldn't decide, so I lost interest in the project. Not completely, but I don't feel like sorting through fish photos any more. Hmmm, maybe a flying pig...
|
|
|
|
Post by Vermin King on Jul 8, 2017 15:44:30 GMT -9
Up above I mentioned that I was going to re-work the cupola roof. I also toned down the pink a tad. The lower dormers as previously posted would work, but the decorative trim on each would practically touch each other, so I reduced them to 95% of the original size. With the new light trim on the roof section edges, I decided to widen the chimney pieces a tad. With the smaller window dormers, I also decided to reduce the round-window dormers to 95%. I am not sure if I'm going to continue the build in the correct order, but my biggest question mark right now is the Cupola, so I hope to have it built tonight and get started on the dormers. If all goes well, the dormers will be done tomorrow, and hopefully the chimneys and steps. That's if I don't get distracted by the steampunk three-wheeler or re-visit the steam coach. Once I know that everything works, I will post the files. I will also post a version without the balcony. Other than changes to the roof base and downstairs cap, that version would not have the balcony rail or supports and would need to add two window dormers. I am seriously considering not using Tommygun's airship mast and making my own. I think that it would be less effort. The one he designed has four slanted sides. The side abutting the Dodecagon House needs a vertical wall up to the porch roof, with a notch for the porch eaves. Modifying it would require a lot of measurements and math. Either way, I'll have to decide what I'm doing with the bucket under the zeppelin. I need to start making those decisions |
|
|
|
Post by greypilgrim on Jul 8, 2017 18:08:42 GMT -9
This is looking so good...
|
|
|
|
Post by Vermin King on Jul 8, 2017 18:56:37 GMT -9
Well, I did yard work until after dark, so I have five of the seven cupola/dormer files printed and clear-coated, but that's about it. Page 6 has the chimneys, and I don't want to print them until I'm sure of the chimney base geometry. Page 7 is detail for the small dormers, and I forgot to reduce them when I did the main bodies of them. That will have to wait until tomorrow.
I had hoped someone would throw out fish recommendations for a fish flyer.
|
|
|
|
Post by Vermin King on Jul 9, 2017 9:30:57 GMT -9
Once I finish the yard, I should make good progress today 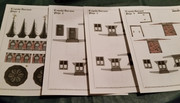 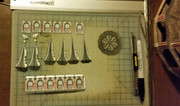 |
|
|
|
Post by Vermin King on Jul 9, 2017 11:56:17 GMT -9
Yard is taking too much time, and then you don't want to work on a paper model while sweat is running off you. Not as productive as planned, but happy with what has been done today Remember me talking about the big open area for the dome? Attaching the roof cap really requires it. 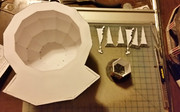  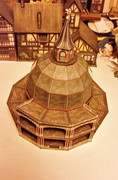 I need to adjust the tabs on the cupola roof, but I think it fits. Back to the yard and then onto the dormers |
|
|
|
Post by Vermin King on Jul 9, 2017 13:45:55 GMT -9
Need to rework the large window dormers. They need to be taller and farther from the porch roof. I think I am going to add a short wall under the windows between the trim pieces 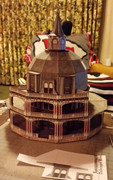 I think that just stretching them taller would look more odd than putting just a little wall under them. Wish me luck. I think I'm going to change the layout on them at the same time. Hmmm |
|
|
|
Post by Vermin King on Jul 10, 2017 17:24:57 GMT -9
Well, I did some playing with the dormers, and I've decided to totally redesign the dormer pieces. The doors stick out too far from the roof. The window dormers are about the right distance out to allow the side trim to look right, but they need to be taller, which requires a wall piece below the windows, and to keep them from looking too skinny, I need to widen the box slightly and reduce the size of the trim pieces (I really want to keep them). And if I am doing that, I might as well make the chimney pieces vertical on the sides. Chris's Habdome entrance piece is wider at the bottom. I also want to see if I can make them a tad easier to build.
Then there's the colors on the trim. They look good on the files, but they somewhat wash out even with 'Best' printing. I can enhance these with saturation, contrast and brightness. But I want to design these so that I won't have to be thinking whether I should have done things differently. By having these pieces and seeing how they fit the building, I can probably get it right next time as far as the proportions and color
So, it may be a week before I post anything new. I really think I'm going to take a break and work on something for the Hoard, first
|
|
|
|
Post by Vermin King on Jul 13, 2017 18:24:51 GMT -9
I want to have a steam coach for this. I thought about doing the Era or Enterprise, but less utilitarian and mix in touches of the Royal Mail Coaches ( I really like the red and black color scheme). While looking up images (and any existing models), I found a couple models of the Skoda Sentinel Steam Lorrie. The ABC model has a unique way of doing the undercarriage that I think would lend itself well to a Royal Mail Steam Coach. First, if you aren't familiar with these vehicles, I'll post some images. 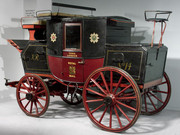  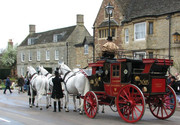 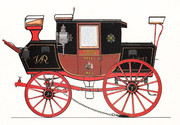 Forget all the extra roof seating, and the iron-frame benches. On actual steam coaches, the 'trunk' is extended to be the housing for the boiler. Then there is a box under the chassis which contains the drive mechanicals. Extending back from the trunk is the platform for the engineer to stand/sit. In the tourist photo, the red bench at the back is what I envision for the engineer. My hope is to design a Royal Mail Carriage, with a Steam Carriage version. On the Era, Enterprise, and Autopsy, the steering column is vertical with a chain mechanism to turn the traditional front wheels. So, instead of a foot rest, there will need to be a foot platform with a splash guard at the front. I hope to actually do a first run on this over the weekend. And if it fails, there's always the redesign of the dormers ... |
|
|
|
Post by Vermin King on Jul 14, 2017 18:36:37 GMT -9
Worked on cleaning up the Glasgow London Royal Mail Coach 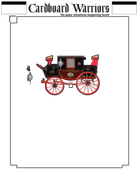 Should be able to finish cleaning it up and break it into 'elements' tomorrow. Might have a model by Monday night. I'm planning on making this a lot simpler than the Vardo. Those big ole honking lanterns are seen on most of the replica coaches, but you don't see them in the period oil paintings and drawings. They also aren't on the museum coaches. I might do a set of optional giganto lanterns, and they will definitely be going on the steam version. Have a great weekend |
|
|
|
Post by cowboyleland on Jul 15, 2017 6:39:32 GMT -9
Just want to point out that with the aircraft and the steam carriage this is no longer "just "a" steampunkish idea."  |
|
|
|
Post by Vermin King on Jul 16, 2017 16:32:14 GMT -9
I didn't say it was a small idea. The weekend didn't go anywhere near 'as planned', so what's new... I think we only got about 15 gallons of japanese beetles in the traps, but the little buggers don't go after peaches, which were a banner year this year. We made 28 pints of peach jam, two peach pies, and froze 20 quarts of peaches. We were trying to find Mom's old recipe for peach dumplings, but it has been so long since we had a decent crop, the recipe may be gone forever. Did get a bit done on the Royal Mail Coach. Doing it up as the Glasgow London run. One side of the body is finished. Got the wheels separated out, but didn't finish the chassis ... yet. I think it's going to look pretty sweet. I hope  |
|
|
|
Post by Vermin King on Jul 18, 2017 18:45:27 GMT -9
Anomaly time! Okay, the goal on this coach is to fall somewhere between 'toy' and 'simple model', but the spring arrangement on this was off a 'replica', and it bothered me. So I looked up more museum replicas (not the tourist replicas), and found a non-restored coach. I've heard about a second, but haven't found it, yet. So, tonight I've been creating the leaf springs for that chassis, creating the other side of the coach and rethinking the benches. I think they need to be separate. I think the benches will be simpler to build separate, and will give me more options for keeping them simple. It will also allow the coach body to be a more straightforward build. I am thinking I want to make it a bit wider than a true replica. I put together the first side at just a handy scale to work with, knowing I could shrink or enlarge after I got the elements together. But when I compared the wheelbase to the Greywolf Medieval Carriage, I think it is about right. Why is it that steps, benches and fenders always make things take longer? Here's where I'm at now  |
|
|
|
Post by Vermin King on Jul 19, 2017 19:07:54 GMT -9
I had come up with my idea for the lanterns when I was working on the 'voiture a vapour', and forgot what file I'd left it in. Spent way too long trying to find it. I decided the easiest way to do the body is to have the benches separate. The storage box/padded handgrip at the back of the roof needed to be a separate piece, too. I want to keep the basic cab as simple as can be. The chassis frame will be an open box--simple. Axles are going to be fold-overs that will fit in slots where the axle hubs are on the chassis Got a bit done on the front end and roof, though, so not a bad night  Mail was stored in the front and rear boxes. On the rear, there is clearly a door on the non-tourist-ride versions. I have yet to figure out how they accessed the front box. I'm starting to wonder if the top of the front box has a hatch behind the bench. Any ideas? |
|
|
|
Post by Vermin King on Jul 20, 2017 19:02:26 GMT -9
Got a bit more done. Tomorrow, I should be able to finish up the benches and chassis box. If I stay up late, I might even get it done. Maybe  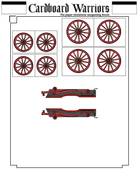 On the hitch, I had an idea on keeping the black posts at the front, but they are going to go away, probably just keeping black spots on top of the crosspiece. If you are curious, the little doo-hickey at the bottom of the back of the chassis is a step, located either on one side or both on most of the examples. |
|
|
|
Post by Vermin King on Jul 21, 2017 14:42:58 GMT -9
Progress! Benches done which finishes the 'body' parts. So, I flipped a coin. Heads -- Build it. Tails -- work on the chassis. Tails.  I haven't found a very good view of the step, so I'll have to wing it. I really like the concept of doing the simplified chassis, but the more I study the design, the more I'd like to represent it better. No, Dave, no. I'll resist. But at each axle, there were leaf springs parallel to the wheels. These didn't attach to the body, but each end attaches to a leaf spring parallel to the axle that then attaches to the body. In the midst of that is a beam that attaches the front and back suspension assemblies. This kept things from getting floppy and damps down the sway. Considering how this layout was in use from either the late 1700's or early 1800's, I think this is very impressive. A layout that stayed in use for about 100 years. Back to the chassis |
|
|
|
Post by Vermin King on Jul 21, 2017 19:19:59 GMT -9
Sometimes you just have to stop. Got the undercarriage box done, and the steps. Took longer to get the leaf springs and brackets worked out than I thought.
Made good progress on the hitch, only to find out I botched the dimensions on the cross-piece. Trying to decide whether to leave it as is and make a box to glue onto what I've got. Seeming like it might be the easiest way to do it, and it will capture the look better. My original idea would have had resulted in a single complicated piece instead of two easier pieces. Sounds like I am talking myself into it. Sometimes errors result in a better idea.
Once that is worked out, all I have left are the two axles. I really thought I'd be printing tonight...
|
|
|
|
Post by Vermin King on Jul 22, 2017 5:53:59 GMT -9
And it is down to the two axles, but I have some morning errands. I'd hoped to print and clear coat before I took off, but there's always this afternoon... BTW doing the cross-piece as a box seems like a wonderful solution, and doing it this way it is actually optional. Looking forward to building this. I'd have probably finished the axles, but I'm trying to decide how far the wheels should extend out from the body. Wheels on the model are flat. In real life the wheels are like a very leaky dish. The rims are actually out to the edge of the hub. With the flattening of the wheels, there has to be some artistic license. But it needs to look right... When it is done, I might have to get it into the hands of cowboycentaur and see if he would take a photo in front of the Coaching Inn |
|
|
|
Post by Vermin King on Jul 22, 2017 8:31:01 GMT -9
Printing as I type. Wish me luck.   Yeah, extra wheels at the bottom of page two so I can have raised rims and hubs. Okay, maybe I'll print page one on the back of this one with recessed windows ...  |
|
|
|
Post by Vermin King on Jul 22, 2017 9:57:15 GMT -9
First issue -- while scoring, I realized my fold lines are too dark. Once I clear-coated, the lines are not distinct enough (unless you designed it and know where to look) I'll lighten the fold lines and re-post the files. The undercarriage page is fine, but here is the new page one. Deleted. It looked fine on the computer, but still not distinct enough. I was hoping for a quick fix, but I guess I'll have to put some more time into it this evening.   Anyone feel like seeing how this looks off their printer? Unless you are very patient, I'd cut off the back steps |
|
|
|
Post by Vermin King on Jul 23, 2017 8:13:16 GMT -9
|
|
|
|
Post by Vermin King on Jul 23, 2017 16:14:49 GMT -9
And now I am dealing with a family problem... but here's where I'm at 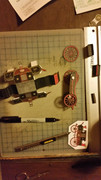 Not sure why it is sideways |
|
|
|
Post by Vermin King on Jul 23, 2017 17:37:39 GMT -9
Down to the lanterns  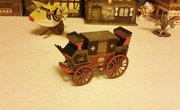 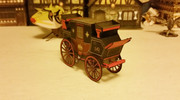 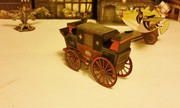 I'll have to do them tomorrow. I'm glad I added some width to it. Otherwise it would really look narrow. I might widen it a touch more, and then it is on the steampunk version |
|
|
|
Post by Vermin King on Jul 24, 2017 14:38:17 GMT -9
Well, the database went down this AM and I got the yard cleaned up, but I have a new appreciation for leg cramps. I tried to keep myself hydrated, but son-of-a-buck this is awful.
I used to say 'Never grow up. Never grow old.' Probably more accurately 'Delay getting old.'
Starting the conversion of the Steam Carriage tonight.
I had thought about doing the simpler version of the London Glasgow Royal Mail Coach first, but we are getting too close to the end of the month
|
|
|
|
Post by squirmydad on Jul 25, 2017 14:30:24 GMT -9
Well, the database went down this AM and I got the yard cleaned up, but I have a new appreciation for leg cramps. I tried to keep myself hydrated, but son-of-a-buck this is awful. I used to say 'Never grow up. Never grow old.' Probably more accurately 'Delay getting old.' My co-worker is retiring at age 58, mainly because his health IS still in good order and he'd like to be the first one to retire from my department of his own volition. |
|
|
|
Post by Vermin King on Jul 26, 2017 18:38:47 GMT -9
Well, some progress tonight on the Steam Carriage. Some last night, too. Last night I concentrated on the undercarriage. I think I have it worked out how it should look (except I still haven't decided on whether it should be chain drive or piston). Tonight was working on the body. I really like the 1996 Impala SS, especially in blue, so I incorporated that color. The rear box is extended, and even though the profile of the Mail Coach is taken from plans, I decreased the height of the front and rear boxes, giving it a sleaker appearance. Tomorrow I'll get the body and frame combined. Separating them was a mistake, which is why I intend to make a simpler version of the Mail Coach eventually. It will also have the lowered boxes, because I think it looks more like the period paintings that way, rather than the replicas I patterned it from.
I think the Mail Coach is a fairly easy build, but it should be easier. Just due to adding boilers, mechanical box underneath (which I hope to incorporate into the body/undercarriage), and the steering mechanism, the steam version will be more involved, so I know I need to simplify things.
|
|