|
|
Post by Cardstock Dane on Sept 30, 2014 2:22:51 GMT -9
You'll end with nice "hero's ghosts"  Not too sure about that - but of course, it would depend on the printer. Hm, mayhaps I should drop by the FabLab one of these days... |
|
|
|
Post by Cardstock Dane on Sept 29, 2014 11:44:23 GMT -9
I am wondering if one could do something similar himself, using old fashioned overhead projector transparencies to print on, then laminate...
|
|
|
|
Post by Cardstock Dane on Sept 29, 2014 10:33:53 GMT -9
|
|
|
|
Post by Cardstock Dane on Sept 27, 2014 7:39:25 GMT -9
Here's a few more - together, they're a guard! 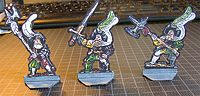 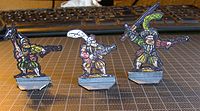 More printed out and ready to cut, just need to give the old fingers a rest. ETA: Proper credits for photos and painting goes to here. |
|
|
|
Post by Cardstock Dane on Sept 27, 2014 5:43:30 GMT -9
^ I'm Danish. Ramblings of drunken men is how we communicate with each other here.  |
|
|
|
Post by Cardstock Dane on Sept 27, 2014 3:45:49 GMT -9
^ I had problems understanding what the heck the Hippo is saying... may I be so forward to suggest, that you consider writing it in a comprehensible language next time? Many of os are way too old to understand 'leetspeak', not to mention those of us who don't speak English as our first language, and thus have an extra hard time spelling our way through the 'hippo-lingo'. |
|
|
|
Post by Cardstock Dane on Sept 27, 2014 1:02:49 GMT -9
This excellent tutorial also serves to remind us how much work, effort and thought there is actually put in every mini we get to buy (or download for free), print out and admire. We're really lucky to get all this stuff so cheap.
|
|
|
|
Post by Cardstock Dane on Sept 27, 2014 0:42:22 GMT -9
Another set added to my wish list. Dang, you people will cost me all my spare change... |
|
|
|
Post by Cardstock Dane on Sept 26, 2014 15:44:50 GMT -9
Oh, and I just realized that I forgot to say the most important thing: I LOVE your style! If you have backs for those, too, they'll be among my favourite minis. |
|
|
|
Post by Cardstock Dane on Sept 26, 2014 10:34:15 GMT -9
Not the best photos, but it should give you some idea: 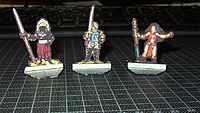 A few other examples (especially the monk at the right):  I personally think it looks good - I have based these on photos of 'lead' minis and for my own purposes, so I can't share them - but personally, I like the way they look. I have a couple of batches I haven't gotten around to cut yet, that looks even better - more about those in my design thread when they're ready. |
|
|
|
Post by Cardstock Dane on Sept 26, 2014 10:16:42 GMT -9
Just checked them out again, and subsequently added them to my must-have-list. These really look great! |
|
|
|
Post by Cardstock Dane on Sept 26, 2014 6:38:22 GMT -9
you can disguise uneven feet a little with some "ground" texture, but it helps a lot. Have to agree with you there. I have gotten some good results disguising with scenic bases myself, some of them even look better than flat fleeted minis would, if I may say so myself. |
|
|
|
Post by Cardstock Dane on Sept 23, 2014 10:16:43 GMT -9
Thanks, VK! They even provide a pronunciation guide in that great little model: Eyjafjallajökull * pronounced Aya-feeyalla-yurkul Almost right. I'm only half Icelandic (my mother is from Vestmannaeyjar), and I'm far from a fluent in Icelandic - but I do know it's pronounced Aya-fjadla-juh-kudl. the double l's constitutes a 'dl' sound.  My mom had great fun listening to the Danish newsspeakers struggling with pronouncing it right. |
|
|
|
Post by Cardstock Dane on Sept 23, 2014 10:04:13 GMT -9
As much as it pains me typing this, coming from the Land of LEGO and all, maybe this could be of some interest: Cobi, a Polish manufacturer, makes a LEGO clone product, which may interest those who are into modern themed wargames: cobi.pl/en/ |
|
|
|
Post by Cardstock Dane on Sept 23, 2014 8:54:32 GMT -9
Please, pass paper modelling on to your sons. And their sons. And your parents and cousins and....and... and welcome to this forum. You will like it here. |
|
|
|
Post by Cardstock Dane on Sept 19, 2014 9:54:56 GMT -9
Ooops, forgot one tiny but important addition: After you cleaned out the background, outlined the cleaned images and patched the backside photo, but before you run it through the generator I posted the link to, it is a good idea to run an "unmask sharpen" to enhance the brightness and intensity of the colours - that has given me good results regarding colours. If you dislike bright colours for some reason, just skip this. |
|
|
|
Post by Cardstock Dane on Sept 19, 2014 5:18:13 GMT -9
Well, whaddya know - I finished the tutorial faster than I thought I would, so here it is: 1. Get some photos of lead/plastic minis. The internet is a good source, but if you have your own 3D minis lying around, take some pics of those and use them – the latter has the advantage, that you can share the paper flats afterwards. As I can’t hand draw very good (except from the Sarge from ‘Beetles’), what I do is to find minis with photos of both fronts and backs. In this tutorial, we will be using the duelist I showed you in a couple of posts ago. Here’s the original: www.sodemons.com/rhmordheim/associates/empireguys/index.htmNow you have to pull out Photoshop, GIMP or whatever your choice of graphic software is. Set the basic layer to transparent, and clean out all of the background – the magic wand tool may or may not be your friend here, depending on how precise the background allows it to make the selection. Some – or a lot of – freehand cleaning may be necessary. If the base is a nice, scenic one, I like to keep it. If the base is an old, boring black slotta base, cut it out as well – you can always find a nice, alternative scenic base and photoshop your mini to stand on that instead. After this, the monk looks as you can see here (you can’t see the transparency, but it’s there):  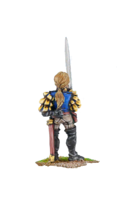 I then add a thin outline to the front photo. In Photoshop, I do it by using the Layer Style ‘Stroke’. I flatten the photo, so the background becomes white, and save it. The front part is now ready for further processing, but the back will need a bit more work, as it doesn’t align with the front, being a photo of a three dimensional figure (see next step). Now, the front photo looks like this (it’s bigger because I expanded the resolution to 300 dpi, so it’s easier to work with): 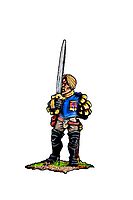 I keep the outlined and flattened front photo open in Photoshop, and add a new layer. In this layer, I take bits of the back photo (after flipping it horizontally), and ‘patchwork’ it onto the front, so to speak. Don’t worry if some parts are a wee bit too bit, or extend outside the outline – you can clean that with the eraser (but be sure that you have only selected the ‘patchwork’ layer, or you will erase parts of the front photo as well). After you’re satisfied, outline and flatten the layer, just like you did with the front photo, and save it. My patched back now looks like this…  …not something that would slip past Parduz’ critic eyes, but it’s not supposed to, so don’t worry – the next step with clean up ugly edges pretty smoothly. Note the difference between the original back and the patched one, by the way. IF there is an edge or two that looks a bit too sharp, do a bit of photoshopping (blurring, painting and general smoothing) before proceeding. Now, here comes the secret ingredient: Go to cartoon.pho.to/, upload your photos, let the generator do its thing, and download the results, which should look something like this: 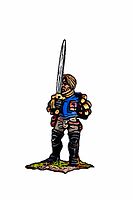 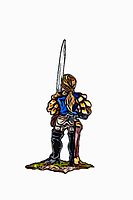 Basically, what it does is to generate a rotoscope image of the photo, to make it look like a drawing. From here on, it’s merely a matter of cutting out the white background, (magic wand tool should do precision work at this point), add black outlines, scale, change resolution to 150 dpi if you want, and add to template and print. There are other tools that can do something similar, if you want a different style. I downloaded FotoSketcher (http://www.fotosketcher.com/), which has some alternative styles, but I haven’t tried it out for real yet. There are others as well, so Google is your friend. Enjoy and have fun! |
|
|
|
Post by Cardstock Dane on Sept 19, 2014 4:20:15 GMT -9
Just a thought, but were these printed on normal card, or matt-surface photo-quality card? Normal card. These are for an old school D&D campaign for a bunch of teens (nephews and their friends), so there's a limit to how much money I intend to throw after them. I'm aware of the superior quailty that matte photo card would provide, but as they cost more for 50 sheets than normal card costs for 200 sheets, the choice is easy for me to make. I am looking forward to your tutorial. Working on it as I type this. I have to work tonight, but hope to have it ready for tomorrow. |
|
|
|
Post by Cardstock Dane on Sept 18, 2014 16:31:32 GMT -9
figures holding a sword looks like they holding a PAPER sword: the hand does not show the tension needed to handle the weight. I've wielded swords. Many different kinds. Trust me, the tension ain't that big a deal. A normal one-handed sword weighs no more than 3-4 kg. Sounds heavier than it really is. I voted computer generated - mainly because I think it gives better consistency between different styles than hand drawn, both model and mini wise. That been said, there are many very good artists both here and other places, and I like almost all of it. As for models, I think that the hand drawn ones tends to look a bit outdated - with some noteable exceptions. I use computer drawn textures or phototextures in my own models, as I think it makes the models look far more realistic, but as almost everything else, it all comes down to flavour and taste. |
|
|
|
Post by Cardstock Dane on Sept 18, 2014 15:08:05 GMT -9
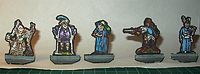
Glad you like it - here are some more. Front - the Zulu Warrior (at the left) came out a bit to dark for his facial features to be visible.  I feared that, because the original is pretty dark to. I may work a bit more on that one. The blitz seems to overexpose a bit, too, even after running it through PS - I shot these last ones after dark, maybe that's why. Also, the camera mercilessly shows me where I missed a spot when edging. Anyway, backs: 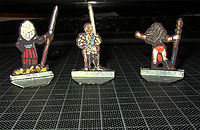 And if anyone is interested, here are the links to the originals I made them all from - that should take care of crediting, too. Zulu Warrior: www.ralparthaeurope.co.uk/shop/ral-partha-fantasy-c-37/fantasy-adventurers-c-37_40/03003-zulu-warrior-p-1272.htmlDuelist: www.sodemons.com/rhmordheim/associates/empireguys/index.htmWizard: www.daysofknights.com/forum/viewtopic.php?t=667Female Swashbuckler: www.reapermini.com/Miniatures/previews/latest/60174Female mage: www.shakandara.com/reality/minis/robral.htmlMonk: thebaldingninja.blogspot.dk/2012_07_01_archive.htmlI can't share the pdf's I made, but what I can do, is to share the technique I used to make them, so you can make your own. It's relatively easy, allthough it takes a wee bit of low level photoshopping, but I will make a guide anyway - I hope to post it during the weekend. And next projects is the adventure group I'm going to DM for, and a city guard, and... dwarves! I can't wait to make more of these. |
|
|
|
Post by Cardstock Dane on Sept 18, 2014 5:03:41 GMT -9
Ok... I can see it at first glance, without even putting on my reading glasses. But then again, I already know what it is, so maybe that's why. |
|
|
|
Post by Cardstock Dane on Sept 18, 2014 4:22:27 GMT -9
A little update - I found the time to print and cut a few of the minis I've made this way (don't worry, you won't get the files). Here's a few photos of them - again, I'm quite satisfied myself. Forgive the bases - I had a few, sloppily cut modern concrete bases without good edging lying around, which I just threw them into. I'm going to make some proper bases at a later point. Fronts... ...and backs.  |
|
|
|
Post by Cardstock Dane on Sept 18, 2014 3:55:47 GMT -9
I'm not into papercraft vehicles myself.... but I'm sure you will find what you look for at www.papermodelers.com/. Those guys are very, very good and you can find countless models of plains, ships and tanks there. |
|
|
|
Post by Cardstock Dane on Sept 16, 2014 6:53:50 GMT -9
I guess even at 31 flavors some people just prefer vanilla? Because it tastes good? I've played all kinds of roleplaying. Until some 3-4 years ago, I was into LARP a lot. And a lot of my co-players - the majority, actually - usually preferred to play something quite mundane, like a baker, a smith, a beggar, a mayor, rather than being the überhero or the necrowizard (and who says a baker can't have juicy secrets?). It's all a a matter of taste, but what would a world filled with fantastic beings be without normal people? In fact, as I see it, it's the normal people that gives the fantastic being their flavour. Without them, what would be so fantastic about the fantastic? |
|
|
|
Post by Cardstock Dane on Sept 16, 2014 3:27:54 GMT -9
That's great! I'm planning a D&D campaign for my nephews (13 and 16 y/o), and they can't wait for their first scenario. I'm old school, though, so I'm using the good, old TSR rules. |
|
|
|
Post by Cardstock Dane on Sept 8, 2014 15:15:46 GMT -9
It's an honour to be mentioned by PaperMau. |
|
|
|
Post by Cardstock Dane on Sept 8, 2014 1:50:03 GMT -9
I got my prize - and spent it! 20 bucks can get you a sweet deal at OneBookShelf, with the general prices there.... check out what I got: Merchant's GuildMystery TowerTrader's EmporiumWillow Brook InnCrescent Moon TavernGrey Hare InnMermaid TavernWhat can I say? I love pubs, inns and taverns, both IRL and as models. All this is what I got for my prize! And on top of it all, I got a lot of free stuff, that's been uploaded to OBS since last time I checked it out (and may that serve as a reminder for me to do it more frequently). Thanks again to squirmydad for having the contest and for the generous prizes! I can't wait to get home and check out the files - and I can't wait for Papercuts 2015 to arrive! |
|
|
|
Post by Cardstock Dane on Sept 7, 2014 3:42:46 GMT -9
Thanks to squirmydad for having the contest, and thanks to everyone who submitted. Awesome stuff, there is quite some talent here on this fine forum! |
|
|
|
Post by Cardstock Dane on Sept 6, 2014 11:56:56 GMT -9
There was a clear pattern after a few hours. Best model won - congratulations, kiladecus! |
|
|
|
Post by Cardstock Dane on Sept 6, 2014 0:44:25 GMT -9
I would love to see this technique used on some minis that you personally painted or have permission to transform in this manner. I was all ready to test-build and make cutfiles for these until I learned of this little legal hiccup. Please keep trying this! I think it's awesome. Well, basically, what I do is to 'patchwork' bits from the back onto a silhouette of the front, trying to fit it all together. Then I 'cartoonize' the photo, and the result is what you see. The cartoonization process also helps to smooth out the patchwork on the back, so it ends up looking good rather than like a mess. |
|


 I feared that, because the original is pretty dark to. I may work a bit more on that one. The blitz seems to overexpose a bit, too, even after running it through PS - I shot these last ones after dark, maybe that's why.

