|
|
Post by bravesirkevin on Mar 18, 2013 12:11:02 GMT -9
It's a great scene and the components are of a high quality. Those stairs most have been fiddly to build! But they look cool  Stairs do take a little patience to build nicely, but they're not overly complicated. I've built a little margin of error into it to make it a little more forgiving for those who aren't used to the more complex builds. In the weapons shelf I recognize a warhammer image from Neverwinter Nights Not from Neverwinter Nights... a few of the weapons, including the warhammer, are a shout-out to the art style of Dungeons and Dragons, and the artists behind it. The big homage is not a weapon though. |
|
|
|
Post by bravesirkevin on Mar 17, 2013 21:32:37 GMT -9
Liking the floor tiles especially The tiles are one of the nicest things in this set. There a a whole bunch of texturing options (something like 150 possible combinations per tile, not including the grid options. Speaking layer options... 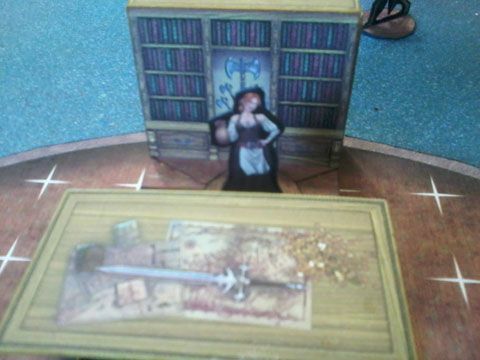 I landed up printing out a second set with one of the alternative wood colours and wooden floors instead of stone ones.. This shows off some of the possibilities offered by the layers. Lots of customisable detail on the shelves and table surface. Sorry, the barmaid paper mini is not part of the set. 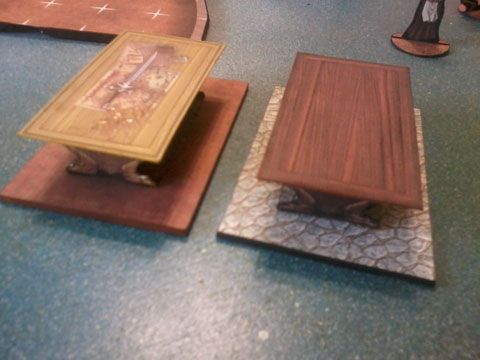 Quick comparison between the tables so you can see how much difference the layers offer. There are exactly 67 possible combinations of clutter on the table top, combine that with the 3 possible wood textures, and 14 possible floor options and you get a huge number of possibilities.  One of the awesome 2d markers included in the set! |
|
|
|
Post by bravesirkevin on Mar 17, 2013 3:13:30 GMT -9
So, more pics as promised: 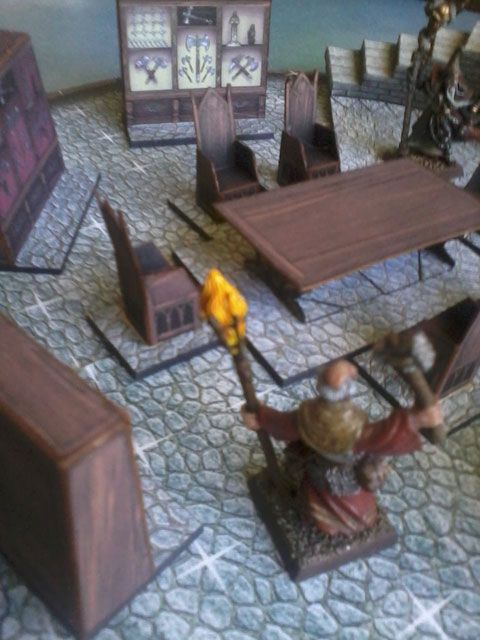 The furniture pack has an insane amount of layers. Not clearly demonstrated here, but there's a layer for every dungeon tile texture and 3 different colours of wood. The bookshelves have 6 spots with 4 different textures in each, allowing for thousands of unique combinations of contents, from neatly arranged books, dishevelled stacks, alchemy themed clutter and trophy/weapon display. The table also has a few overlay textures, including maps, books and weapons. 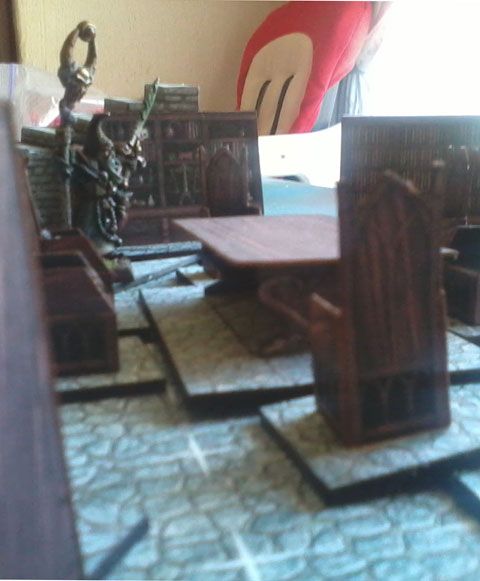 This pic's a failed attempt to try and show off the detail on the trestle table and chairs. Despite their complex looking appearance, they're actually incredibly easy to assemble! 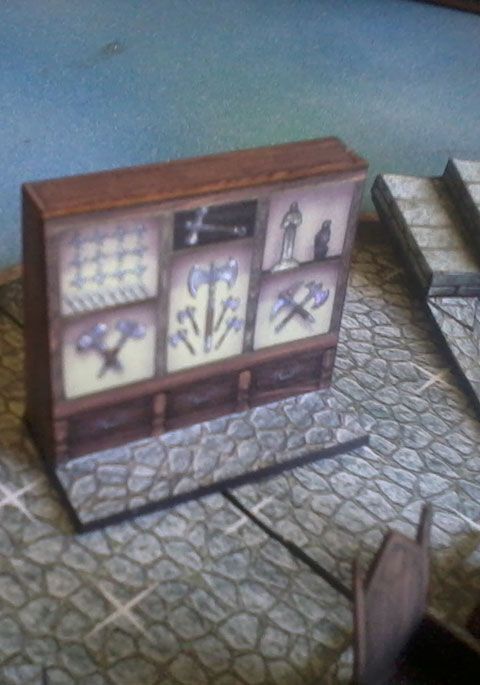 Obligatory close-up on the weapons display shelf variant. Quite a few homages snuck into this one. One's even an homage to two very different things, both of which I love dearly Any guesses what they are? |
|
|
|
Post by bravesirkevin on Mar 16, 2013 15:20:25 GMT -9
Oregon's pretty far from me, so I think I'll have to give that one a miss... If you get the lesson recorded and put videos up on your site, let me know and I'll send traffic your way from all my sites. |
|
|
|
Post by bravesirkevin on Mar 16, 2013 10:37:36 GMT -9
Thanks a lot for your support guys! I NEED this in time to build it for my "High School Gamers Reunion" April 5. Is that a possibility? More encouragement to hurry up!  I love it... Yeah, I'm busy polishing things tonight, Instructions tomorrow, doing the photo shoot early in the week, likely on tuesday and then I can upload it... Will get some cutfiles sorted out soon after it's been uploaded, though OldSchoolDM's already helped out there by creating one for the tight radius spiral stair case. |
|
|
|
Post by bravesirkevin on Mar 15, 2013 18:42:47 GMT -9
This one's been a work in progress forever. I started it back in November 2011, and while I've been working on bits and pieces of it here and there, I've mostly neglected it as more pressing concerns interrupt the progress. Luckily, a couple of my very loyal friends and supporters have urged me to get this baby finished and out there as soon as possible, so I've sat down and finished components, and I'm almost ready to upload it and unleash it on the world! Been putting together the models for the product shots, and I snapped a few pics while I was going with my cell phone. Getting some nice professional photography done early next week, but this gives you an idea of what's coming: 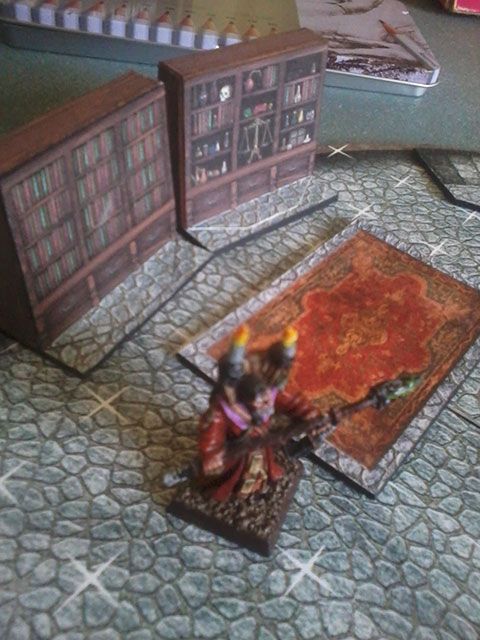 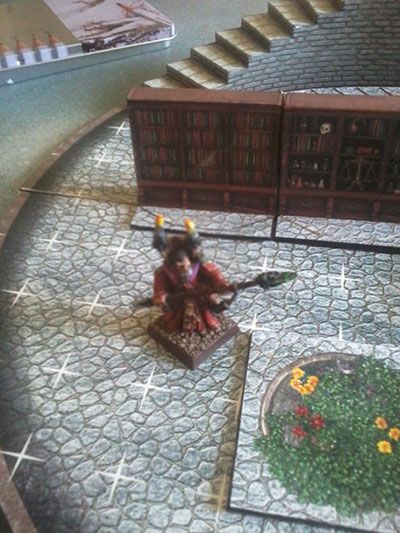 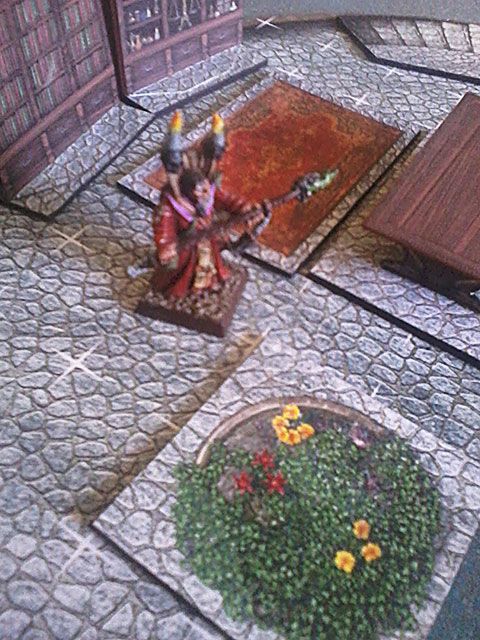 Still busy gluing together some more components, so I'll add some new shots soon, along with some proper details about what's going to go in to the set. There are a few more (better quality) photos in an album the Kev's Lounge facebook page here: www.facebook.com/media/set/?set=a.320440648035290.74461.129983827080974&type=1&l=a76fe795df |
|
|
|
Post by bravesirkevin on Mar 10, 2013 5:53:03 GMT -9
|
|
|
|
Post by bravesirkevin on Mar 7, 2013 7:48:55 GMT -9
What are those yellow "star-looking things?"  They're linking clips to hold the dungeon tiles together. |
|
|
|
Post by bravesirkevin on Mar 6, 2013 10:24:03 GMT -9
|
|
|
|
Post by bravesirkevin on Mar 4, 2013 11:46:28 GMT -9
It would still save time and ink if I had the option to print each of the the gates once and print different interiors for them as needed. Pardon me for playing devil's advocate here, but would it really be worth it? The gates are really little more than a decorative border at the moment so printing 20 gates would use only slightly more ink than you would printing 20 interiors, and that's countered by the fact that you'd be using more ink and paper printing the frames separately, along with the fact that the frames would get a lot more tricky to build. It might be worthwhile if the frames were already complex 3d constructions that were time consuming to build, and/or the interiors were uniform so you'd only need one of each colour instead of one of each colour in each shape. In this case, however, I'd say the slide option would probably over complicate this one unnecessarily. |
|
|
|
Post by bravesirkevin on Mar 4, 2013 1:10:21 GMT -9
... It's nice idea! ;D I think use it with konungs. They'll be ready after gangers (leutenants ) You are really nice Alex. As usual. ;D But this is not my idea. It dates back to 1985. By ral partha.  I remember those 3-stage minis. I had a few and they were my favourites! Still use the wizard, fighter and druid regularly. |
|
|
|
Post by bravesirkevin on Mar 4, 2013 1:03:57 GMT -9
Looks good David... Just a tip: The snake lady's balance is off. It looks like she's going to fall over at any moment. Easy fix though, just send the tail back the other way, so that the whole body looks almost like an upside-down question mark.  |
|
|
|
Post by bravesirkevin on Mar 2, 2013 23:11:40 GMT -9
Okay. I'm new at this. I downloaded the widows house and it said i could unlock the layers, however i don't know how or what program to use. I tried photoshop, but it pops a box saying to enter the password and does the same thing in illustrator. Can someone help me, my husband would really like these models made up for his gaming night. Layered PDFs are for use with Adobe Acrobat Reader, available as a free download here: get.adobe.com/reader/. Hope that helps. |
|
|
|
Post by bravesirkevin on Feb 26, 2013 17:44:12 GMT -9
I'm sure it's obvious, but just to be clear, this is a detailed character illustration of the Greenhold Sorceress and not the actual 28mm figure artwork. I'll post pictures of her 28mm figure when its ready. Is there a reason you wouldn't use this art for the 28mm figure? I think it would work out fine. The cape covers most of the back detail, and there isn't a huge amount of perspective in the figure so it wouldn't look too weird from the back. The only real problem area is the feet, but they way you cut your minis means that you can change the feat on the back without messing up the pose. I just really like this dynamic pose and think it would make for a very interesting mini as it is |
|
|
|
Post by bravesirkevin on Feb 26, 2013 16:19:02 GMT -9
By the way, I must thank bravesirkevin for the unsharp mask tip. A few days ago I played a little with it to print some Battle Studio! minis and it worked very well. I did not write down the parameter values but I got the feeling that they will depend on the contrast and colors so I do not know if I could have a "one size fits all" setup. You're most welcome! Your set-up will depend a lot on how the image starts out, so there is no "one size fits all" as you put it, but once you're more familiar with the way the tool behaves you'll come up with your own rules of thumb on how to get the best results. WOW! Thanks for the tip, BSK! I am afraid to touch anything, so when you say to leave "Threshold" alone, I will not be touching it. A quick question... should I keep the "Radius" low? Is this another case of "Don't touch it, Dave?" Low radius is generally better, but not too low. Around 2 pixels will work in most cases, but it does depend very heavily on the state of the image before you started. Long Answer: Generally, I'd set my amount at around 175 or so, and then tweak the radius until I found the kind of sharpness I wanted, and then reduce or increase the amount to fine tune the contrast so that things don't get blown out. In your case, I would use the threshold because your stuff is hand coloured so you've got paper grain and pen strokes which will both get very noisy if you don't use the threshold. Just leave it at zero until you're happy with the contrast and sharpness, and then right at the end of the process slide it up gradually to smooth off your flat colours properly. Don't be nervous! Just experiment and learn! Until you're more confident, it might be a good idea to keep a back up "raw" copy that you can compare the "corrected version against. Also, if you mess up the corrected version, you can always go and start over on a new copy of the raw version. Don't worry though, you will pick up the skills pretty quickly once you get going. |
|
|
|
Post by bravesirkevin on Feb 25, 2013 6:30:32 GMT -9
In GIMP it's under Filters>Enhance. In Photoshop it's under Filters>Sharpen
Just to add a more complete description, what it does is to increase the contrast of each pixel, by comparing it to the pixels that surround it according to certain parameters.
The 3 parameters are:
Amount: How much contrast to add. In Photoshop, this is measured as a percentage, from zero to 500%, in GIMP it's value from 0.00 to 5.00. I'm not sure if they correlate, so please experiment a little. In Photoshop 100% leaves it exactly the same, and a good value is usually somewhere between 150% and 200%
Radius: This is a count of how many surrounding pixels to compare against. A small value will compare each pixel against only the pixels that are very close to it, while a large radius will take a much bigger sample (And thus affect the colours even more dramatically).
Threshold: This parameter is there so that it ignores colours that are very similar. The main use for this is to prevent noise in a flat colour area from getting blown out of proportion while you're sharpening. A very low value will make your noise more noisy, and a value that's too high will cancel out the sharpen effect unless there's a lot of difference in the colours, so you'll need to play around to find the right balance. I usually don't touch this one unless I have noise in my image.
|
|
|
|
Post by bravesirkevin on Feb 22, 2013 18:41:51 GMT -9
Okay, that went quicker than I thought. There are two versions of the drivers available. One is a basic version which has very stripped down front-end features just to get the average joe going. There is also a full feature driver that includes more advanced front-end options and that's intended for pros who need to get the most out of their hardware. This link may or may not be helpful: h10025.www1.hp.com/ewfrf/wc/document?docname=c03168175&cc=us&dlc=en&document=&lc=en&product=303753#N170If it's not, you can try googling "HP Full Feature Driver Windows 8", which will hopefully help you to find an installation wizard that will autodetect the appropriate set up for your printer. |
|
|
|
Post by bravesirkevin on Feb 22, 2013 18:28:15 GMT -9
Yeah, I should have guessed it right away! I've had two of their all-in-one machines myself, one of which I still use for printing. The scanner's actually not too bad and you can do pretty well with it once you're familiar with the interface, I just prefer to use my Canon scanner with much higher resolution.
There actually is not a problem with your driver, it's about the front end software. The HP all-in-one's default scanning software is set up to be user friendly for the average joe and is meant to give him good results when he's scanning his grandmother's photos so that she can put them on facebook. It's not designed to handle hand coloured line art pieces, and to do that well you need to use the more advanced tools. On my older model, a C4100, I was able to get a good TWAIN plug-in for photoshop, but the newer model's driver seems to force you to use the basic front-end with all it's useless settings, and I suspect that that is the same problem that you're running in to. I'll do some research and see if I can come up with a workable solution.
|
|
|
|
Post by bravesirkevin on Feb 22, 2013 15:42:45 GMT -9
Hey Kiladecus, this is terrible news  I was following the discussion on FB and I have to agree with those who posted that there must be some way to tweak the scanner settings or use some alternate driver with Windows 8. I hope... I missed the conversation on Facebook, but I can definitely state that the driver's the issue there. The driver is attempting to autocorrect the colours, and it's guessing that the spotty black areas are meant to be grey. I can't give you good advice without knowing what hardware and software you are using, but I might be able to point you in the right direction with a little more info. |
|
|
|
Post by bravesirkevin on Feb 22, 2013 12:20:34 GMT -9
I think the real trouble you're running into with that demon is that his torso is facing forward, while is hips are at a 3/4's angle. Everything below the waist looks fine on its own, and everything above the waist looks fine on its own but together they look a little off.
I think the easiest way to fix it would be to make his right leg point forward like you've done with the left leg. The more difficult fix would be to redraw the torso so that the pose matches the angle suggested by his legs.
|
|
|
|
Post by bravesirkevin on Feb 22, 2013 12:10:48 GMT -9
Macgyvered barricades assembled from what ever junk happened to be on hand.
|
|
|
|
Post by bravesirkevin on Feb 21, 2013 14:43:35 GMT -9
I bet that 18+ label sells a ton of figures  That irresistable lure of forbidden fruit... ;D |
|
|
|
Post by bravesirkevin on Feb 20, 2013 19:10:49 GMT -9
Thanks Labrat! Very much appreciated! |
|
|
|
Post by bravesirkevin on Feb 20, 2013 6:24:27 GMT -9
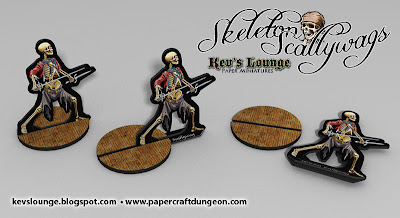
RPGnow (and the other OneBookShelf sites) are AMAZING because there is a 100% back-up of everything you buy. Also, if you (as a publisher) update a file, it stores the new one. Papercraftdungeon.com has the same functionality, but we're still working on improving the UX, so it might not be obvious to a new user at the moment. The main advantage that OneBookShelf has over my shop is that they've got more reputation and trust in the market place, so they're more effective at bringing in traffic and closing a sale, but they do take quite a significant commission for it. At the end of the day though, what I really want is for people to actually use my products and enjoy using them, and that's why I put so much effort into making sure they look good and assemble well, and why I have clear and explicit instructions that minimize the chances of them messing up a complex build which would ruin the experience for them. If going through OBS will help get my stuff in to hands of more people, and make the whole venture a little more profitable so that I can create more cool stuff for people to use, then I'm all for it. Just not a huge fan of their terms and conditions which do limit what i can do, so I will be keeping some sets exclusive to papercraftdungeon.com. Speaking of great, I love the skellies! And thanks! I'm glad people like them! |
|
|
|
Post by bravesirkevin on Feb 19, 2013 13:32:47 GMT -9
I got my "Red Skeltons" from RPGNow! Somehow or other, my security system doesn't want to play well with Papercraft Dungeon's, but will with RPGNow's. I like the set a lot, and look forward to building them, with maxed-out, red-hot flames, of course! Thanks! Have fun! Steve Getting the issue looked at, but from what I can tell it seems to be something to do with Paypal and your security software. I'm glad you managed to get your skeletons at last. Thanks for your support Steve RPGnow Link: www.rpgnow.com/product/111443/Kev%27s-Lounge-Paper-Minis%3A-Blazin%27-Bones |
|
|
|
Post by bravesirkevin on Feb 19, 2013 0:01:01 GMT -9
That's a really nice build! Good job! Is that forge section not a little delicate though? |
|
|
|
Post by bravesirkevin on Feb 18, 2013 7:52:30 GMT -9
Great tut Hackbarth! I use Photoshop rather than GIMP, but most of it looked like it would be true for both, except for this step: In the uppermost layer, go to Layer > Transparency > Add Alpha Channel and choose to turn white (FFFFFF) into alpha. Most Photoshop users would just set the lines layer to "Multiply" or "Darken" and I'd always assumed it was the same in GIMP. Are you planning to add more complicated tuts for the more experienced users later on down the line? |
|
|
|
Post by bravesirkevin on Feb 18, 2013 2:55:50 GMT -9
|
|
|
|
Post by bravesirkevin on Feb 17, 2013 9:36:37 GMT -9
Magnets are a bit of a tricky one. I don't bother with any of the tape or magentic plastic emulsions, because they're only really any good when they have a big surface area to work with, and at this scale, you never have that much surface area except on the bases of buildings and other large props. If I need something to be magnetic I go straight for the ferrite buttons, but I prefer the rare-earth ones when I can find them at a reasonable price.
As for things to clamp the magnets to, that galvanised mesh looks like a good option. I personally use tin sheets for that and they work pretty well, and they're very easy to cut with a pair of springloaded shears. Best thing is that they don't cost me a cent. I get them in the form of discarded printing plates from my local printshop.
That's coming along really nicely OldSchoolDM! It's got me thinking of ways to design complex buildings that store compactly.
|
|
|
|
Post by bravesirkevin on Feb 17, 2013 2:21:37 GMT -9
Damn! Looks like our friend Pasiphilio's getting even better at this! <==== Super impressed! ;D |
|


 I love it...