|
|
Post by greypilgrim on Feb 27, 2017 15:53:23 GMT -9
Congrats, Shep!
|
|
|
|
Post by greypilgrim on Feb 26, 2017 11:46:18 GMT -9
RE: wrapping the tail -
One could try physically curling the tail around in an arc, rather than making new art showing it up against the body (if that's what you're thinking about). If that proves unstable, you can just straighten it back out again.
|
|
|
|
Post by greypilgrim on Feb 26, 2017 11:41:26 GMT -9
RE: wrapping the tail -
One could try physically curling the tail around in an arc, rather than making new art showing it up against the body (if that's what you're thinking about). If that proves unstable, you can just straighten it back out again.
|
|
|
|
Post by greypilgrim on Feb 5, 2017 13:51:36 GMT -9
Oh, I hear you - I have a hard time just drawing a line sometimes - LOL.
|
|
|
|
Post by greypilgrim on Feb 5, 2017 13:48:24 GMT -9
The "running ink" problem is the main reason I try to use a marker that is as close as possible to the color of the printed area to either side of the cut edge. The only other thing to do is to use only a slight amount of pressure of the marker on the paper. It takes practice, but it helps.
Enjoy!
|
|
|
|
Post by greypilgrim on Feb 5, 2017 13:40:48 GMT -9
On the subject of "clear canopies", a fellow by the name of Bob Martin wrote this describing his technique over on the Fiddlers Green website's forum hosted on PHPBB server. He uses clear packing tape. In his words: "I usually print out the sheet that has the canopy on a regular sheet of printer paper. Then with a sharp x-acto knife I cut out the windshield areas. Then I cover the entire canopy with 2" wide clear tape. I get it at the dollar store for a buck. Then cutout the entire canopy outline. Also cut out all the areas where the glue tabs are. Then turn the canopy over and cover the underside with clear tape. trim off the excess tape. Important, slit the tape where the glue tabs were. When forming the canopy these tape tabs will be used to tape the canopy together and hold its shape. Make sure the surface you use when applying the tape is really clean. Avoid smudges and finger prints. Finished.. Clear as mud Huh  " There was a video posted showing the procedure, but I can't find it now. And the link I had only goes to an empty page. Personally, I would print and cut a second sheet of the canopy on regular paper (again, cutting out the actual window areas), and then glue this on top the first to hide the sheen of the tape where it lies atop the framework. The discussion link is here at the very bottom of the page: www.fiddlersgreen.net/forum/viewtopic.php?f=14&t=2926&p=13198&hilit=tutorial+clear+canopy#p13198And for a bit more clarification, consider this which he wrote elsewhere: "Cover both sides of windows and trim off excess tape. Notice tape separation around the windows. :cry: Image Next, using a sharp modeling knife penetrate only the top layer of tape and go around the whole window. careful not to cut through both layers of tape. :shock: Image Go around the entire window with your finger and press the tape down. Notice the tape separation is gone. :wink: Image You can do this from either the inside or outside of the window. I prefer to do it from the outside. GOOD LUCK :mrgreen: " |
|
|
|
Post by greypilgrim on Feb 5, 2017 12:58:39 GMT -9
whisper31: When I first started out "edging" my models (which was the first "skill" I picked up from my idolized predecessors in the hobby (yes, most of you are reading this - haha!), I was using a basic "Sharpie" brand black marker. Then I tried some "Crayola" brand to get more color options. I alomst immediately switched to the "Tombow" or "johnny-oBlick" coloring markers because they came in a vastly greater number of shades. Both of these brands have a thin point or brush-like tip at one end, and a broader tip at the other. I find this helps me control my edging or to make a small colored mark where necessary. I don't know what brands you have available to you. Granted, the "Tombow" are a bit pricey (about US$3 per pen); while the "johnny-oBlick", which is a wholesale/retail company with its own brandline, is not quite so expensive (about US$2). I started with the basic colors and I add another one or two hues as needed for the projects I work one - so you do not have to go all out in getting a huge assortment of colors all at once as these all all sold on an individual pen basis and you do not have to buy a large "set" or "collection" of colors all at once. I will admit that I do get very anal on my edging. On Chris Roe's Utility Shuttle and Crotale builds, for instance, I make sure I color in for the continuation of the stripes across the fold lines in between the basic color of the model. Continue your dedicated pleasure to the art of papercraft! 
|
|
|
|
Post by greypilgrim on Feb 5, 2017 12:39:14 GMT -9
Nicely done!
|
|
|
|
Post by greypilgrim on Feb 5, 2017 12:37:54 GMT -9
Hi, radoslawkamil. Last year I built a large version of this same landing platform. The discussion is at the link below. The photos comparing the original and my version are almost all the way down to the bottom of the discussion page. I made some interior support walls for strength, and a photo of those are presented as well. These were for my grandson who is a Lego Star Wars fanatic. cardboard-warriors.proboards.com/thread/7569/landing-platform |
|
|
|
Post by greypilgrim on Feb 5, 2017 12:03:27 GMT -9
Thank you, radoslawkamil and whisper31, for the discussion. Those octagonal bases turned out nice and I'll use them at some point. radoslawkamil: I use GIMP in the low level efforts which I work at - basically just kitbashing. My method is that I'll import the desired replacement texture to the base level, then import the form onto an overlay. Then I go through and erase (or 'X'-out) the space between the lines of the original, and *voila!*, I have a new paint. I'm sure you more experienced fellows have other - probably far easier and quicker - methods... but this is where I am at with my current skills. [Further help and tutorials are always welcome - hint, hint!  ] |
|
|
|
Post by greypilgrim on Jan 23, 2017 16:31:23 GMT -9
Just a thought - Wouldn't a simple Hook-and-Eye style have been easier?
|
|
|
|
Post by greypilgrim on Jan 12, 2017 15:55:56 GMT -9
That looks really neat, squirmydad! Thanks for sharing!
|
|
|
|
Post by greypilgrim on Dec 18, 2016 9:38:21 GMT -9
This stuff looks nice!
So the tiles are 8" x 8" format?
It does not state the size in the product description (though it does state the square size of 1"). It is obvious once the pics are examined.
I would recommend the tile size be included in the description to differentiate your line from the other standards of 6- or 7-inch tiles which are out there - and to avoid confusion.
|
|
|
|
Post by greypilgrim on Nov 19, 2016 13:46:44 GMT -9
I can't believe it took me 4 months to find my camera! But, finally, here is a shot of my Crotale. I apologize for the lighting - and this does not show the detail of the belly hook-up of the transparency... 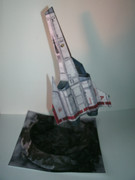 Looking at the expanded view, you can see the bottom of the transparency stand being held by the two slots in the crater base. It's very flimsy, though - I wish I had thicker transparency to work with. |
|
|
|
Post by greypilgrim on Oct 27, 2016 16:59:48 GMT -9
jedidresden - when you post those pics, please give a description of how you actually solved the problem (rather, what you did to make it work for you)
|
|
|
|
Post by greypilgrim on Sept 25, 2016 7:42:31 GMT -9
I will assume this is a grav version for the vehicle based on the outboard geometries. Looks good. I like!
|
|
|
|
Post by greypilgrim on Aug 28, 2016 14:17:20 GMT -9
Chris, this sounds great! Can't wait for the new year and the new stuff to start rolling out!
|
|
|
|
Post by greypilgrim on Jul 23, 2016 4:31:07 GMT -9
UPDATE: Whew! I cannot believe how real life can get in the way of things. FINALLY got around to actually gluing the Crotale IIIC (yes I can spell it right sometimes  ). Took an hour and a quarter. Before I did that I mashed up a display stand maybe a half hour tops (not including searching for what files to use to print off). I used the tall support from the Despoiler. From WWG I used the Mayhem Wastelands file and the kitbashed Crater Ring (full size, about 6.5 inch outside diameter). Looks pretty snazzy - I'll get a pic up tonight. Total project time was about 4 hours. That squadron is going to take a "little" time. Still have to change the insignia, and experiment on different squadron color stripe - I'll have to work on my skills for that bit. |
|
|
|
Post by greypilgrim on Jul 5, 2016 12:10:58 GMT -9
Thanks, Chris - I'll stat looking there... [After checking] That would work, I think, though not the style I had in mind. I'll keep looking or come up with something of my own - which I'll share. 'Course this I'll have to do *before* I start assembly - but I won't add the time into the 'official' time log for build... |
|
|
|
Post by greypilgrim on Jul 4, 2016 18:10:23 GMT -9
UPDATE:
After an afternoon with family, I spent another hour and a quarter on edging. I took my time - almost luxuriating in the calm downtime - and as they say: the devil is in the details.
I use johnny-o Blick Studio markers for most of my work. The majority of the edging here was with their Cool Gray 20% to cut the main body white edges (sometimes I used two swipes), with Basic Gray #3 at the darker gray bits of the artwork. DBS Olive was used for highlighting the green running lights on the wings, with a basic Sharpie red to continue the red stripes over the edges to connect the side flat surfaces for a nice continuous look. A basic black Sharpie was used around the engine intakes and exhausts.
In my mind's eye I was considering various formats for the eventual display stand. I haven't gone back to the archives, yet, so does anyone remember if Chris has a stand in any of the other sets that could be adapted? I am figuring in part that I could have a coupling-copy of the engine exhaust at the high back of the stand to fit like a plug into one of the exhausts. (Which one to put it into might dictate how the model "lists" or rolls as it sits on the stand.
|
|
|
|
Post by greypilgrim on Jul 4, 2016 7:55:45 GMT -9
Happy 4th of July to all! In celebration of the Holiday - and to give an enforced break to my massive WWG Mall Build (okay, I've been wanting to do a zombie run ) I'm building a Cotale IIIc. This is My second, actually - I gave my first to my grandson when he came for a visit a few years ago. What I'm doing different this time around: 1) Keeping track of my build time. The actual handcutting took me an hour and a quarter. Now, this does NOT include the landing gear (as I am intneding to display this 'in-flight') - although I think I will cut them later before assembly with slot tabs (and slots in the underbody) so it can 'land'. Nor does the time include making the in-flight display stand, which I'll cobble from some other papercraft pdf from elsewhere. 2) I am going to try for a more rounder canopy, and therefore did not score those lines. After I do this build, I intend to eventually modify the original pdf to do a flight wing for my Traveller game stuff with the emblem of the Duke of Regina's Huscarles 4518th Lift Infantry Regiment as support elements. (see insert) An additional modification to that may me to shorten the length and wing span a bit so it can replace the original Rampart space fighter in my future Azhanti High Lightning build. (Why do I always have such grandiose schemes? Why? Why? Why?) Oh, and I'm building this with the soundtracks for the newer BSG series running in the background...  Attachments:
|
|
|
|
Post by greypilgrim on Jul 3, 2016 13:02:47 GMT -9
... and those needle antennae are wicked! How did you do those?
|
|
|
|
Post by greypilgrim on Jul 3, 2016 13:02:07 GMT -9
First off, I do applaud the ingenuity to do this.
I must confess my first actual reaction was the same as voiced by a stunned Capt. Malcolm Reynolds when he found a naked girl (River) semi-cryogenically frozen in a mysterious box in his cargo bay: "Huh!?"
My second reaction was, "Wow! Outrigger tank treads! How cool is that?"
|
|
|
|
Post by greypilgrim on Jul 3, 2016 13:01:16 GMT -9
First off, I do applaud the ingenuity to do this.
I must confess my first actual reaction was the same as voiced by a stunned Capt. Malcolm Reynolds when he found a naked girl (River) semi-cryogenically frozen in a mysterious box in his cargo bay: "Huh!?"
My second reaction was, "Wow! Outrigger tank treads! How cool is that?"
|
|
|
|
Post by greypilgrim on Jun 27, 2016 15:37:09 GMT -9
Good to see you climbing back into the saddle again. amigo!
|
|
|
|
Post by greypilgrim on Jun 12, 2016 2:45:00 GMT -9
Thanks, uptrain89.
The washers seem like a good idea - not only for the reason you gave, but also that you'd only have to use one per spin-point rather than two, so they would go twice as far.
|
|
|
|
Post by greypilgrim on Jun 12, 2016 1:42:52 GMT -9
uptrainfan89 : What source are you using to acquire your magnets? And what is the cost breakdown? I've watched other guys (and gals) post about their usage, and have considered trying them, but have just never gotten around to ordering / picking up any.
|
|
|
|
Post by greypilgrim on Jun 7, 2016 10:51:25 GMT -9
Yup - everything copastetic now - thanks, Chris.
I also join in wishing you good results on the real paying stuff (job) in your busy life and wait patiently for more great flavored (read: textured) goodness when you find some time to steal away from those other endeavors ... ")
|
|
|
|
Post by greypilgrim on Jun 5, 2016 16:53:50 GMT -9
Sorry for the double-post - guess my fingers stuttered...
|
|
|
|
Post by greypilgrim on Jun 5, 2016 16:04:22 GMT -9
Went to Genet Models webpage and was looking at a page for someone's patent drawing and submission service. Correct URL address with "www.genetmodels.com" - just the totally wrong homepage being viewed! "Do-All Patent Service" or some such.
|
|


 "
"
 ]
] ). Took an hour and a quarter.
